“Card-in / Card-out” refers to an access control system that is also an egress control system. Users are required to present their credential both when they enter and when they exit. Requiring employees to card in and out can simplify time and attendance tracking, Requiring a credential to exit a secured space can reduce the risk of theft and help prevent unauthorized visitors from entering and exiting restricted areas.
When card-in/card-out systems are used to track employee hours, employees must present their credential to gain entry to their workplace and again when exiting to record their hours at work. In this case there is no impediment to egress and life safety code is not affected. When the purpose of the system is to only allow egress with presentation of a valid credential, this is where complication often sets in.
Frequently life safety codes and building security are seemingly at odds in their hardware requirements, and card-in/card-out systems can be one of those situations due to the ‘card-out’ side of the equation. Life safety code demands that door hardware provide free egress with one motion with no prior knowledge required. Therefore, a card-in / card-out system is potentially two violations in one, requiring prior knowledge (knowing that you need to bring your credential) and two motions (1. Present your credential, and 2. Push the door open); so it is a good idea to consult with your local Authority Having Jurisdiction (AHJ) before installing a card-in / card-out system that impedes free egress by demanding a credential.
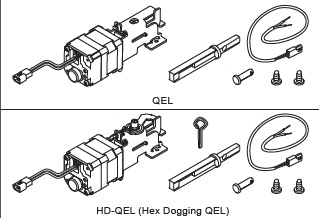
The components necessary to create a card-in / card-out system are:
- Access Control Panel
- Exterior credential reader
- Interior credential reader
If the system will allow free egress this is all you need. Most existing access control systems can be configured to accommodate card-in / card-out operation. If the object is to record employee time and attendance, check with your access control company to see how their software can provide your Human Resources department or payroll service with attendance data.
If the system must restrict egress, one way to do so is to program the system to sound an alarm when a user attempts to exit without presenting their credential. The alarm provides a deterrent to motivate compliance, and the alarm event can be time-stamped in the access control audit trail record. If video surveillance is in service at the opening, the access control system can signal the CCTV system and images of the non-compliance event can be captured. The alarm could be programmed to reset automatically when the door closes, or only when a valid credential is presented. There are many options.
To further restrict egress, a delayed egress system can be added. Delayed egress systems are highly regulated by fire safety code, so all delayed egress systems behave in similar ways: after pressure is applied to the door or device for two or three seconds, an alarm sounds for fifteen seconds and then the system allows the user to exit. The alarm continues to sound until the system is reset. To comply with fire safety code the system will have signage on the door:
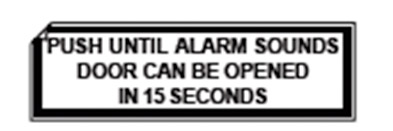
Von Duprin Chexit door label from Chexit installation instructions.
There are some variations. For example, instead of two or three seconds of pressure on the door, some jurisdictions allow the fifteen-second alarmed delay to begin sounding right away; with written permission from the local Authority Having Jurisdiction (AHJ) it is possible to have a thirty-second alarmed delay instead of fifteen seconds; some jurisdictions will allow the delayed egress system to self reset, others demand that the system be reset at the door. Consult with your local AHJ for details.
The effectiveness of delayed egress as a prevention of unauthorized egress is dependent upon how fast personnel can respond, especially if the intent of the system is to inhibit theft. I imagine that fifteen seconds seems like a very long time to someone who has just set off the alarm and is waiting to escape with their stolen industrial secrets or whatever, but it is really not a long period of time in which to apprehend a thief. On the other hand, if the thief had to pass a security guard after getting past the delayed egress system, s/he would be less likely to escape.
Life safety is never to be ignored.

Your source for quality security products with superior service!