You are currently browsing the Door Hardware Genius posts tagged: alarm


Choosing a Delayed Egress System: Self-Contained, or Built from Components?

Delayed egress is a process that delays unauthorized exit from a space while complying with NFPA 101 life safety code.  Use of this process is strictly regulated with the help of building inspectors and fire marshals across the United Sates.  With that in mind it is always a good idea to get your local AHJ (Authority Having Jurisdiction) on board whenever you are planning to install delayed egress on an opening.

When you beginning planning your delayed egress system you will find that many systems on the market are self-contained.    These could be delayed egress electromagnetic locks or electrified delayed egress exit devices.

Here are some examples of self-contained delayed egress maglocks:

  • SDC 1511S
  • Schlage Electronics M490DE
  • Dynalock 3101C

Here are some examples of self-contained delayed egress exit devices:

  • Detex V40 EE
  • Von Duprin Chexit
  • Sargent Electroguard

delayed-egress-anatomy
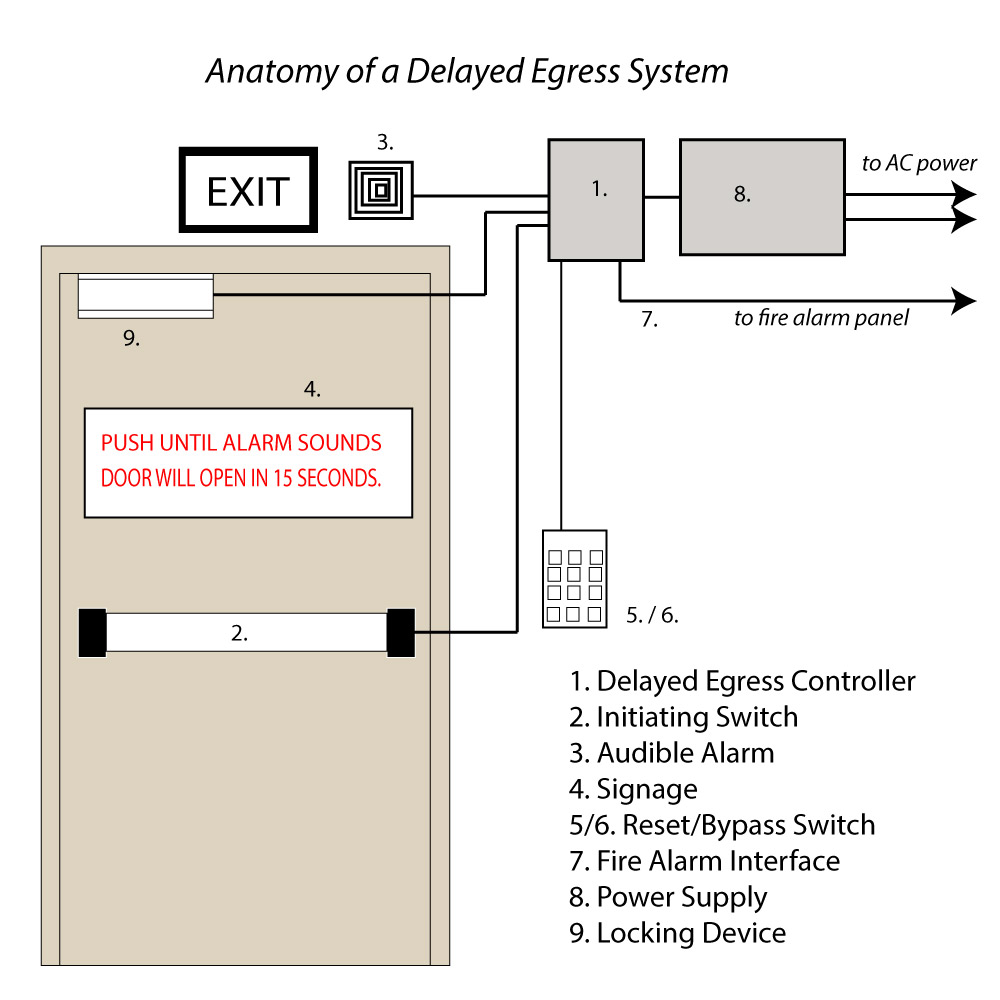
Almost all delayed egress systems are made up of the same components:

  1. Delayed egress timer and relay logic board
  2. Initiating Switch (to initiate the delayed egress process)
  3. Audible alarm
  4. Signage
  5. Reset switch
  6. Optional bypass switch
  7. Fire Alarm interface
  8. Power supply
  9. Locking device

Therefore it is possible to construct a custom delayed egress system from components.  Later I’ll talk about why you might want to choose a built-from-components delayed egress system instead of a self-contained one.   The following sections describe each part of a built-from-components delayed egress system.

Delayed Egress Timer and Relay Logic Board

This board is UL Listed and specifically designed to perform all delayed egress functions in compliance with life safety code.   Here are some examples of component boards for delayed egress:

  • Securitron XDT-12 or XDT-24
  • Seco-Larm SA-025EQ

The board is the brains of the delayed egress operation.  It has contacts to wire in switches for delayed egress initiation, fire alarm interface and system reset, timers to control nuisance and egress delay, and relays to control locks and notify external devices.

There are also delayed egress controllers that offer more features.  The following may include the delayed egress timer/relay board and some other required feature(s) such as the initiation switch or the audible alarm.

  • Alarm Controls DE-1
  • Security Door Controls 101-DE
  • Securitron BA-XDT-12 or BA-XDT-24

Initiating Switch

The switch that initiates the delayed egress process shares several characteristics with any request-to-exit switch.  To comply with life safety regulations it must require no prior knowledge to operate; it must require no more than one motion to operate; and it must be placed in relation to the door according to life safety standards in your local jurisdiction.  I think that the best possible initiation device is a mechanical push bar with a switch, such as the Adams Rite 8099-M or the Securitron EMB.  In a panic situation it remains obvious that to get out, one must push on the bar, and because it is mechanical it is unaffected by power outage.  If it is wired to open the contact when pushed, if the wires leading to it are cut it will initiate the delayed egress process.

In rare circumstances where it might be permitted, the locking device might be a fail safe electrified mortise lock that is locked on both sides, inside and out.  Then the initiation switch might be a palm switch next to the door.

Audible Alarm

The mandatory audible alarm sounds for 15 seconds before the delayed egress controller releases the locking device to allow exit.  It’s loudness must be between 81 and 88 decibels.  In some jurisdictions the alarm must be manually reset at the door; in others it may be self resetting via timer or door position switch.  Yet another reason to have a heart-to-heart talk with your local AHJ when designing your delayed egress system.

Signage

The wording on the mandatory sign must comply with life safety code.  There are minor variations in wording.  I suggest buying a sign that is part of a delayed egress system.  The sign that comes standard with the Von Duprin Chexit is readily available as a separate part.

Reset Switch

As mentioned in the “Audible Alarm” section above, a delayed egress system reset switch located at the door is mandatory in some jurisdictions.  Check with your local AHJ.  In some jurisdictions delayed egress systems are allowed to be reset by remote switch or other means, such as a door position switch.

Any kind of momentary contact switch will do the reset switch job, but delayed egress system reset switches located at the door almost always require some kind of security to prevent unauthorized resetting.   Standalone keypads or key switches are often used for this purpose.  Delayed egress systems can also be integrated into existing access control.

Optional Bypass Switch

Not required but often needed, the optional bypass switch allows authorized personnel to exit without triggering the delayed egress system.  Again, any momentary contact switch will do, but usually some security is required.  If you are using a keypad as the system reset switch and the keypad has more than one relay, you can program the second relay to be the bypass switch.

If access from the exterior side is required a bypass switch is required on that side.  Sometimes security is not needed from the exterior side.  In that case a simple momentary contact pushbutton will do the job.

Fire Alarm Interface

The mandatory fire alarm interface allows enables fire alarm panel to deactivate the delayed egress system immediately in the event of a fire alarm.  This is an integral part of the life safety code that allows a delayed egress system to exist.  Therefore, if your building does not have a fire alarm panel, without special permission from the local AHJ you cannot have a delayed egress system.

Power Supply

All delayed egress systems I have had experience with run on low voltage power that comes from a low voltage power supply.  Generally delayed egress systems require regulated and filtered power at 12 or 24 volts.  Delayed egress controllers draw very little current, but as will all electrically operated systems, the current draw of all attached devices must be taken into account when selecting a power supply.

Locking Device

The locking device must be electrically locked and fail safe from the egress (interior) side.  The most frequently used locking device in a component based delayed egress system is the electromagnetic lock.

Why Build a Delayed Egress System?

Why would you put together a delayed egress system from components when there are so many good self-contained systems?

  1.  To Save Money.  Piecing together a delayed egress system can be significantly cheaper than buying a self contained delayed egress system.
  2.  To take advantage of existing hardware.  For example, if there is already an electromagnetic lock on the door, adding the other components is relatively easy.
  3. Conditions at the door prohibit use of a self contained delayed egress system.  For example, door size or the presence of existing hardware may require the installer to seek a more creative solution.


Bottom line, unless you have a prison, you cannot lock ’em in.  Well, not without permission.  🙂

Securitron’s new PowerJump ICPT™ Inductive Coupling Power Transfer

Securitron’s new PowerJump ICPT™

Securitron’s new PowerJump ICPT™

The door hardware industry breathlessly awaits the debut of Securitron’s new PowerJump ICPT™ Inductive Coupling Power Transfer.  The PowerJump is Securitron’s miraculous new device that may put a significant dent in the electric through-wire hinge market.  I mean, why would you drill a half inch hole the width of a 36-inch door when you could install this little pair of black boxes on the lock side?

I downloaded the installation instructions from the Securitron web site to check out product attributes and characteristics.  The first thing I noticed, having spent much of my career working with wooden doors, that the Securitron PowerJump ICPT is a bit friendlier to a hollow metal door or frame install than it is to a wood door or frame install.  Because the body of the unit is almost the same size as the face, the installer must take great care to cut a very clean hole for the body so that the hole does not exceed the size of the face.  This can be a little tricky when using a speed bore bit (or auger bit as mentioned in the instructions) to drill the two deep holes for the mortise pocket before cutting in the face.

One trick I have used to use when installing mortise locks was to cut in the face first and get that nice and clean before drilling the holes.  I had good success with this because it gave me a very clear outline to stay within – much like coloring inside the lines with crayons in kindergarten.  Installing the PowerJump is a lot like installing a really small mortise lock, actually.  The face is the same width and a standard architectural grade mortise lock – 1-1/4 inches.

The PowerJump ICPT draws 500mA at 24 volts DC on the frame side, will transmit it across up to 3/16 inch of empty air and output either 250mA at 24VDC or 500mA at 12VDC on the door side.  500mA seems a little slim to be powering an electrified mortise lock.  Usually I like to see a bit of a cushion when it comes to current, so I would usually not power a device that requires 250mA at 24 volts DC, like a Sargent electrified mortise lock, with a power source that provided no more than the 250mA required.  I’d be a lot happier with a power source that has a capacity at least 1.5 times as great as the appliance being powered.

However, the average electrified hinge with 28-gauge through-wires only has a current rating of about 160mA and we have been powering electric mortise locks with these for decades.  Since I am not an electrical engineer I am not sure how that works, but it does.  I am also mystified by the science behind transmission of electrical current by induction.  Therefore, like most installers, I trust Securitron to produce yet another innovative product that works well.   I’ll be waiting to hear how installers like it when it is finally released.  I know I’ll hear about it one way or another.

Securitech Trident Multi-Point Deadbolt Exit Lock

Trident 4-point deadlocking exit device.

Simple and robust design helps to ensure security and longevity; single motion egress ensures life safety code compliance.  

Simple to order and to install, the Trident offers excellent security while preserving life safety.

The first thing I noticed when I unpacked the box was the small number of parts.  The second thing I noticed was how well all of these parts are labelled.  As I read the installation instructions I was struck by how easy Securitech had made the installation process, especially with the inclusion of a metal template to help get everything lined up just right.

I assume that the Trident is named for the three active bolts that secure the door on the lock side, but with the inclusion of the passive hinge side bolt it is actually a four point lock.  The hinge side bolt slides passively into its keeper whenever the door is closed.

Trident is a heavy device, so before installing it, make sure your door swings and closes properly and the hinges are in good shape.  I suggest using hinges with non-removeable pins so as not to rely solely upon the Trident’s hinge side bolt.  A stainless steel continuous hinge would be even better for both security and durability, if it is possible to use one.

Every locking mechanism of the Trident is through-bolted through pry-resistant steel plates, so casual attack using a pry bar would likely be fruitless no matter how much time the would-be burglar might have.  Each locking bolt is substantial and housed in a very sturdy mechanism.  Bending one of them would be difficult; bending all of them enough to gain entry would be almost impossible.  The main outside plate is impressive-looking with its Securitech logo and satin stainless steel finish, and since it is through-bolted to the head of the device in several

Photo by Tom Rubenoff

places, it’s pretty strong, too.

The weakest part of any muli-point locking device is the door frame.  Fully grouted (concrete filled) hollow metal frames hold up the best under attack.  At the very least, to have real security measures must be taken to ensure that the door frame cannot be either pulled out of the wall or bent away from the locking bolts.

To maximize security, I suggest not using the optional exterior key control with this device.  The presence of a key cylinder outside provides a target for burglars.

The Trident comes standard with a paddle that tells the user to push to exit and alarm will sound, but since the alarm is optional, this may be an empty threat.  Be sure to order your Trident with an alarm if you want one.

I was impressed with the workmanship evident in how the Trident is put together.  Everything worked super-smoothly and fit together perfectly.  The strong, simple design looks like it will provide many years of flawless service.  I highly recommend it for the back doors of stores, warehouses or factories or anywhere where a higher level of security may be needed.

Multi-function Doorways, Part Two

Secured stairwell doors are among the most basic multi-function door applications.  In most jurisdictions they must (usually)* be both unlocked and positively latched in the event of a fire.  Unlocked so that if a person, fleeing into the stairwell during a fire, finds the stairwell full of smoke, they can safely exit the stairwell.  Positively latched so that the door will remain latched closed against the spread of the fire.

Until there is a need for access control, a passage function mortise lock, cylindrical lock with UL listed latch or exit device with passage function trim are fine.  The application begins to get interesting when the need arises to lock a stairwell door.

Right up front, electric strikes are out of the question because of the unlocked/positive latching requirement mentioned above.   It is not possible to positively latch a door when the electric strike is unlocked.  There is no such thing as a fire rated, fail safe electric strike.  If you configure a fire rated electric strike to be fail safe it voids the fire rating.

Since electric strikes are unusable for this application, that leaves either electric locks or electromagnetic locks.  Both have advantages and disadvantages.  Fail safe electric locks positively latch whereas mag locks allow the installer to us the existing hardware on the door to accomplish positive latching.  Electric locks require running wire through the door and some means of getting the wire from the frame into the door, such as an electric through-wire hinge.  Not all inspectors like electromagnetic locks, so before you install them be sure to check with your local Authority Having Jurisdiction (AHJ ) – that is, Fire Marshal or Building Inspector.

If the stairwell door already has a fire rated exit device installed, there is probably a fail safe electrified trim available for it.  Once again, this means an electric through-wire hinge or other power transfer device would be required.  Sometimes existing exit devices are incompatible with the electrified trims available for that brand and model of device.  If that is the case, the exit device might have to be replaced with one that is compatible with electrified trim.

Alternatively, there are after market request to exit (a.k.a. RX) switches available for most exit devices.  One could be used to release an electromagnetic lock on the stairwell door.

Usually it is required that all electric locking devices on stairwell doors be controlled by the fire alarm panel.  When the fire alarm is in a state of alarm, it unlocks all the stairwell doors.  Two conductor wire is run from the fire alarm panel contacts to a special fire alarm relay in the power supply that powers the electric locks on the stairwell doors.  The alarm panel opens the circuit, causing the state of the fire alarm relay to change, thus powering down the fail safe locks and thereby leaving them unlocked.

An important detail:  technically speaking, according to most building and life safety codes, fire rated doors can only be modified in a fire rated shop.  Therefore if you field cut a raceway for an electric wire through the cross members of the door, for example, you are probably voiding the fire rating.  I have never heard of anyone being called on this, but it is good to keep in mind.  Just like it is good to keep in mind that the AHJ has total authority over what you can or can’t install.  Best make sure you’re on the same page with her or him, otherwise they do have the power to make you remove what you installed and replace both door and frame to repair the damage.

Happy hardware and good luck to you.


*Some jurisdictions specify that not all stairwell doors need be unlocked in the event of a fire, only certain doors.  For example, I have known some places where code was the door had to be unlocked at every fourth floor.  Check with your local AHD to find out what the rules are for your location.


Door Propped Alarm

Overview

The purpose of a Door Propped Alarm is to sound an alarm when a door has been left open after a pre-determined period of time – a function that is deceptively complex.   The motivation for this function is usually that a door is left unlocked or open when it should be closed and/or locked.  Many access control systems include Door Propped Alarm capabilities, but stand-alone Door Propped Alarms are also available.

First, to clear up a common misconception, a Door Propped Alarm is not an exit alarm.

An exit alarm is a relatively simple device that screams when a door is opened.  Usually it is equipped with an audible local alarm, a cylinder, keypad or credential reader for reset and authorized bypass, and a door position switch to tell the alarm when to scream.  In recent years the exit alarm has grown more sophisticated, incorporating timers for automatic reset, delayed arming and other complex functions.

A Door Propped Alarm must accomplish a more complex set of operations because of the variety of user needs and expectations.  A lot of this variety stems from vocabulary issues.  For example, many users will refer to a door as being “closed” when they really mean, ‘locked.’  A true Door Propped Alarm will have the flexibility to accommodate these varied expectations.

Function

The condition that creates the need for a Door Propped Alarm is the need to leave the door open for a period of time, but no longer.  For our discussion, we’ll call this period of time the Authorized Open Period.  This is the most important time segment a Door Propped Alarm needs to track.

The next time segment that a user may want the Door Propped alarm to track might be what could be called the Pre-Alarm state.  Typically in this state the Door Propped alarm will change the state of one or more relays.  These relays can be used to notify other equipment to create a warning sound, lock other doors, or for many other functions.  The warning sound is useful because it allows the user to close to door before the Door Propped Alarm goes into full alarm.  In the Pre-Alarm state, the Door Propped Alarm could be set up to automatically reset when the door is closed and/or locked.

The Alarm State may or may not be a timed function, that is, it may have the ability to self-reset after a pre-programmed amount of time that would begin when the door is closed and/or locked, or it may require manual reset at the door by key or other credential.  In the Alarm State, the Door Propped Alarm may have an on-board siren or may change the state of a relay to sound an external alarm.

Necessary Switches

In order to work, a Door Propped Alarm needs a door status switch.  Depending on what the user wants the Door Propped Alarm to do, it also may need a lock status switch.  If the user wants to sometimes leave the door open or unlocked without the alarm going off, some kind of secure access control, such as a key switch, keypad or credential reader, will be necessary to temporarily bypass the Door Propped Alarm.  If the user wants to require that the alarm be silenced and reset at the door for extra security, a key switch or other secure access control will be needed.

To get an even better idea of the functionality of a Door Propped Alarm, go to Securitron’s web site and search out the installation instructions for their DPA-12 or DPA-24 Door Propped Alarm.


Tags