You are currently browsing the Door Hardware Genius posts tagged: hinge


A Few Strange Hinges

Interim Hinge by McKinney

Interim Hinge

Above is pictured an interim hinge, used when your door and your frame have different sized hinge preps. For example, your frame is prepped for a five-inch by four-and-a-half inch hinge and your door is prepped for a four-and-a-half by four-and-a-half inch hinge. Why would you need such a thing? Inability to read a tape measure, perhaps?

Wide Throw Hinge

Wide Throw Hinge by McKinney

The hinge above is a wide throw hinge, used when you have a thick molding applied to the pull side face of the door frame. My illustration below shows the difference.

Sometimes people order wide throw hinges by accident because they do not know how to properly measure a full mortise hinge. Full mortise hinges are measured height first, then width. Wide throw hinges have a width that is greater than the height whereas standard hinges do not So if, for example, you order a 5 x 4-1/2 inch hinge you are getting a standard hinge and if you order a 4-1/2 x 5 inch hinge you are getting a wide throw hinge.

Half Mortise and Half Surface Hinges

Half Mortise and Half Surface HInges by McKinney

In the picture above, the half mortise hinge is on the left and the half surface hinge is on the right. As you can see by the “application’ drawings below each hinge, the half mortise hinge has the mortise prep on the door, and the half surface has the mortise prep on the frame. You can tell the half mortise at a glance because the surface leaf is narrow, for installation on the surface of the frame.


Radius Corner Hinges

Colloquially known as round corner hinges, radius corner hinges are used mainly on residential doors but also in some commercial applications. In the United States radius corner hinges come in two curvatures: ¼-inch radius and 5/8-inch radius. The difference is easy to see when the different radius hinges are side by side as shown below.

Radius Corner Hinges


They are called radius corner because their degree of curvature is determined by the length of the radius of an imaginary circle.  The ¼-inch radius corner is based on the radius of a ½-inch diameter imaginary circle and the 5/8-inch radius corner is based on the radius of a 1-1/4-inch diameter circle as shown in the following illustration:

radii


When we superimpose the imaginary circles onto hinges we see how the length of the radius affects the curvature:

radii1


In these examples I show 4-1/2 inch x 4-1/2 inch ball bearing full mortise hinges.

For more about hinges, click here.  

Thanks for stopping by.

How to Choose a Door Closer

To intelligently choose a door closer for your application you have to know certain facts:

  • Does the closer need to comply with ADA opening force guidelines?
  • Is the door an interior or exterior door?
  • What is the door width?
  • Will the closer be mounted on the push or pull side of the door?
  • Where on the door will the door closer be installed?  How much room is there?
  • Are there any special circumstances like wind, positive or negative pressure, etc.?
  • You may also need to know the door handing.

ADA Reduced Opening Force Guidelines

American Disabilities Act (ADA) reduced opening force restrictions are enforced by the Authority Having Jurisdiction in your locality.  In some localities or applications ADA requires a maximum opening force of 5 lbs. and in others a maximum opening force of 8.5 lbs.  Most closers on the market today can be field adjusted to comply with these restrictions, but to do so you need to have a door pressure gauge.

I am mildly acquainted with two door pressure gauges.  One is the model DPG by HMC and the other is the ADA/FG by LCN.  Apparently there are a lot of initials involved in door pressure.

Door closers are also available with reduced opening force meant specifically to comply to ADA standards.

Manufacturers usually print a disclaimer that says that a door closer adjusted to ADA maximum opening force may not have enough power to shut the door.  This is often true because perhaps recommended spring strengths for different applications are the result of perhaps a century of innovation.  Manufacturers know that a force greater than 8.5 pounds may be necessary to close a door.

Interior versus Exterior

When speaking about door closer closing force, we say that a door closer is of a certain size.  Door closer size does not refer to actual dimensions, but to spring strength.  Historically, door closers are available in sizes 1 through 6 – 1 being the wimpiest and 6 capable of exerting the strongest closing force.

A size 4 closer is usually recommended for an exterior, 3-foot wide door, whereas a size 3 closer is deemed appropriate for an interior door of the same dimensions.  The assumption here is that the exterior door is more likely to be expected to close a door against a wind or negative or positive air pressure.

Door Width

If you look at a door hung on butt hinges and equipped with a door closer from above, it looks something like this:

View from the Ceiling


You see from the illustration that the door closer closes the door by exerting force on a point about eight or ten inches from the hinge side of the door.  To see what this means, go to a door with no door closer.  Open it.  Now put your hand a foot from the hinge side of the door and push it closed.  Pretty difficult, isn’t it?   If your door was wider, it would be even harder to close from that point.  This is why door closer size – that is, spring strength – is determined by the width of the door rather than the height.

For a three foot wide exterior door, you would normally adjust your door closer to be a size four.  For a four foot wide exterior door you would adjust your door closer to be a size five.  Therefore, if you have a four foot wide exterior door, you had better buy a closer that can be adjusted to a size five.

Push or Pull?

Different arms are required for different applications.  On doors that swing out, where the closer is mounted on the push side, the closer is mounted in a top jamb or parallel arm configuration.  If it is mounted on the pull side it is mounted in what is called a ‘standard’ installation.  (There are other ways to mount a closer on the push side, but parallel arm and top jamb are the most common.)

See manufacturer’s literature for more information, or check out my article on Door Closer Basics.

Room

If you have a glass and aluminum storefront kind of door, you may have a space issue as regards your choice of door closer.  If you have a hollow metal door with no window hung in a steel frame, chances are you will have no space issue.

You need to figure out what door closer will fit.  To do that, measure the space where you would like to install it and download installation templates or instructions from manufacturer’s web sites.  Check the dimensions to see if the closer you have selected will work or not.

Or you can measure your door and frame and consult a door hardware professional.

Special Circumstances

I have installed door closers in some fairly challenging environments.  One, for example, was on a four foot wide, eight foot high, two and a quarter inch thick mahogany and glass door.  In addition to the size of the door, the location was also challenging – right across Beacon Street from the Boston Common where the wind could race across the open ground and dash itself against the door to its heart’s content.  Also, the front of the building had settled over the century or so of its existence, and leaned decidedly inward.  The door opened inward, and, left on its own, would swing sedately inward to 90 degrees if not latched.

In other words I had to install a door closer that would close an extra heavy door, uphill, in a wind.  I actually got one that would do it about 95% of the time.  For this application I chose the most durable, powerful, adjustable door closer I knew at the time:  the LCN 4041.  If I did the same job today I would probably choose an LCN 4011 or a Norton 7500.

A big, beefy, versatile door closer is not a cure-all.  For example, sometimes the 4041 is just too big, or templated too close to the hinge.  The point is that you must look at all the details of your door before you buy a door closer – not only how it is made and its size, but its environment as well.


Wiring Through a Door

AKA coring the door or drilling a raceway.

Like Moses leading the Hebrews across the Red Sea, you must work a miracle to bring electricity from the hinge side of the door to the lock side.  Luckily it is a miracle on a much smaller scale.  Moses had to deal with millions of gallons of water and miles of sea bottom whereas you only have to deal with a few feet of wood.   So relax.

Raceway Reasons

The best way to get a wire raceway into a door is to order the door with it already built in.  This is especially true of hollow metal doors which often have cross members inside at angles to where the through-wire needs to go.  However, that would require planning in advance – a rare occurrence these days, it seems.    Lack of planning is the main reason that field-drilling a raceway becomes a necessity.

Coring the door is usually the best option whenever you are installing an electric lockset.  This is true whether you use a door cord or an electric hinge.  The safest place for the wire is inside the door.

You will probably also need to drill a raceway if you are using an electric strike in the inactive leaf of a pair of doors.   Usually you will also need a door cord, electric hinge or other power transfer.

Horizontal vs. Vertical

Electric Through-Wire Hinge

It is possible to drill a raceway with the door still up.  I have done it but I don’t recommend it.  It takes nerves of steel and a stiff, sharp drill bit.  You need a decent sized bit that won’t bend right or left on you as you try to drill straight, and you need to make sure that the door doesn’t move on its hinges while you are drilling.

I found that taking the door down and standing it on edge in a homemade door stand is the easiest for me because:

  • The door is much less likely to move while you are drilling it
  • Using a level to guide you is much easier, and
  • Gravity is on your side

Constants

Certain constants apply to either horizontal or vertical drilling.  In both cases I recommend a 3/8-inch by 3-foot drill bit.  If the door is more than 3 feet wide, drill it from both sides or get a 4-foot bit.  I prefer to drill from both sides because it’s a lot easier to drill straight for 18 or 24 inches than it is to drill straight for 3 or 4 feet.

Simple Door Stand

If you have a drill with a built-in level, use it.  If your drill does not have a built-in level, any level will do.  Just put it against the door anytime you want to check the angle at which you are drilling.  Determine if the door has a beveled edge and don’t let the bevel skew your path through the door.  Make sure your drill bit remains parallel to both the interior and exterior surfaces of the door.


Drilling a raceway across a door is a challenge, but all it really takes is good focus and an ability to drill a straight hole.  If you are challenged in the latter aspect, you might consider a drilling tool like the Security Door Controls product shown below.   If you have many raceways to drill, a tool like this one is a great idea.

Security Door Controls 7000IDF Door Drilling Kit


Hinge Basics ‐ Architectural and Residential Hinges

A huge variety of door hinges are available in today’s commercial hardware market. Which hinge is right for your application? This article discusses hinge types, hinge characteristics, and basic guidelines
on how to choose a hinge for your application.

Parts of a Hinge
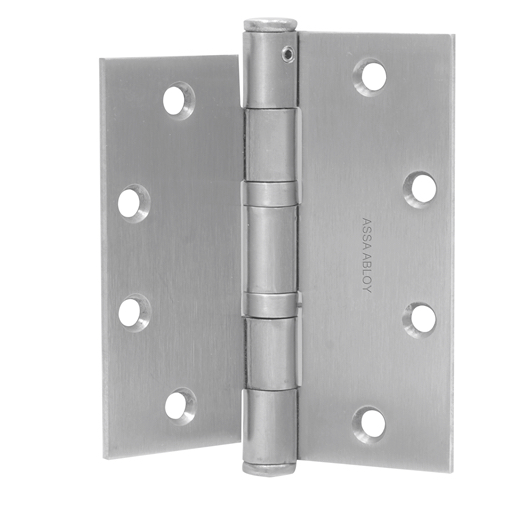
At right is an illustration that details the components of a full mortise hinge. Pictured is the most common hinge used in the United States, a five knuckle, full mortise ball bearing architectural grade template hinge, four-and-a-half by four-and-a-half inches.

  • The leaves are fastened to the door and door frame.
  • The bearings keep the hinge aligned help the hinge last longer by reducing wear
  • The pin (shown slightly withdrawn from the knuckles as if being removed) holds the leaves together and provides the axis on which the door will turn
  • The knuckle is a loop of metal through which the pin passes
  • The top tip rests on the top knuckle of the hinge, stabilizing the pin; the bottom tip is attached to the bottom knuckle and helps keep the interior of the knuckles clean.

Some Variations

The leaves could be of equal widths, or unequal; the leaves could be “swaged”, meaning bent to compensate for a door with a beveled edge; the bearings could be ball bearings, concealed bearings, lube bearings, or “plain bearings”, indicating no bearings at all; the pin could be non-removable or fixed; there could be five knuckles, three knuckles, or in some cases, no knuckles; and hinge tips could be decorative or could serve a purpose, such as hospital tips, which are beveled to prevent things from getting caught on them.

Commercial architectural grade hinges could be standard weight or heavy weight; they could have square corners or round; and they could be “template” or “non-template” hinges, indicating whether its screw pattern matches architectural conventions so as to fit in standard hollow metal door preps or not.

Electrical options are also available, such as electric though wire, concealed magnetic contact, exposed electrical contact, and others.

Hinge Sizing

To measure a full mortise hinge, also called a butt hinge, lay it on a flat surface.  Measure the height, then the width.  When you specify full mortise hinge sizes, always refer to the height first, then the width.

Heavy Weight vs. Standard Weight Hinges

Heavy weight hinges are used for very heavy doors or doors that are subjected to very high traffic. Hinge “weight” actually refers to hinge leaf thickness. Heavy weight hinges leaves run closer to .200 gauge thickness, while standard weight hinges are more in the range .150 gauge thickness.

Hinge thickness is also dependent on hinge size. For example, a standard weight hinge 6 inches by 5 inches will be thicker than a standard weight hinge that is 4-1/2 by 4-1/2 inches.
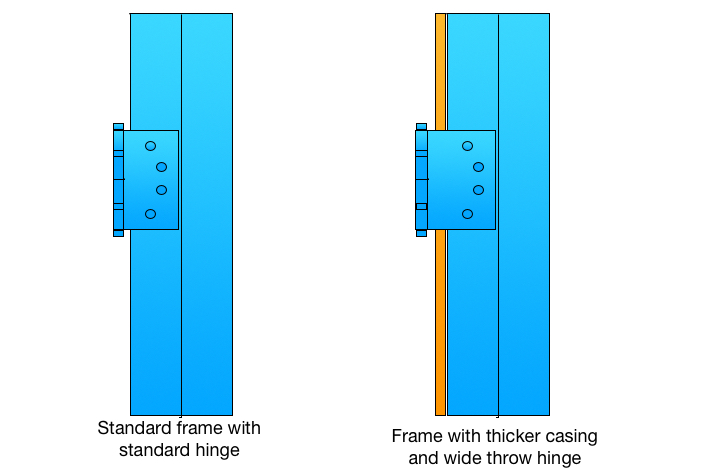
Wide Throw Hinges

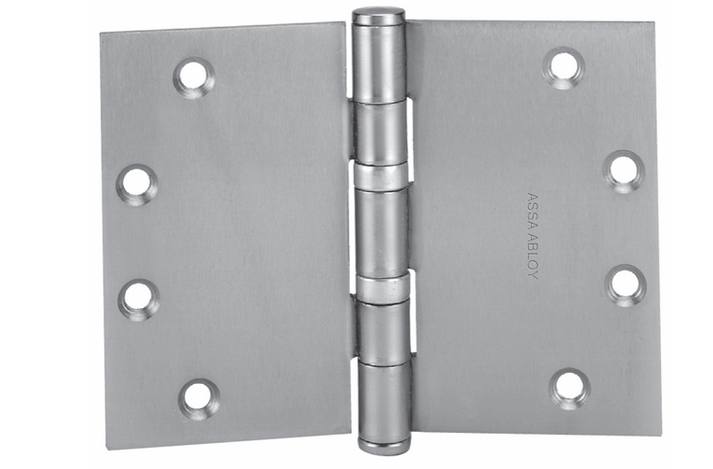
At right is shown a wide throw full mortise hinge. Wide throw hinges enable a door to open 180 degrees when a decorative door molding might otherwise prevent it from doing so.

Other Types of Hinges

All the hinges lifted below are available in standard weight and heavy weight versions for different commercial applications. Illustrations at right show various kinds of hinges.

Full Mortise Hinges

As I said earlier, full mortise hinges are by far the most common type of hinge. They come in a wide variety to accommodate diverse applications.
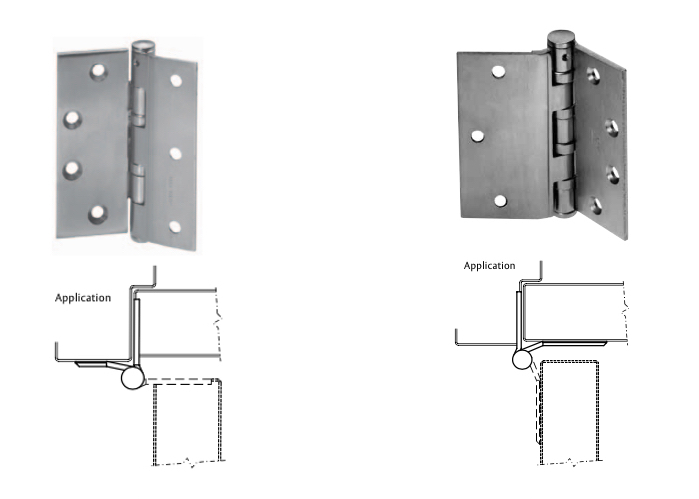
Half Mortise Hinges

Half mortise hinges are hinges that have one leaf mounted to the visible front of the frame and the other leaf mounted in a hinge prep, or mortise, on the edge of the door.

Half Surface Hinges

Half surface hinges are hinges that have one leaf mounted to the surface of the door and the other leaf mounted into a hinge prep on the jamb part of the door frame.

Full Surface Hinges

Full surface hinges have both leaves visible when the door is closed. One leaf is fastened to the surface of the frame and the other to the surface of the door.

Swing Clear Hinges

Swing clear hinges are designed so that when the door is opened to 90 degrees, the door itself is completely out of the opening.  For example, if you needed to move a cart through a door that was 35-1/2 inches wide through a 36inch wide door, unless the door was hung on swing clear hinges, you would have to be able to open the door 180degrees in order to get the cart through the opening.

All of the hinges above are available in swing clear versions.

Template and Non-Template Hinges

“Template” hinges are full hinges that have a standard screw pattern and sizing to fit into an ANSI  standard hinge prep, usually on a hollow metal door and frame. Most architectural (commercial) grade hinges are template hinges. Most residential hinges are non-template hinges.
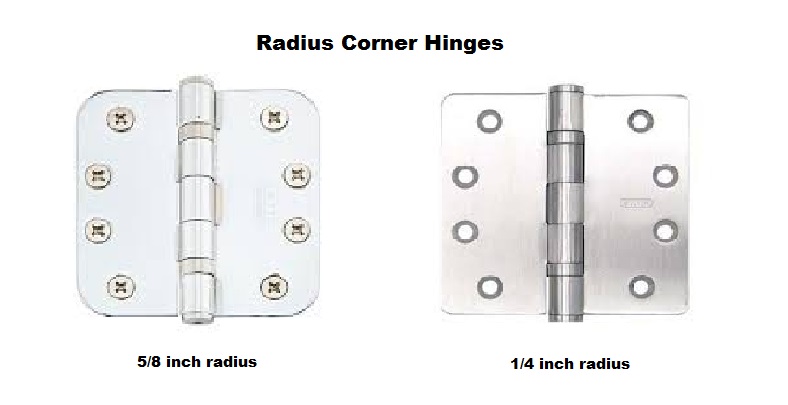
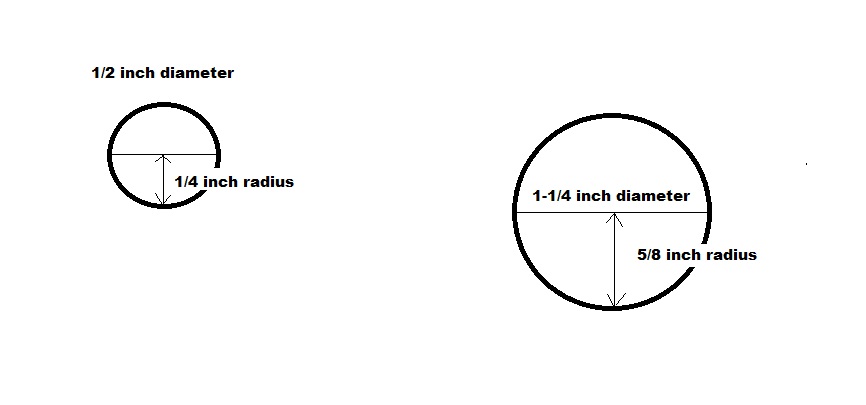
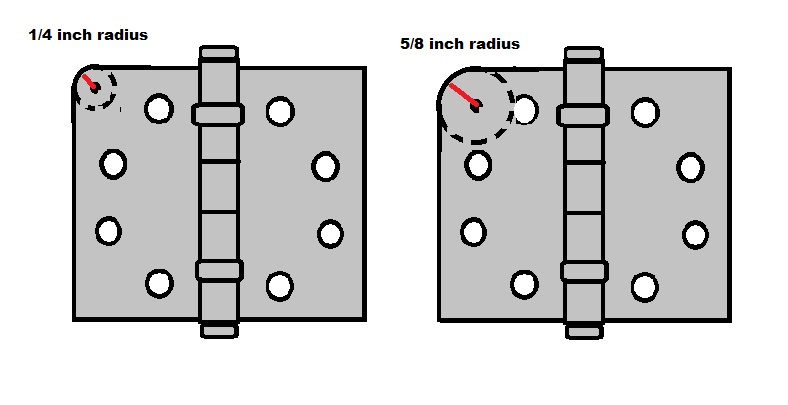
Radius Corners

Radius corner hinges are hinges with rounded corners. “Radius” refers to the radius of the circle thatwould exist if the curve of the rounded corner were continued to form a circle.Architectural hinges are available with 1/4-inch radius corners whereas residential hinges are available in 1/4-inch radius and 5/8 inch radius corners.

Residential Hinges

Residential hinges are very similar to architectural hinges, but there are differences. As stated above, more often residential hinges are non-template hinges, but they are sized the same as architectural hinges. Residential hinges also more often have radius corners than architectural hinges and are usually made of thinner gauge metal. Often one will see an architectural grade hinge used on exterior doors and residential grade hinges used on doors within the dwelling.

Spring Hinges

Spring hinges are architectural hinges that are spring loaded so as to shut the door. They are available in fullmortise, with or without radius corner, in most sizes in which other full mortise hinges are made, and are available in template and non-template versions. A full mortise spring hinge is shown at right.  Beneath the full mortise spring hinge is a picture of a double acting spring hinge for a door that swings both ways.

Continuous Hinges

Continuous hinges are hinges that extend the full height of the door. They are widely used on aluminum storefront and hollow metal applications. They are a good alternative for high traffic applications where added durability is necessary. Continuous hinges are available in aluminum, steel, or stainless steel, and, like architectural hinges, are available in different types to accommodate different conditions. Many of these configurations match those discussed in this article.

Pivot Hinges

Pivot hinges are used on heavy doors in high traffic applications and on many aluminum storefront doors.  Since the117 weight of the door rests on the bottom pivot, the door does not “hang” as it does with other types of hinges, therefore there is less risk that the door will sag over time.  At right is a picture of a pivot set from Rixson Hardware’s pivot catalog.

Electrified Hinges

Full mortise, pivot, continuous hinges and others are available with electrical options such as:

  • Electric Through Wire:  a number of conductors are threaded through the hinge in order to conduct electricity from the door frame into the door (or vice versa) to power electric locks or transmit contact closure from monitor switches in the door or in the locking hardware. Available with anywhere from 2 to12 conductors, typically 24 gauge wire. 2conductor,18 gauge wire is also available.
  • Concealed Magnetic Contact: a magnetic contact reed switch is concealed in the leaves of a full mortise hinge. When the door is opened, the leaves are spread apart, breaking or making the contact. HInges with concealed magnetic contact are handed.It is possible to have both the above options in the same hinge.

Non-Removable Pins

In situations where you have an out-swinging secured door, you can use hinges with non-removable hinge pins. Non-removable hinge pins are pins which have a groove milled in them in the middle. A set screw is threaded through the middle knuckle to mate with the groove (see picture at right) to inhibit burglars from pulling the pin and the door to gain entry.  (In the picture, the center knuckle is not shown so that theset screw can be seen.)


Tags