You are currently browsing the Door Hardware Genius posts tagged: lock


Ligature Resistant Door Hardware

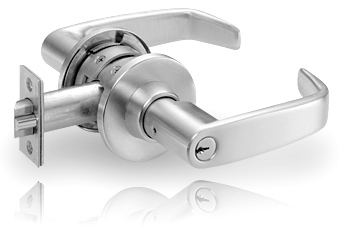
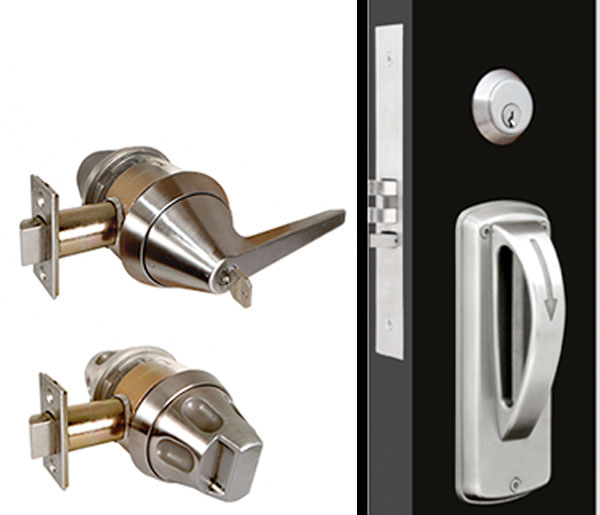
Left: Marks USA Lifesaver series. Right: TownSteel MRXA series.

Ligature resistant, otherwise known as anti-ligature or behavioral health door hardware is designed to make it difficult for folks to use it for suicide by hanging or otherwise harming themselves or others.  Pictured adjacent are cylindrical knob and lever locks by Marks USA and a mortise lock by TownSteel.

All are designed to resist attempts to hang oneself.  The cylindrical lever and knob locks feature more or less conical designs that cause a cord to slide off of them regardless of how one might try to tie it on.  The lever turns freely even when locked, achieving the same result.  The mortise lock uses a conical cylinder collar and sloped trim to achieve ligature resistance.  The opening in the pull is closed by a steel plate, making it impossible to pass a cord through it.  The exposed fasteners are security fasteners that require a special tool to loosen, and they fit flat and flush to the escutcheon and lock front.

When you sell or install ligature resistant hardware it is best not to modify the product in any way, because in doing so you will assume all responsibility for anything that happens as a result involving the hardware.  This can include disassembling a cylindrical lock to rekey it.  For this reason I recommend that when keyed anti-ligature locks are specified they are specified as interchangeable or removable core locks.

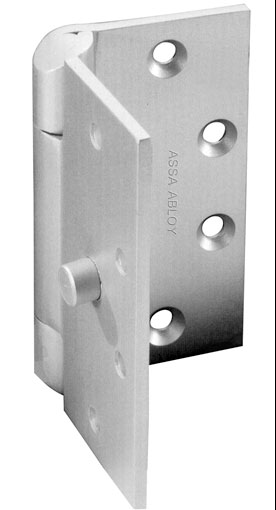
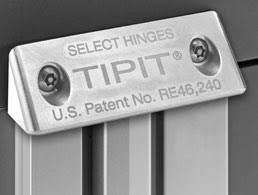
Ligature resistant hinges have hinge tips called “hospital tips” that are sloped to discourage suicide attempts (see McKinney hinge adjacent).  Security screws also help keep folks safe by making it difficult to use the hinge to hurt oneself or others.   Select Hinge offers a little gem called the “Tipit” for continuous hinges that makes continuous hinges ligature resistant.

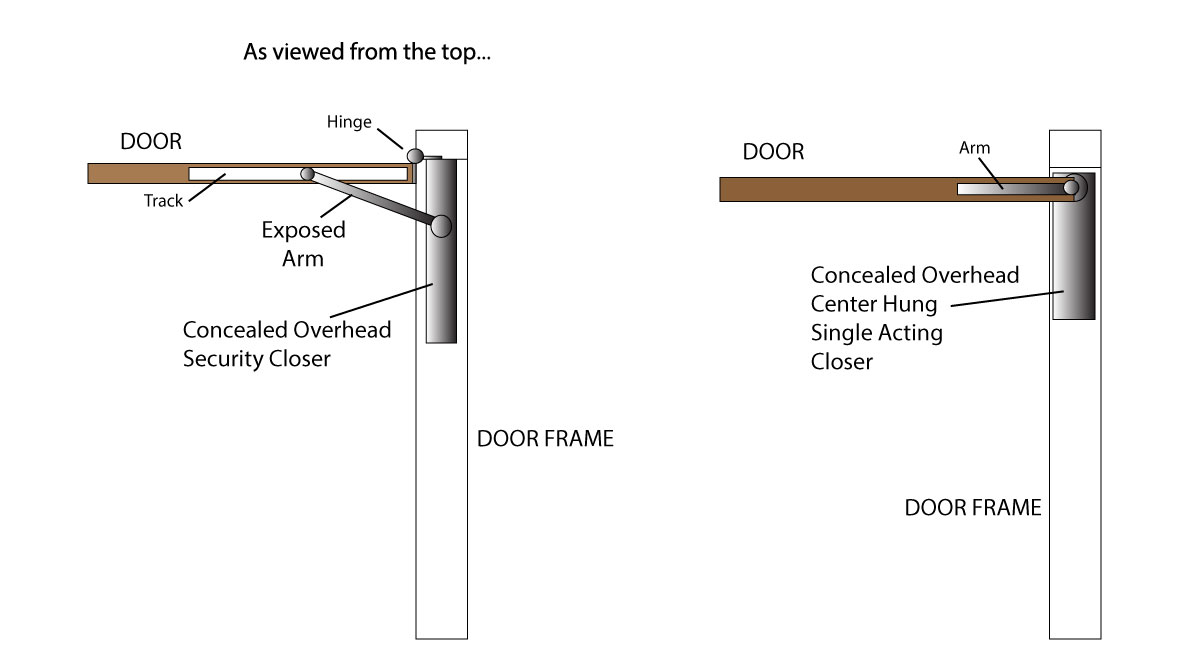
Increasingly I field inquiries for ligature resistant door closers for butt or offset hung doors, but to my knowledge there is no such animal as of this writing.  Various factory tech support people have recommended overhead concealed security closers for ligature resistant applications, and this seems to be the consensus at this time.

I believe that using doors that are center hung with single acting, concealed overhead or floor closers would be safer and would eliminate the need for anti-ligature hinges; but this is impractical for retrofit applications where butt or offset hung doors are already present in abundance.

In the illustration below I show why I feel a center hung, concealed, single acting door closer would be the best choice for ligature resistance.


In door hardware, safety is the most important consideration.


locksnsafescom

Your source for quality security products with superior service!

Field Reversing the Adams Rite 4510 Latch

4510

Adams Rite 4510 Latch

Although Adams Rite tech support might not want to talk about it*, depending on who you talk to there, the 4510 series latch lock, like its predecessor the 4710, is, in fact, field reversible.  Following are the steps to do so.

First, try to choose a clean work surface in an enclosed space, just in case the springs go flying.

1. Remove the retaining plate screws using a #1 Philips screwdriver.  Place the screws on the work surface where you can find them later.

screws

2. Carefully remove the plate from the back of the lock body that holds the bolt, auxiliary dead latch and latch springs in place.   The latch springs exert tension against this plate, so remove it with care.

3.  Using the tip of the screwdriver, move the locking lever pin so it lines up with the slot in the lock body and gently push the front of the bolt with your thumb.  The bolt, auxiliary dead latch and deadlock arm assembly will slide out of the back of the lock body together.

SlideLatchOut4. Remove the pin that attaches the deadlock arm to the bolt assembly.

See the exploded view of the old 4710 latch below for more detail.  The newer 4510 is similar if not identical to the 4710.

Caution:  There is a spring inside the bolt assembly that actuates the deadlock arm.

5. Remove the deadlock arm and spring.

pin1

6. Turn the latch over and install the deadlock arm and spring on the other side.  You will need to hold the deadlock arm and spring in position. When the spring and all are in position, install the pin.

7.  Slide the bolt assembly into the lock body.

pin9. Place the smaller spring into the auxiliary deadlatch and the larger spring in the bolt.

8.  Slide the auxiliary deadlatch into the lock body.

9.  Install the retaining plate and screws.


Detail from discontinued Adams Rite 4710 Latch parts breakdown, from Adams Rite parts book

Detail from discontinued Adams Rite 4710 Latch parts breakdown, from Adams Rite parts book

disassemble

* I recently related this procedure to a locksmith who said she had called Adams Rite tech support who told her the unit is not field reversible. This is understandable because the installation instructions do not discuss reversing the handing.

Overview: School Security Hardware

11line

Sargent 11-Line Cylindrical (bored) Lockset

Security in our elementary and secondary schools has become much more important. Schools across the country are implementing lockdown procedures in case of emergency. Lockdowns are achieved through the use of locks, and new lock functions have been developed for use in concert with existing lock functions to answer the need for increased security.

Classroom Security Locks

A regular, traditional classroom function lock is unlocked and locked from the outside by key and the inside lever is always unlocked, allowing free egress. The problem with this function from a lockdown point of view is that, in order to lock the door, the teacher must open the door to lock it, exposing themselves and potentially their students to danger as they do so.

All major lock companies are either developing a classroom security function or assigning that application to one of their existing functions. Basically, the principal is this: in the event of an emergency the teacher can lock the outside lever handle of the classroom door from inside the classroom, thereby securing the safety of the students without endangering themselves. The inside lever remains unlocked allowing free egress. When locked, entry from the outside is by key only.

Some companies have developed classroom security function locksets in which the outside lever can be locked or unlocked with either the inside key or the outside key. This allows the teacher to continue to use the lock as a traditional classroom lock unless an actual emergency develops.

Click here for a complete description of classroom security function in a mortise lock.


Electric Lock Down Systems

Some school districts have opted to lock down their perimeter doors with delayed egress systems. Delayed egress systems are a way of locking exterior entrance doors from both sides while allowing for emergency egress.

The Keyway: Gateway to the Cylinder

The keyway is the shape of the keyhole of the lock cylinder into which the user inserts the key.  The keyway is designed to allow only keys of the correct shape to be inserted such that, when properly made, they will align the pin tumblers properly and operate the cylinder.  If you view a key from the tip, you can see how the shape of the key corresponds to the shape of the keyway.


The theory behind the keyway is to let only certain kinds of keys in and keep all others out, and keyways do this with varying amounts of success.  A variation on this idea is the “sectional” keyway system in which keys of slightly different keyways are allowed to “pass” into the cylinder keyway.  See the diagram of the Schlage hierarchy of keyways below:

The keyways shown at the bottom of the chart are designed to fit in only one keyway.  Unlike the keyways shown in the top two rows, actual locks have the keyways in the bottom row.  The keyways shown in the second row could be called sub-master sectional keyways because keys cut on blanks of these keyways will each pass several of the keyways in the bottom row.  Keys cut on the “L” keyway shown at the top of the chart will pass all of the keyways below it.  This keyway is designed to be used only at the level of Master or Grand Master key.

Unfortunately, some key duplicators use the “L” keyway key blanks to cut keys of any sectional keyway they may currently not have in stock.  This shoddy practice degrades the security of a master key section that depends on sectional keyways for security.

Restricted Key or Restricted Keyway?

Keys can be stamped with the words, “Do Not Duplicate” or “Property of [insert name of institution or government agency here],” and that may stop some honest people from getting the key copied.  The term, “restricted key,” however, usually means factory restricted keyway, and a factory restricted keyway can effectively inhibit unauthorized key duplication.

How Does a Factory Control a Keyway?

The most effective way to control unauthorized key duplication is to make the key blanks as difficult to get as possible.  Key blanks are like blank paper to a copier.  Imagine copy paper protected by a patent owned by a paper mill.  The only place to get the paper would be the paper mill.  Thus, one of the ways security hardware manufacturers protect a keyway is to protect it by patent law.  Part of that protection is aggressively pursuing anyone who violates the patent with lawsuits and other legal instruments to prevent patent infringement.

Another way factories protect keyways is to keep records of who is using what keyway and where.  Many companies have restricted key programs – Schlage Primus, Kaba Peaks and Medeco are a few examples.  Factories may keep signatures of end users on file.  In this case, requests for restricted products must be accompanied by a document that is signed with the correct signature or the factory will not release the product.

Some restricted keys come with an ID card that authorizes the card holder to get keys made.  This is less secure than key duplication that is controlled at the factory, but it is a step up from keys that anyone can get made at Home Depot.

Keyways and Key Bumping

In order to use a bump key to open a lock, the key bumper needs to have the right blank.  You cannot bump a cylinder with a bump key that has the wrong keyway.  It won’t go in.  Therefore, having a lock that has a somewhat rare keyway is a very easy and inexpensive way to make unauthorized entry by key bumping difficult.  Most of the people out there bumping locks open are not the brightest bulbs in the lighting fixture.  Challenge them with a hard-to-identify keyway and they will most likely be defeated.


Interconnected Locks


Sargent 7500 Series Interconnected Lock

An interconnected lock is actually two locks that are connected by an assembly that retracts both the deadbolt and the latch simultaneously when the inside handle is turned.   This is done to fulfill the life safety requirement under NFPA 101 that egress should be accomplished by one motion with no prior knowledge necessary, and at the same time provide the user with the security of a deadbolt.  The same function could be provided by an entry function mortise lock, but interconnected locks are cheaper, since they are usually cobbled together out of (usually) a grade 2 cylindrical lock and a tubular deadbolt.

The history of the interconnected lock is a twisted, strange story of different companies reinventing the wheel with different distances between the centerlines, connected or separate latch/bolt assemblies with correspondingly different strike preps, and radically different hole patterns on both interior and exterior door surfaces.  The end result has been many, many doors and frames prepped for locks that are now irreplaceable.

Today, preps are much more standardized.

These are some of the interconnected locks available today and the measurements of their preps:

  • Falcon H Series – 4 inches CTC, 1-3/4 inch hold above, 2-1/8 inch hole below
  • Schlage H Series – 4 inches CTC, 1-1/2 inch hole above, 2-1/8 inch hole below
  • Schlage S200 Series – 4 inches CTC, 1-1/2 inch hole above, 2-1/8 inch hole below
  • Schlage CS200 Series – 4 inches CTC, 2-1/8 inch holes above and below
  • Sargent 75 Series – 4 inches CTC, 2-1/8 inch holes above and below
  • Yale 4800LN series – 4 inches CTC, 2-1/8 inch holes above and below

Replacing any of the locks above with any of the others would not present an enormous problem.


Sargent 7500 Series Door Prep

The “Passage Set”

Often, when customers say they want a “passage set” they really want a cylindrical lock that actually locks.  This is because they don’t know (and often don’t want to know) cylindrical lock functions.   Therefore, the next question I ask is often, “How do you want this ‘passage set’ to work?”

Of course, “passage set” is the name of a cylindrical lock function.  The function of a passage set is that the latch can always be retracted by turning either handle.  It always latches but is never locked.   So when customers order a passage set with an electric strike, I am doubly suspicious.  Do they really want a passage set with that electric strike?

Passage sets are used in non-locking applications like corridors, closets and some offices, and in non-locking fire rated doors to meet the positive latching requirement for fire rated openings.

Therefore, if you want to sound intelligent as you order your cylindrical locksets, don’t call them passage sets unless they are.  Thank you.


When Your Key Won’t Turn

Someday you might come home or go to open up your business and find that your key won’t turn at all, not even a little. There are several reasons this might occur.

At right, illustrations show the operation of a standard pin tumbler lock. When you insert your key, the key raises the pins to the point where the division between the top pins and the bottom pins aligns with the division between the plug and the bible of the cylinder, allowing the plug to turn.

Sometimes dust and dirt collect inside the lock cylinder. When that happens the dirt can cause the pins to stick in a partially raised position, preventing the plug from turning. In most cases a spritz of dry lubricant will be sufficient to free up the plug and allow you to open your door. Simply spray the lubricant into the keyway and insert the key a few times to work the lubricant into the mechanism. If this method does not work you may need to use a more solvent-based lubricant like WD-40 to loosen the dirt. Locks exposed to the elements sometimes collect a lot of dirt.

If your key will only go in part way, this could still be the same problem, or there may be an obstruction in the keyway. Illumination of the keyway reveals that the bottom pins hang down into the keyway. In the event that lubricating the lock is ineffective, slide a thin piece of wire into the lock along the bottom of the keyway, avoiding the pins, and feel for an obstruction. If the piece of wire will not go in as far as the length of the blade of your key, there may be an obstruction present. At this point you might want to call a locksmith, however, you can gently work your way past the pins and try to go over the obstruction in order to try to coax it out. This process can take a lot of patience and skill, and it is possible to make the problem worse if you are heavy handed with the pins.

From Wikipedia

Should lubrication fail to free up your lock and you can find no obstruction, your lock may have a more serious malfunction, such as a pin chamber worn enough to allow a pin to get stuck at an angle, or a corroded pin that is frozen in place and will not budge no matter what. In these cases you need a professional to gain entry for you and repair your lock. If you succeed in freeing up your lock but find that the problem is reoccurring with increasing frequency, it’s probably time for you to replace your cylinder.


Tags