The locks are shipped with separate tailpieces, often called ‘throw members’
The installer (usually a contractor) installs the locks and throws the tailpieces away
This occurs so often that when I get a call from a customer who says, “I have a job where we installed all SFIC cylindrical locks…” I finish the sentence for them, “… and the contractor threw the tailpieces away.” That usually gets a chuckle, but there’s not much humor in it really, especially if the tails must be factory ordered with a lead time of several weeks and the inspection is tomorrow.
Nope, no fun.
To avoid losing the tailpieces this way, there are a couple of things you might do:
Get a responsible person (maybe you) to collect the tailpieces when the locks are delivered, or
Have the tailpieces shipped separately directly to you, or
Order cores with the locks and have the contractor install them and ensure they are working properly. (They will need to have the tails to accomplish this.)
If you elect to order the cores with the locks and want to avoid the delays associated with waiting for an order of master keyed permanent cores, order construction cores. Construction cores are temporary cores that are all keyed alike for use during the construction phase. Typically hardware re-sellers stock construction cores or they are readily available from the factory, so they are usually deliverable fairly quickly.
I often get a request to help create a system that locks people in. People want to lock children inside a daycare center, students inside a “Time-Out” room, babies inside a nursery in a maternity hospital or patients inside, for example, an Alzheimer’s disease in-patient facility for their own good.
“Well, what if there’s a fire?” I ask.
That’s really the issue. If we are keeping them in, how are they supposed to get out in the event of a fire? Yet, except when there is a fire or other emergency that renders the building unsafe, it is in their best interest if they are kept inside.
Often, people simply want to lock people in with an electromagnetic lock or other device. Since this is certainly a violation of life safety code, any injury that may result would be uninsurable and could invite litigation.
I discuss delayed egress systems in depth in another article (click here to read). A delayed egress system is really the right way to do this, since it is actually covered in the NFPA 101A Special Locking Arrangements section of the fire safety code, but it is fairly inconvenient to use. To get out without setting off an alarm users must use some kind of bypass request to exit switch like a keypad, card reader or key switch – much less convenient than, say, simply pushing a door open via the push pad on an exit device.
The gist of a delayed egress system is that, after a short ‘nuisance’ delay, the lock sounds an alarm for fifteen seconds and then lets the person out. That means that authorities on the secured premises have fifteen seconds to get to the exit and prevent unauthorized egress.
Where unauthorized egress is not a life threatening prospect, therefore, a delayed egress system is perfectly adequate. However, when a person’s life may depend on being kept inside their care facility, a more complex solution maybe required.
A great solution for Alzheimer’s or other dementia care facilities is the WanderGuard system by Stanley. This system is designed for Alzheimer’s and other health care facilities where unscheduled patient departure is an issue, and covers other needs with fall monitoring and patient call capabilities. Patients are fitted with bracelets that serve as tracking and communication devices. As one might expect, such a system is not inexpensive and a bit on the overkill side for use in a day care center or maternity facility. To physically keep people inside the facility, the WanderGuard system is designed to interface with delayed egress locks.
I think that the WanderGuard system would be a good choice for use in maternity ward nurseries as well.
The situation is more challenging when you have a day care center or a “Time-Out” room.
I had heard that Schlage was coming out with a mechanical time out lock, but a search as of today renders only the same Time-Out Room solution: An electromagnetic lock with a momentary pushbutton. The troublesome child is forced into a room, the door is shut, and then the teacher or other disciplinarian must physically press the momentary contact pushbutton to keep the magnetic locked locked. As soon as the teacher lets go, the child is free.
As long as the button is momentary, I have no problem with this idea. Should there be a fire or other life safety emergency, even if the teacher panics and runs away, leaving the child in the Time Out Room, the child will still be able to leave the room and exit the building.
The right way to prevent the kids in a daycare center from running out of the building and into the street without permission is with a delayed egress system. True, it may be cumbersome to punch in a code on a keypad or present a proximity card for authorized egress, but delayed egress systems can be easily deactivated for periods of time, say, for drop off and pick up. A delayed egress system is more expensive than, for example, an electromagnetic lock connected to the fire alarm system for safety. But if you run the scenario of a fire in your mind, the fire alarm interface to the electromagnet malfunctions, panicked children and day care providers flinging themselves against an illegally locked door, too crazed with fear to think – suddenly a delayed egress system makes a lot more sense.
There is really only one place you can really lock someone in, and that’s in a jail or prison. Otherwise there must be some provision to let them out – for safety’s sake.
A number of different kinds of switches are available to help you keep track of whether or not your door is shut and / or locked. Here are some of them:
Door Status Monitor Switch
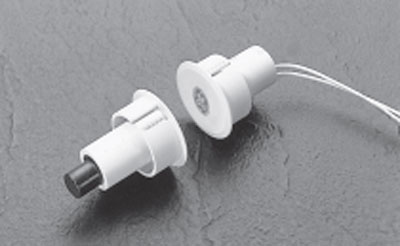
A door status monitor switch changes states when the door is opened or closed. Typically this is accomplished by using a magnetic reed switch, either surface mounted or concealed in the edge of the door and door frame like the one shown at right.
How a Magnetic Reed Switch Works
The magnetic reed switch is typically installed on the door frame and the magnet that activates the switch is typically installed on the door. Inside the magnetic reed switch, a thin piece of steel – a steel ‘reed’, if you will – is held in position by the attraction of the magnet when the door is closed. When the door is opened, the magnet is taken away from the switch and the spring tension of the “reed” causes it to spring back against the other contact, changing the state of the switch.
Most magnetic reed switches are normally closed – “closed loop” – but are also available normally open (“open loop”) SPDT (single pole double throw, or “form C”) or DPDT (double pole double throw).
The Purpose of the Door Status Monitor Switch
The door status monitor switch is used to notify remote devices that a door is open or closed. Typically these remote devices are burglar alarm panels or access control system controllers. It does not tell you if the door is locked, just if it is closed.
Request to Exit Switch
The request to exit switch, also known as a REX switch, is so named because it is usually connected to the request to exit contacts on an alarm panel or access control board. It is used to notify an external device that someone is exiting through, or wants to exit through, a door. REX switches come in a wide variety of configurations, from push button palm switches engraved “push to exit” to switches concealed inside exit devices. A motion exit sensor is also a form of request to exit switch.
Request to exit switches are available with a wide variety of contact configurations and with or without electronic or pneumatic time delay. If the switch is being used as a means of egress for pedestrian traffic, it will need to comply with life safety code. Life safety code varies from locality to locality as governed by your local AHJ – Authority Having Jurisdiction – that is, your local building inspector or fire marshal.
Latch Bolt Monitor Switch / Strike Monitor Switch
I write about Latch Bolt Monitor (LBM) switches and Strike Monitor Switches because they somewhat overlap. Both are designed to monitor the position of the latch bolt.
Some LBM switches are inside locks and others are in electric strikes. From inside the lock, they monitor whether the latch is extended or depressed. When located in an electric strike, they monitor whether or not there is a latch bolt present in the keeper.
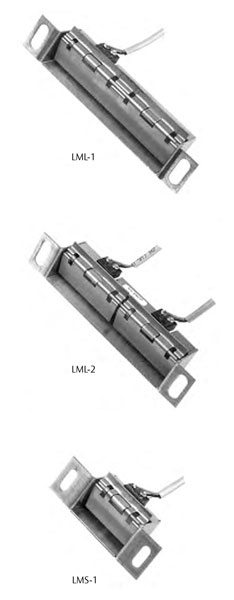
Pictured at right is Securitron’s line of inexpensive strike monitor switches as examples of strike monitor switches. Several companies offer like products. Strike monitor switches are an easy way to monitor if there is a latchbolt (or some other object) present in the keeper. Several companies, such as Von Duprin, offer heavier duty monitor strikes. Monitor strikes are sold as a finished unit that includes as strike and a switch whereas strike monitor switches are aftermarket add-on units.
Magnetic Bond Sensor / Bond Sensor
Magnetic bond sensor and bond sensor options refer to electromagnetic lock applications. Many manufacturers offer Bond Sensor or Magnetic Bond Sensor as an option. What this does is allow an electromagnetic lock to notify some external device that its holding force is below spec. Authorities are alerted and the situation is addressed.
Maximizing Effectiveness
To maximize effectiveness of door monitor switches, it is best to use both a door status monitor and some kind of lock status monitor as well, and this is why: because monitor switches can be fooled. A door status switch will tell you if the door is open or closed – unless it has been altered to tell you the door is closed when it is not. Also, a door may be closed, but not locked. If you have a latch bolt monitor or magnetic bond sensor in place as well as a door status switch, you will know if the door is closed but not locked.
This is the center of this knowledge: to know that the door is shut AND locked.
As electric locking systems become increasingly complicated, troubleshooting these systems has also become more complex. Yet certain basic principles always apply.
Case in point, a customer had access control on a stairwell door using a fire rated mortise exit device with an electrified mortise lock. The solenoid in the mortise lock had burned out twice and the third one, newly installed, was already too hot to touch. Granted, a solenoid operated fail safe device used in a continuous duty application will get warm, but it should not get too hot to touch. So they called me to help them figure out what was going on.
To find the problem, I first listed the possibilities:
They had gotten three defective solenoids in a row
The power supplied is the wrong voltage – if the voltage was either too high or low, that would cause the solenoid to heat up
The current supplied is inadequate – the solenoid used 330mA. If it were being supplied with only 150mA, for example, the solenoid would heat up.
We determined that 27 volts DC was available at the door to power the 24 volts DC solenoid – perfectly acceptable – and we all felt that it was rather unlikely that they had received three defective solenoids in a row. So that left current drop. Where was the current going? What was preventing it from getting the current it needed?
The access control tech on site could not determine whether the solenoid was getting enough current at the door by using a meter (for whatever reason) so we traced the current back through the line.
The power supply was a 6 amp, 24 volts DC power supply that had an output board with 8 fused outputs. If all were in use, then a max of 750mA should be available from each output, provided they all were carrying the same amperage load. We determined that four of the outputs were being used: three were used to power electric strikes at 300mA and one was used to power the electric mortise exit device at 330mA. The sum of the current draw for all devices attached to the power supply was therefore about 1.2 amps – well within the power supply’s capacity. Therefore the power supply size was not the problem. The technician measured the output from the contacts that were connected to the mortise lock and found that they were outputting correct voltage and current. Therefore the output board was not the problem.
Assured by the technician that the wire run between the power supply and the mortise lock was less than 100 feet and that 18 gauge wire was used, I knew that the wire run was not the problem. I asked how power got from the door frame through the door and into the mortise lock. The technician responded that power transfer was accomplished by use on an electric hinge.
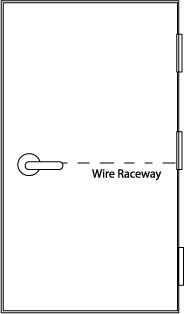
Typical wire gauge in an electric hinge is 24 gauge – a thin wire to be sure, but since power only needs travel a few inches through it, hinge wire gauge is usually not a problem. But this electric hinge had its own 3-foot wire lead threaded through a raceway in the door to the mortise lock. Whereas a few inches of 24 gauge wire might not be a problem, I reasoned, three feet of it might be a problem. We talked about it briefly and then agreed that they would give it a try.
To my dismay, they called back two hours later – after they had replaced the wire running through the door with 18 gauge wire and let the mortise lock run on it for a while – and let me know that this did not work either.
The answer finally came when I asked how the electric mortise lock was connected to access control and was told there was a controller in a box above the door. The controller used a form C relay to turn the electric mortise lock on and off. I suggested that the technicians check the relay to make sure it was working properly. When they did they discovered that the electric mortise lock had been connected in series with another device. This other device – whatever it was – drew enough current to deprive the mortise lock of the current it needed to operate without burning up. Problem solved.
The moral of the story is that, yes, access control has only gotten more complex as time goes by, but by using simple, logical methods a good technician and figure out and repair most problems. So stick with it and keep asking questions until you ask the right one.
The purpose of a Door Propped Alarm is to sound an alarm when a door has been left open after a pre-determined period of time – a function that is deceptively complex. The motivation for this function is usually that a door is left unlocked or open when it should be closed and/or locked. Many access control systems include Door Propped Alarm capabilities, but stand-alone Door Propped Alarms are also available.
First, to clear up a common misconception, a Door Propped Alarm is not an exit alarm.
An exit alarm is a relatively simple device that screams when a door is opened. Usually it is equipped with an audible local alarm, a cylinder, keypad or credential reader for reset and authorized bypass, and a door position switch to tell the alarm when to scream. In recent years the exit alarm has grown more sophisticated, incorporating timers for automatic reset, delayed arming and other complex functions.
A Door Propped Alarm must accomplish a more complex set of operations because of the variety of user needs and expectations. A lot of this variety stems from vocabulary issues. For example, many users will refer to a door as being “closed” when they really mean, ‘locked.’ A true Door Propped Alarm will have the flexibility to accommodate these varied expectations.
Function
The condition that creates the need for a Door Propped Alarm is the need to leave the door open for a period of time, but no longer. For our discussion, we’ll call this period of time the Authorized Open Period. This is the most important time segment a Door Propped Alarm needs to track.
The next time segment that a user may want the Door Propped alarm to track might be what could be called the Pre-Alarm state. Typically in this state the Door Propped alarm will change the state of one or more relays. These relays can be used to notify other equipment to create a warning sound, lock other doors, or for many other functions. The warning sound is useful because it allows the user to close to door before the Door Propped Alarm goes into full alarm. In the Pre-Alarm state, the Door Propped Alarm could be set up to automatically reset when the door is closed and/or locked.
The Alarm State may or may not be a timed function, that is, it may have the ability to self-reset after a pre-programmed amount of time that would begin when the door is closed and/or locked, or it may require manual reset at the door by key or other credential. In the Alarm State, the Door Propped Alarm may have an on-board siren or may change the state of a relay to sound an external alarm.
Necessary Switches
In order to work, a Door Propped Alarm needs a door status switch. Depending on what the user wants the Door Propped Alarm to do, it also may need a lock status switch. If the user wants to sometimes leave the door open or unlocked without the alarm going off, some kind of secure access control, such as a key switch, keypad or credential reader, will be necessary to temporarily bypass the Door Propped Alarm. If the user wants to require that the alarm be silenced and reset at the door for extra security, a key switch or other secure access control will be needed.
To get an even better idea of the functionality of a Door Propped Alarm, go to Securitron’s web site and search out the installation instructions for their DPA-12 or DPA-24 Door Propped Alarm.
Like Moses leading the Hebrews across the Red Sea, you must work a miracle to bring electricity from the hinge side of the door to the lock side. Luckily it is a miracle on a much smaller scale. Moses had to deal with millions of gallons of water and miles of sea bottom whereas you only have to deal with a few feet of wood. So relax.
Raceway Reasons
The best way to get a wire raceway into a door is to order the door with it already built in. This is especially true of hollow metal doors which often have cross members inside at angles to where the through-wire needs to go. However, that would require planning in advance – a rare occurrence these days, it seems. Lack of planning is the main reason that field-drilling a raceway becomes a necessity.
Coring the door is usually the best option whenever you are installing an electric lockset. This is true whether you use a door cord or an electric hinge. The safest place for the wire is inside the door.
You will probably also need to drill a raceway if you are using an electric strike in the inactive leaf of a pair of doors. Usually you will also need a door cord, electric hinge or other power transfer.
Horizontal vs. Vertical
Electric Through-Wire Hinge
It is possible to drill a raceway with the door still up. I have done it but I don’t recommend it. It takes nerves of steel and a stiff, sharp drill bit. You need a decent sized bit that won’t bend right or left on you as you try to drill straight, and you need to make sure that the door doesn’t move on its hinges while you are drilling.
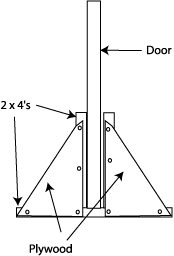
I found that taking the door down and standing it on edge in a homemade door stand is the easiest for me because:
The door is much less likely to move while you are drilling it
Using a level to guide you is much easier, and
Gravity is on your side
Constants
Certain constants apply to either horizontal or vertical drilling. In both cases I recommend a 3/8-inch by 3-foot drill bit. If the door is more than 3 feet wide, drill it from both sides or get a 4-foot bit. I prefer to drill from both sides because it’s a lot easier to drill straight for 18 or 24 inches than it is to drill straight for 3 or 4 feet.
Simple Door Stand
If you have a drill with a built-in level, use it. If your drill does not have a built-in level, any level will do. Just put it against the door anytime you want to check the angle at which you are drilling. Determine if the door has a beveled edge and don’t let the bevel skew your path through the door. Make sure your drill bit remains parallel to both the interior and exterior surfaces of the door.
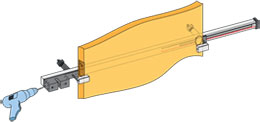
Drilling a raceway across a door is a challenge, but all it really takes is good focus and an ability to drill a straight hole. If you are challenged in the latter aspect, you might consider a drilling tool like the Security Door Controls product shown below. If you have many raceways to drill, a tool like this one is a great idea.
Someday you might come home or go to open up your business and find that your key won’t turn at all, not even a little. There are several reasons this might occur.
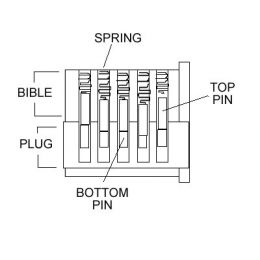
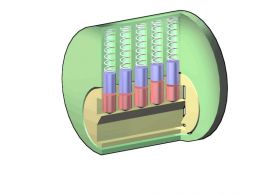
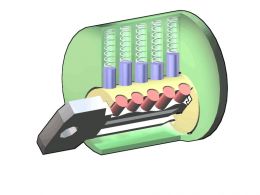
At right, illustrations show the operation of a standard pin tumbler lock. When you insert your key, the key raises the pins to the point where the division between the top pins and the bottom pins aligns with the division between the plug and the bible of the cylinder, allowing the plug to turn.
Sometimes dust and dirt collect inside the lock cylinder. When that happens the dirt can cause the pins to stick in a partially raised position, preventing the plug from turning. In most cases a spritz of dry lubricant will be sufficient to free up the plug and allow you to open your door. Simply spray the lubricant into the keyway and insert the key a few times to work the lubricant into the mechanism. If this method does not work you may need to use a more solvent-based lubricant like WD-40 to loosen the dirt. Locks exposed to the elements sometimes collect a lot of dirt.
If your key will only go in part way, this could still be the same problem, or there may be an obstruction in the keyway. Illumination of the keyway reveals that the bottom pins hang down into the keyway. In the event that lubricating the lock is ineffective, slide a thin piece of wire into the lock along the bottom of the keyway, avoiding the pins, and feel for an obstruction. If the piece of wire will not go in as far as the length of the blade of your key, there may be an obstruction present. At this point you might want to call a locksmith, however, you can gently work your way past the pins and try to go over the obstruction in order to try to coax it out. This process can take a lot of patience and skill, and it is possible to make the problem worse if you are heavy handed with the pins.
From Wikipedia Should lubrication fail to free up your lock and you can find no obstruction, your lock may have a more serious malfunction, such as a pin chamber worn enough to allow a pin to get stuck at an angle, or a corroded pin that is frozen in place and will not budge no matter what. In these cases you need a professional to gain entry for you and repair your lock. If you succeed in freeing up your lock but find that the problem is reoccurring with increasing frequency, it’s probably time for you to replace your cylinder.