You are currently browsing the archives for the Door Repair category


How to Choose a Door Closer

To intelligently choose a door closer for your application you have to know certain facts:

  • Does the closer need to comply with ADA opening force guidelines?
  • Is the door an interior or exterior door?
  • What is the door width?
  • Will the closer be mounted on the push or pull side of the door?
  • Where on the door will the door closer be installed?  How much room is there?
  • Are there any special circumstances like wind, positive or negative pressure, etc.?
  • You may also need to know the door handing.

ADA Reduced Opening Force Guidelines

American Disabilities Act (ADA) reduced opening force restrictions are enforced by the Authority Having Jurisdiction in your locality.  In some localities or applications ADA requires a maximum opening force of 5 lbs. and in others a maximum opening force of 8.5 lbs.  Most closers on the market today can be field adjusted to comply with these restrictions, but to do so you need to have a door pressure gauge.

I am mildly acquainted with two door pressure gauges.  One is the model DPG by HMC and the other is the ADA/FG by LCN.  Apparently there are a lot of initials involved in door pressure.

Door closers are also available with reduced opening force meant specifically to comply to ADA standards.

Manufacturers usually print a disclaimer that says that a door closer adjusted to ADA maximum opening force may not have enough power to shut the door.  This is often true because perhaps recommended spring strengths for different applications are the result of perhaps a century of innovation.  Manufacturers know that a force greater than 8.5 pounds may be necessary to close a door.

Interior versus Exterior

When speaking about door closer closing force, we say that a door closer is of a certain size.  Door closer size does not refer to actual dimensions, but to spring strength.  Historically, door closers are available in sizes 1 through 6 – 1 being the wimpiest and 6 capable of exerting the strongest closing force.

A size 4 closer is usually recommended for an exterior, 3-foot wide door, whereas a size 3 closer is deemed appropriate for an interior door of the same dimensions.  The assumption here is that the exterior door is more likely to be expected to close a door against a wind or negative or positive air pressure.

Door Width

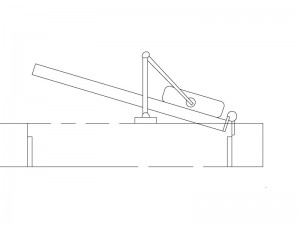
If you look at a door hung on butt hinges and equipped with a door closer from above, it looks something like this:

View from the Ceiling


You see from the illustration that the door closer closes the door by exerting force on a point about eight or ten inches from the hinge side of the door.  To see what this means, go to a door with no door closer.  Open it.  Now put your hand a foot from the hinge side of the door and push it closed.  Pretty difficult, isn’t it?   If your door was wider, it would be even harder to close from that point.  This is why door closer size – that is, spring strength – is determined by the width of the door rather than the height.

For a three foot wide exterior door, you would normally adjust your door closer to be a size four.  For a four foot wide exterior door you would adjust your door closer to be a size five.  Therefore, if you have a four foot wide exterior door, you had better buy a closer that can be adjusted to a size five.

Push or Pull?

Different arms are required for different applications.  On doors that swing out, where the closer is mounted on the push side, the closer is mounted in a top jamb or parallel arm configuration.  If it is mounted on the pull side it is mounted in what is called a ‘standard’ installation.  (There are other ways to mount a closer on the push side, but parallel arm and top jamb are the most common.)

See manufacturer’s literature for more information, or check out my article on Door Closer Basics.

Room

If you have a glass and aluminum storefront kind of door, you may have a space issue as regards your choice of door closer.  If you have a hollow metal door with no window hung in a steel frame, chances are you will have no space issue.

You need to figure out what door closer will fit.  To do that, measure the space where you would like to install it and download installation templates or instructions from manufacturer’s web sites.  Check the dimensions to see if the closer you have selected will work or not.

Or you can measure your door and frame and consult a door hardware professional.

Special Circumstances

I have installed door closers in some fairly challenging environments.  One, for example, was on a four foot wide, eight foot high, two and a quarter inch thick mahogany and glass door.  In addition to the size of the door, the location was also challenging – right across Beacon Street from the Boston Common where the wind could race across the open ground and dash itself against the door to its heart’s content.  Also, the front of the building had settled over the century or so of its existence, and leaned decidedly inward.  The door opened inward, and, left on its own, would swing sedately inward to 90 degrees if not latched.

In other words I had to install a door closer that would close an extra heavy door, uphill, in a wind.  I actually got one that would do it about 95% of the time.  For this application I chose the most durable, powerful, adjustable door closer I knew at the time:  the LCN 4041.  If I did the same job today I would probably choose an LCN 4011 or a Norton 7500.

A big, beefy, versatile door closer is not a cure-all.  For example, sometimes the 4041 is just too big, or templated too close to the hinge.  The point is that you must look at all the details of your door before you buy a door closer – not only how it is made and its size, but its environment as well.
 

Easy Hinge Replacement

The easy way to replace worn hinges is to leave the door on its hinges while you replace them.

To do this:

  • You must replace the existing hinges with hinges of the same size
  • On a hollow metal door your hinges must match the hinge prep screw pattern
  • You must be able to open the door far enough so that you can reach the screws on the door leaf of the hinge with your screwdriver – typically you would need to open the door to about 100 degrees of opening

If any of these is not the case, stop right here and go get some help.   You will need to take down the door, put it in a door stand and replace the hinges one leaf at a time, the old fashioned way.

You will need:

  • A screwdriver that fits your hinge screws, most likely a number 3 Phillips head
  • A ladder
  • A piece of 1 x 4 pine between 2 and 3 feet long or similar piece of wood
  • Wood shim stock

If you are replacing hinges with the same size hinges and can open the door wide enough, go ahead and open the door to the degree of opening that best allows you to access all the hinges screws on both leaves.  Beneath the door place the piece of pine, and then between the pine and the bottom of the door stack shim stock until the door is fully supported by the wood.  If there is a closer on the door, the door should be resting securely enough on the wood shims so that the closer cannot close the door.  However, the door should be shimmed just enough to take the tension off the hinges – no more.  You want the hinge preps to remain as properly aligned as possible.

Once you have shimmed the door you can replace the hinges.   Start with the top.  Install each leaf with two screws only, not quite fully tightened.  Then move on to the next hinge, then the next, until they are all replaced.   When each hinge is in place with two screws in each leaf, tighten all the screws and try the door.  If the hinges bind or make noise, something is amiss and needs further adjustment.

If applicable, put masking tape over the strike plate and close the door.  Is the door happy to remain closed, or does it want to spring open?  If it wants to spring open, chances are the new hinges aren’t quite as thick as the old hinges and need to be shimmed.  Support the door with wood as before and inspect the hinges.  Both leaves should be flush.  If they appear to be inset, shim them out with very thin slices of wood that are the same height as the hinge prep.  Continue as necessary until when tested the door is stable when fully closed.

Troubleshooting

If the hinges bind or make noise, remove the screws from one leaf of the middle hinge and gently pry it out of the hinge prep.  Test the door again.  If the door still binds or makes noise, put the screws back in the middle hinge and try removing the screws from one leaf of the bottom hinge.   By this method you should be able to isolate the hinges that are binding and then look closer to determine the exact problem.

If, as you are working, you find that the hinge preps aren’t lining up so well, the door may have settled on the hinges – particularly if they are plain bearing, five knuckle steel butt hinges and they have been there a long time or had heavy use.  You may find that you have to shim the door up just a bit more to get the hinge preps to line up right for the new hinges.

If there is no possible way to get the hinge preps to line up right then you may be dealing with a deeper issue than simple hinge replacement.  Your best choice might be to put the old hinges back and then decide whether you want to replace the door, frame, or both, or whether you can use a surface mount continuous hinge instead.

Click here to read more about hinges.


Door Problems

If the space between the door and the frame is different at the top than it is at the bottom, you've either got a door problem, or you're going to have a door problem.

As a locksmith I was called many times to fix what the customer thought was a lock problem only to find that the problem was with the door, not with the lock.   “What’s the difference?” you may well ask, proving to me that you are no locksmith.  “Well,” I would smugly reply, relishing my brief moment in the spotlight of useful knowledge.  “I’ll tell you.”  And I will, too.

Overview

Hardware and doors age together and develop different and sometimes incompatible symptoms of aging.  Like people, doors are subject to the prolonged effects of gravity.  Things start to sag, and for a while you can tighten things up and slow down or even perhaps reverse the effects, but eventually Newton will have his way and what was put up will come down.  That is to say the door, suspended an eighth of an inch (ideally) above the threshold, will eventually come to rest on that threshold.  If left to the ravages of time it will eventually cut a groove in the threshold.

Locks, meanwhile, start having trouble finding their strikes.  (A strike is to a lock what a tunnel is to a train or the side pocket to the eight ball.)  Usually (but not always) the strike stays put, but the lock travels downward along with the lock side of the door.  Eventually the lock may not line up with the strike at all, but before that there will be friction between the bolt or latch and the strike, making the lock difficult and eventually impossible to lock and/or unlock.

Besides sagging, wooden doors may warp and door frames of any construction may move as the building shifts and settles over time.  These changes may also result in locks that no longer line up and do not work properly.

Diagnoses and Remedies

The Sagging Door

Looking at the closed door from the ‘pull’ side, it is often easy to see if it is sagging.  If the jamb has not moved and was installed correctly, it is perfectly square.  Ideally there will be a one eighth inch gap between the top and the left and right edges of the door and the frame.  If the door hangs at an angle to the frame, it is probably sagging.

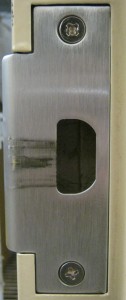
Marks on this ANSI 4-7/8 strike plate show that the latch has traveled down as it has traveled through time because of gravity.

If a door is sagging enough, there will be marks on the lock edge of the door where it is rubbing against the frame.

Often this is because the top hinge is loose.  If you tighten all the hinge screws this may solve the problem.  On a wooden door and/or frame you may find that the screws for the top hinge are stripped – that is, the screw hole has become enlarged because the weight of the door has pulled the screw out.  The solution for this situation may be longer screws.  Be sure you replace the screw with one of the same wire size so it fits flush in the countersunk screw hole of the hinge.  Commercial hinges use a size 12 screw, but bring one of the screws to the hardware store to match it up if you have any doubts.

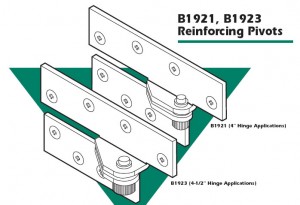
Many times longer screws do not solve the problem because the wood door is not solid would, but particle core or gypsum core, or the frame is shimmed out from the studs so far that that there is nothing for a screw less than five inches long to grab.  In this case it might be necessary to relocate the top hinge (not generally a good result), install an additional hinge or hinges above and/or below the existing top hinge, install a reinforcing pivot hinge at the top of the door, or replace all the hinges with a continuous hinge.

Damaged Hinges and Crooked Door Jambs

If hinge tightening does not solve the problem, the hinge or hinges may be bent or the door frame may have shifted.

Hinges are often bent when someone (who is not too bright) places a piece of wood between the door and the frame to hold the door open.  It is possible to bend a hinge back to almost its original shape, but when it is bent the metal of the hinge is fatigued and it will never be the same.  Since hinges vary by manufacturer, it is best to replace all the hinges if one is bent unless you can find an exact replacement for the bent hinge.

If the hinges are neither loose nor bent, the door frame may be out of alignment.  Use a carpenter’s square to check the corners of the frame and a level to check the legs and header.

If it is a three-piece, knock down hollow metal frame in a sheet rock wall, you may find an adjustment screw at about eye level on each leg of the frame.  These vary widely between door manufacturers, so see what kind of driver may be required to turn the adjusting screw.   You can experiment with the adjusting screw to see if turning one or the other either way has any desirable effect.  Sometimes the adjustment screws are not connected to anything that has contact with anything else.  In that case turning the adjustment screws will have no effect.

Hollow metal frames that are installed in interior sheet rock walls are often secured to the wall at the bottom of each leg with a screw.  If the floor has shifted beneath the frame so that one leg is now lower than the other, it is possible to remove the screws from both sides of the leg, gently pry the leg up off the floor a little and insert shimming material beneath the leg to hold it up.

Wooden Doors and Frames

Wooden doors and frames are generally susceptible to more movement than hollow metal.  In addition to sagging, there is warping, twisting and swelling that may occur.  Fortunately whenever finished wood rubs up against something, it tends to leave a mark.  These marks can tell you what the door is up to and help you fix the problem.

Unlike a hollow metal or Fiberglas door, you can plane a wood door down.  Careful, though:  make sure you iron out any hinge problems before you start to plane, otherwise you’ll plane, the door will sag more, you’ll plane some more, the door will sag some more – pretty soon you’ll have a big space between the frame and the door someplace and you won’t need a door viewer anymore because you’ll be able to see out the crack.

One has no choice but to plane a door that has swollen.  Plane carefully, a little at a time, and do your best to keep the door as square as possible.  After planing, finish the door with paint, polyurethane or varnish – especially the edges – so that it doesn’t swell again so fast.

This is not a complete list of door problems, but it is a good sampling.  I hope it serves as a starting point for you to solve your own.


Tags