Above is pictured an interim hinge, used when your door and your frame have different sized hinge preps. For example, your frame is prepped for a five-inch by four-and-a-half inch hinge and your door is prepped for a four-and-a-half by four-and-a-half inch hinge. Why would you need such a thing? Inability to read a tape measure, perhaps?
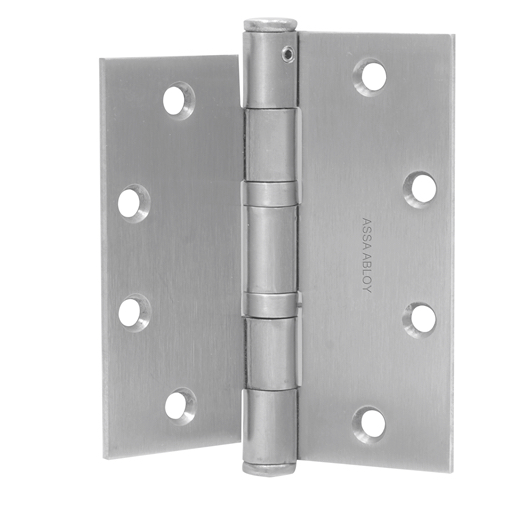
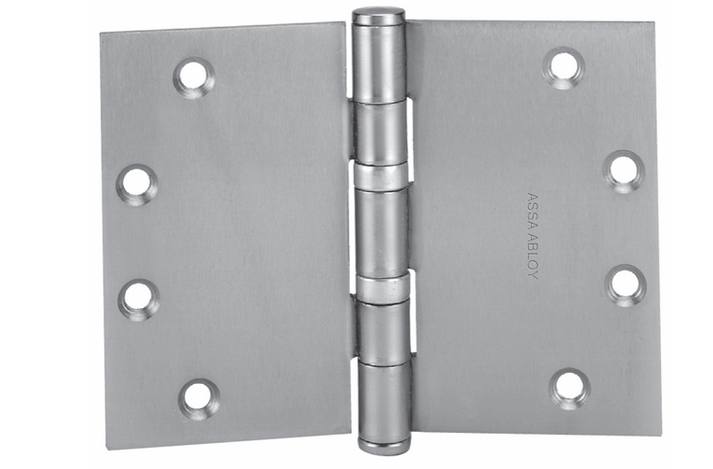
Wide Throw Hinge
Wide Throw Hinge by McKinney
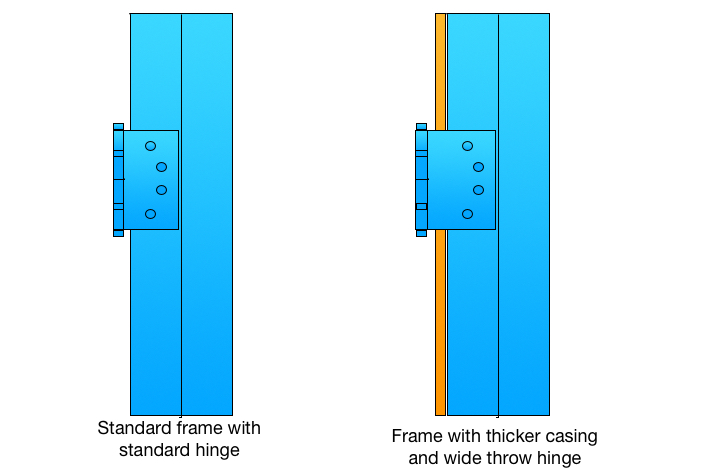
The hinge above is a wide throw hinge, used when you have a thick molding applied to the pull side face of the door frame. My illustration below shows the difference.
Sometimes people order wide throw hinges by accident because they do not know how to properly measure a full mortise hinge. Full mortise hinges are measured height first, then width. Wide throw hinges have a width that is greater than the height whereas standard hinges do not So if, for example, you order a 5 x 4-1/2 inch hinge you are getting a standard hinge and if you order a 4-1/2 x 5 inch hinge you are getting a wide throw hinge.
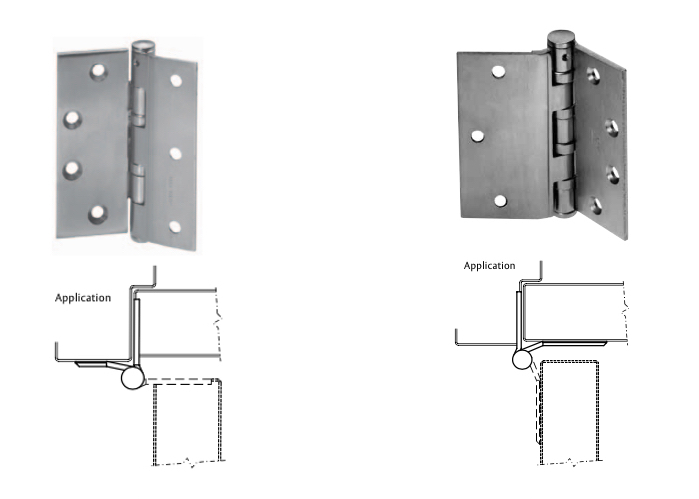
Half Mortise and Half Surface Hinges
Half Mortise and Half Surface HInges by McKinney
In the picture above, the half mortise hinge is on the left and the half surface hinge is on the right. As you can see by the “application’ drawings below each hinge, the half mortise hinge has the mortise prep on the door, and the half surface has the mortise prep on the frame. You can tell the half mortise at a glance because the surface leaf is narrow, for installation on the surface of the frame.
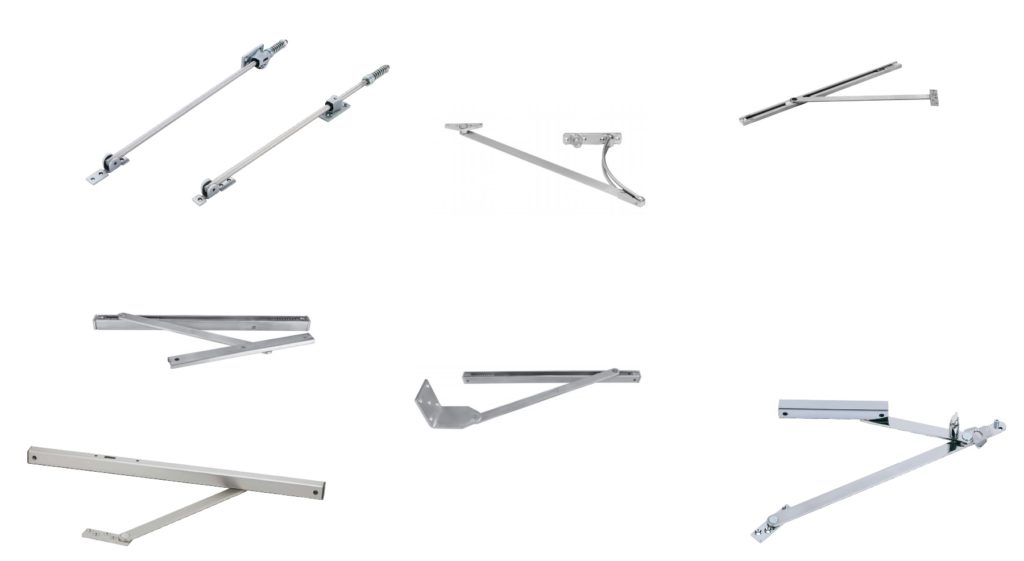
Comments Off on The Diverse World of Overhead Stops and Holders
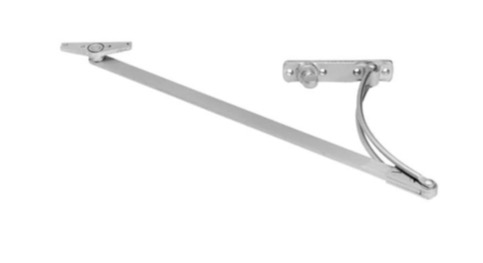
Clockwise beginning at top left: surface mounted GJ 70 and 79 series and Rixson 7 series; Rixson 6 series concealed; bottom right, GJ 81 series surface mount; bottom center, ABH 3400 series with side jamb bracket; bottom left, GJ 90 series surface mount; and above that, ABH 1000A series.
For some applications there is no truly adequate substitute for an overhead stop. Yet many times they are omitted from from hardware schedules where they should be used. But unless concealed OH stops are included at the design stage, retrofitting surface stops to a job after the fact can present a significant challenge.
All overhead stops and holders are designed to accomplish basically the same goals, but in differing situations. If it is a stop, its purpose is to stop the door before it hits something, usually a wall. If it is a stop and holder, its purpose is to stop the door and, under the right circumstances, hold the door open. Overhead stops protect the door closer arm, and they can also make it more possible for the door closer to shut the door in high winds when the stop is templated to allow the door to open to 90 degrees or less. Maximum degree of opening with an overhead stop tends to be in 110 degree range.
Installation of surface-mounted models is simple except when a door closer is involved. Then an amount of thinking and/or additional parts may be required. This is one of the main reasons overhead stops are not often used. However, in at least one circumstance there is no comparable substitute; that is, exterior, high-use, out-swinging doors that are frequently exposed to high winds.
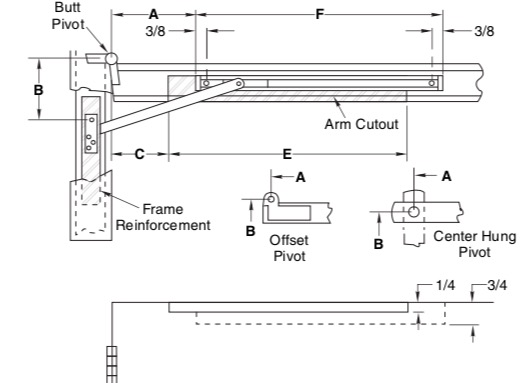
Most overhead stops are sized according to door width and type of hinge used, for example, you would use a 792S (size 2) for a butt hung door with an opening width of 23-1/16 inches through 27 inches, and a 793S for a door with butt hinges that is 27-1/16 inches wide through 33 inches wide. This is information found in the installation instructions. There are also adjustable overhead stops available from most manufacturers; one example is the ABH 1000A series.
The sections below discuss a few of overhead stops shown in the illustration at the top of this article.
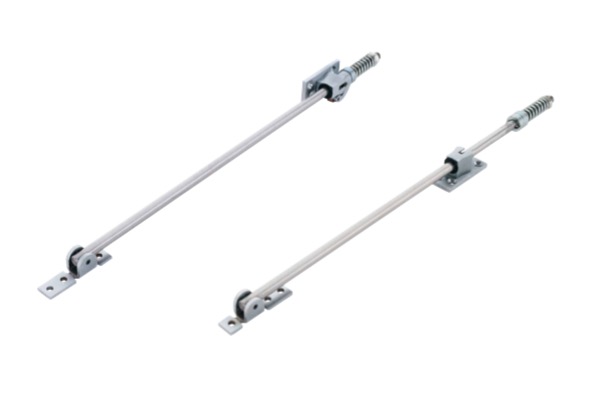
Glynn Johnson 70 and 79 Series
Glynn Johnson 70 and 79 Series Surface Mount Overhead Stops The 70 series is heavy duty and the 79 is extra-heavy duty. These are overhead stops for doors that are regularly exposed to high winds and/or abuse.
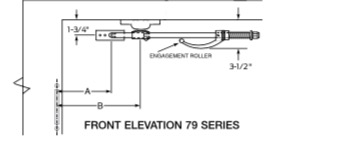
At left is a drawing of the 79 Series installed. You can see the problem of where to put the door closer.
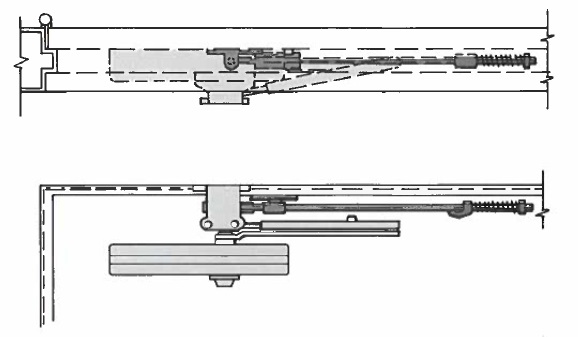
One solution might be the LCN 1460 with 62A shoe that significantly lowers the door closer on the door as shown below:
LCN 1460 with 62A shoe and 70 series LCN overhead stop
The drawing above comes from a GJ / LCN applications guide I stumbled upon many years ago. If you look at overhead stop installation instructions, you’ll see they don’t mention a door closer. I have searched for other guides that show door closers with overhead stops, but I have found none.
If you have an aluminum-and-glass narrow stile storefront door with a 3-1/2-inch top rail, you can see that dropping the door closer this much might be a problem. At best, there would need to be a drop plate added that would show through the glass. Not pretty. Another common solution with all surface mount overhead stops is to install the stop on the push side of the door and the closer on the pull side – a viable choice on interior doors, but not usually on exterior doors.
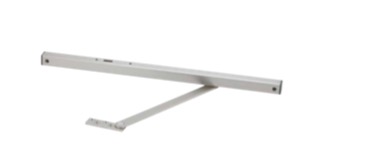
Glynn Johnson 90 Series
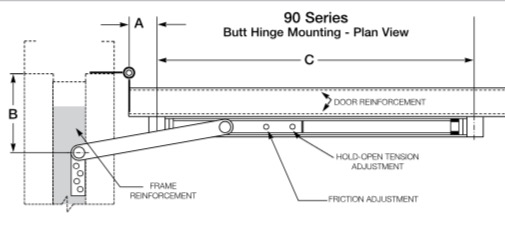
Glynn Johnson 90 Series Surface Mounted Overhead Stops This is the most common type of surface mounted overhead stop, and all overhead stop manufacturer’s make something like it.
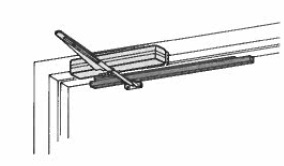
In the drawing above you can see the space it takes up on the door. Here’s how it translates into an application with a door closer:
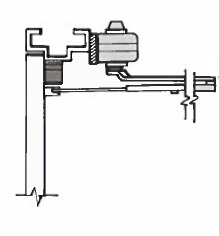
GJ 90 Series with LCN 1460 closer mounted top jambSide View, GJ 90 with LCN 1460 series
As you can see, this is not too bad as hardware conflicts go. The measurements are tight, but do-able.
Rixson 7 Series
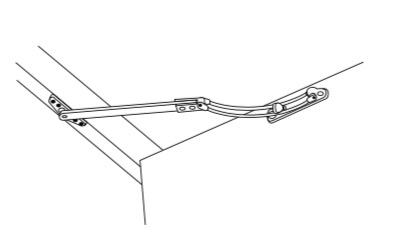
Rixson Series 7 Surface Mount Overhead Stops Rixson doesn’t talk much about this overhead stop in their catalog. They say it is ‘industrial duty,’ so, I guess, it must be well suited for high use and abuse environments like factories and warehouses. Much like the heavy spring on the GJ 70 series above, the cantilever design works as a shock-absorber. I included it because if its unique design, which is to say it looks kind of cool.
Rixson 7 Series
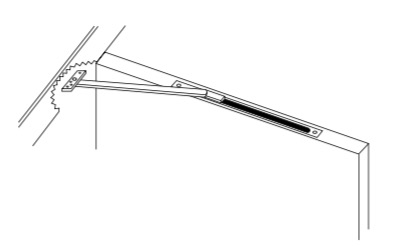
Rixson 6 Series Concealed Overhead Stops All overhead stop manufacturers make concealed overhead stops.
Concealed overhead stops have the distinct advantage that they interfere much less with the door closer installation, however they often make a difficult retrofit, especially on wood doors, sometimes requiring that the door be taken down so the mortise for the track can be cut in.
On a fire rated door this would most likely void the rating.
Rixson 6 Series
Like most Rixson overhead stops, the 6 Series is also available as the 6ADJ Series adjustable version.
Shock absorption is achieved by a heavy spring inside the track. The spring engages at the last seven inches of swing, affording a significant layer of protection for the door closer.
From the Rixson 6 Series install instructions.
The picture taken from the Rixson 6 Series installation instructions shows how much real estate is left on the door for a door closer, and illustrates how much better it is to be working with a concealed overhead stop rather than a surface mounted one.
In 2018 we have seen a sharp increase in choices available for occupancy indicators for mortise locks. Goodness knows the world can always use more occupancy indicators. One might say that us hardware geniuses now have a dizzying array of indicators available to meet your occupancy indication application needs. Following are some examples of the new choices.
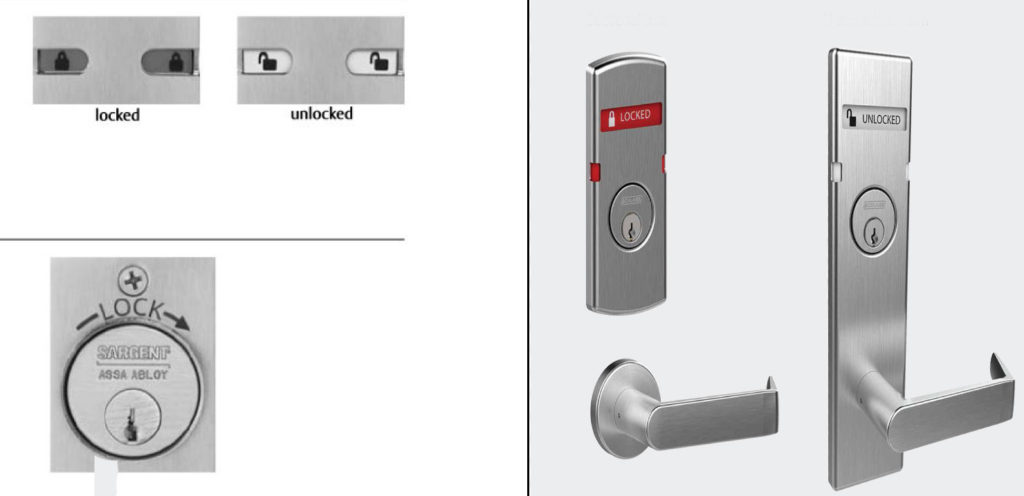
The Schlage lock company advanced with new “180 degree visibility” indicator offerings for their L Series mortise locks, including the new N escutcheon with indicator. Four signage options are available, and indicators are available for use on both the insides and outsides of doors. For example, on a classroom intruder application, LOCKED/UNLOCKED indicators can be installed on both sides of the door, or on a nursing mother’s room, a LOCKED/UNLOCKED indicator inside to reassure the mom, and a DO NOT DISTURB or OCCUPIED indicator outside to stop folks from barging in.
“180 degree visibility” is accomplished by additional indicator windows on the edge of the indicator unit that are visible from the side. There are many models in this offering of indicators: one for each combination of interior or exterior multiplied by four possible signage choices and for use with either cylinder, emergency screwdriver slot or turn piece.
These indicators are usable with many, but not all L Series functions. Schlage still offers their original model 09-611 indicator that is included with some mortise lock functions. Consult your Schlage commercial price book or favorite door hardware genius for more information.
Sargent and Corbin have also increased their indicator offerings for their mortise locks, expanding them to more functions with more signage options, and now including escutcheon trims as well.
One option offered by Assa Abloy and not by Allegion at this time is escutcheons engraved with the word, “LOCK,” and an arrow indicating the direction one needs to turn the key to lock the door. This option would perhaps be most notably used for classroom intruder functions, wherein the outside trim is locked from inside the classroom with a key during a security emergency. The inside trim remains unlocked for safe egress.
Like the new Allegion indicators, the new Assa Abloy indicator offerings work with select functions and have variable part numbers that reflect the different signage, placement and function of the indicator.
Usually occupancy indicators can be added to existing locks, as long as the indicator is compatible with the function of the lock. Replacing a plain escutcheon with an indicator escutcheon is a bit pricier and installation is more complex, but it can be done, once again, if the chosen indicator trim is compatible with the existing hardware.
Your source for quality security products with superior service!
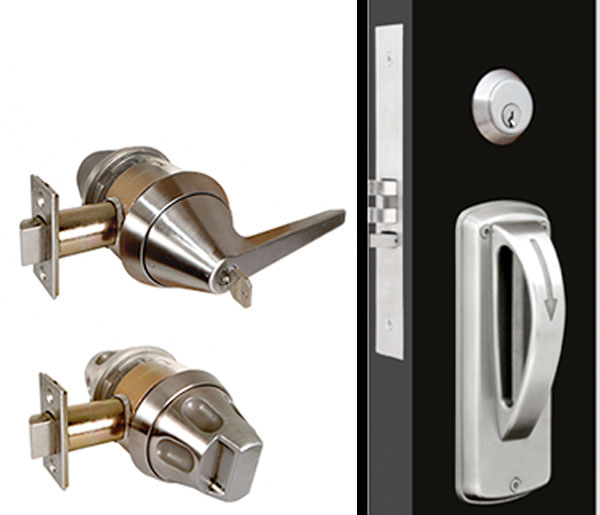
Left: Marks USA Lifesaver series. Right: TownSteel MRXA series.
Ligature resistant, otherwise known as anti-ligature or behavioral health door hardware is designed to make it difficult for folks to use it for suicide by hanging or otherwise harming themselves or others. Pictured adjacent are cylindrical knob and lever locks by Marks USA and a mortise lock by TownSteel.
All are designed to resist attempts to hang oneself. The cylindrical lever and knob locks feature more or less conical designs that cause a cord to slide off of them regardless of how one might try to tie it on. The lever turns freely even when locked, achieving the same result. The mortise lock uses a conical cylinder collar and sloped trim to achieve ligature resistance. The opening in the pull is closed by a steel plate, making it impossible to pass a cord through it. The exposed fasteners are security fasteners that require a special tool to loosen, and they fit flat and flush to the escutcheon and lock front.
When you sell or install ligature resistant hardware it is best not to modify the product in any way, because in doing so you will assume all responsibility for anything that happens as a result involving the hardware. This can include disassembling a cylindrical lock to rekey it. For this reason I recommend that when keyed anti-ligature locks are specified they are specified as interchangeable or removable core locks.
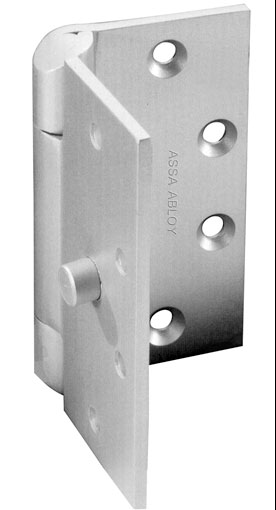
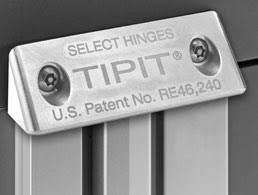
Ligature resistant hinges have hinge tips called “hospital tips” that are sloped to discourage suicide attempts (see McKinney hinge adjacent). Security screws also help keep folks safe by making it difficult to use the hinge to hurt oneself or others. Select Hinge offers a little gem called the “Tipit” for continuous hinges that makes continuous hinges ligature resistant.
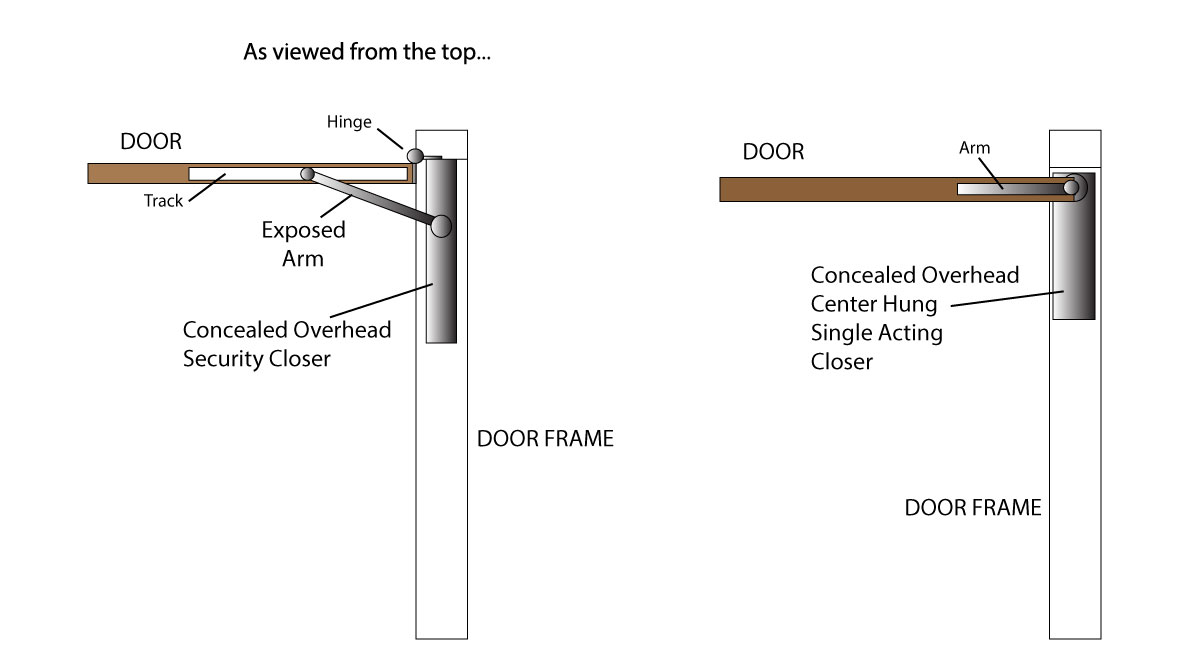
Increasingly I field inquiries for ligature resistant door closers for butt or offset hung doors, but to my knowledge there is no such animal as of this writing. Various factory tech support people have recommended overhead concealed security closers for ligature resistant applications, and this seems to be the consensus at this time.
I believe that using doors that are center hung with single acting, concealed overhead or floor closers would be safer and would eliminate the need for anti-ligature hinges; but this is impractical for retrofit applications where butt or offset hung doors are already present in abundance.
In the illustration below I show why I feel a center hung, concealed, single acting door closer would be the best choice for ligature resistance.
In door hardware, safety is the most important consideration.
Your source for quality security products with superior service!
The “Time-out Room,” also called a “Seclusion Room,” is, perhaps, a sign of our times. The purpose of a time-out room in a middle school or elementary school is to temporarily segregate an out-of-control student from the rest of the school population. As you can imagine, the use of a seclusion room is heavily regulated, and regulations vary from state to state, city to city, and even institution to institution. However, there are some common rules. For example, such rooms are required to be equipped with a means to see and communicate with the student while they inside the room; the room must be free of objects and conditions that might be potentially dangerous; and the door must be unlocked from the inside. The room must also be large enough for the student to lie down in without touching a wall, and must have a high enough ceiling that the student will not have to bend.
The purpose of the room is to let the student cool off and calm down before rejoining the school population. It is not a holding cell. Its purpose is less as a punishment than a behavioral tool.
What stops the student from leaving the seclusion room? A person keeps them in. A person must be present to observe and make sure the student is safe. I venture to say that same person is the one who gets the student into the room in first place and keeps them there. With no great stretch of the imagination, one might foresee instances in which the student to be secluded might be significantly bigger and stronger than the person responsible for keeping him and others safe. It might be physically impossible for the responsible person to keep the student in the room. They might need help.
The answer could be to put someone large, strong and well-versed in non-lethal martial arts with the patience of a saint in charge of the seclusion room duties, or it could be to use some kind of locking device to keep them in. But, wait! You can’t lock them in. It’s against the rules. How do you solve the problem?
Often the answer is an electromagnetic lock controlled by a normally open, momentary contact switch. The magnet is only activated when the button is pressed. As soon as the responsible person takes their hand off the button the mag lock is unlocked. Often, local or institutional rules governing seclusion rooms require a time limit on seclusion. One could add a timer to the system that would automatically release the electromagnetic lock after the permissible amount of time has expired. Life safety code would demand that the magnetic lock be disabled by the fire alarm.
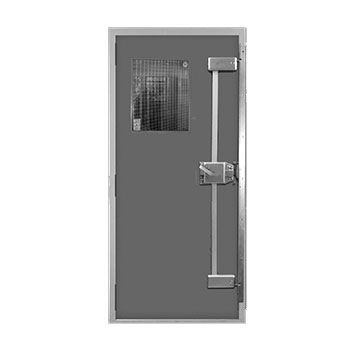
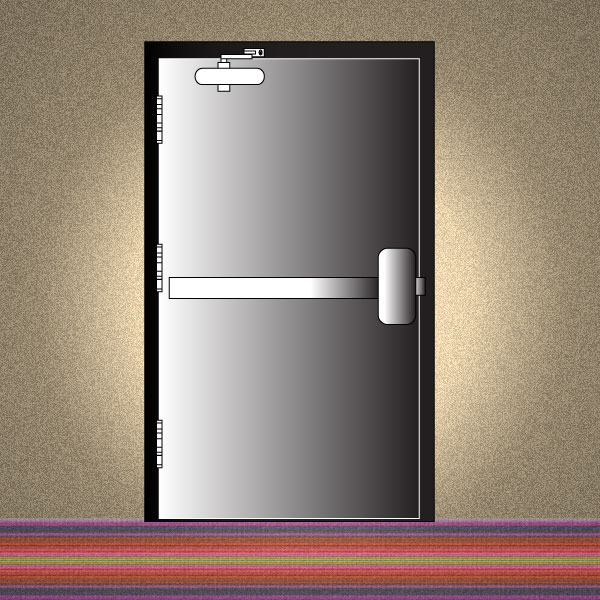
Pictured above is the Stanley Best SSRL seclusion room lock as seen under the Behavioral Health Products section at the bestaccess.com web site. One must stand there and hold the lever in position to temporarily secure the door. In photo we can see that the door is a hollow metal door in a hollow metal frame, and the door has a lite kit in it with wire glass. I’ll bet it’s a heavy gauge, reinforced steel door, too, judging from the three-point locking version of the SSRL shown. Clearly they expect trouble. Through the window they can observe the student and make sure that they are safe.
Since we can see the knuckles of the hinges we know the door swings out. This eliminates the need for a ligature-resistant handle on the inside of the door. We’ll talk more about ligature-resistant hardware soon.
Sometimes you just need a little time.
Your source for quality security products with superior service!
Comments Off on Electric Hinge vs. EPT (and oh yeah, Molex)
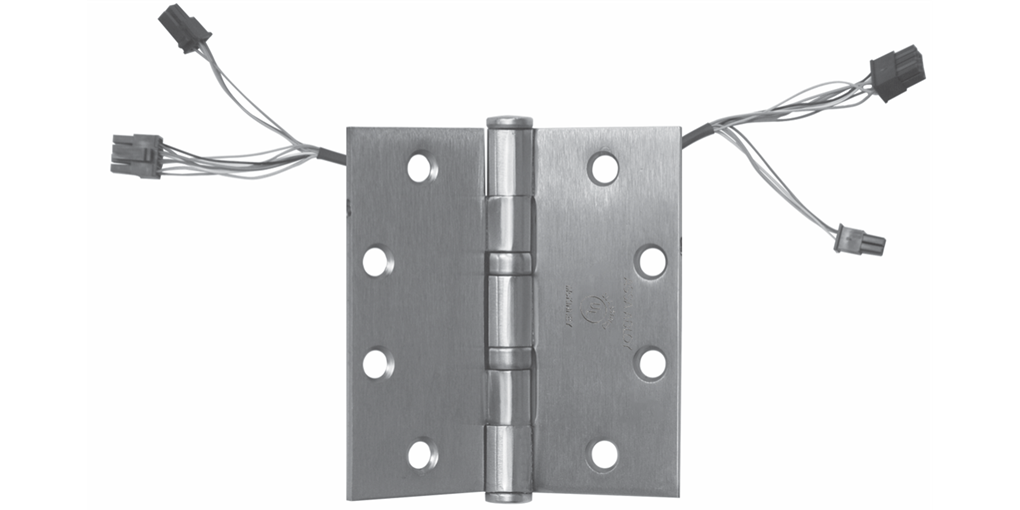
McKinney Electric Thru Wire Hinge with Molex connectors
I was taking a class on Molex connectors a while ago and the teacher – a manufacturer’s representative from a major hardware manufacturer – expressed the opinion that for high traffic applications, a power transfer is preferable to an electric thru wire hinge. I confess that until that moment I had not actually thought about it much, but what he said made a lot of sense. After all, almost everyone prefers an electric hinge to an EPT because of the relative ease of installation.
But the rep made a good point. The wires that run through an electric through an electric hinge are pretty thin – usually 24 or 26 gauge wire – and every time the door is used these wires are bent back and forth. If you’ve ever bent a copper wire back and forth in your hands until it breaks you will know what I’m getting at here. When you bend a copper wire back and forth, over and over, first it heats up, then it breaks. The same process is going on in the knuckle of that hinge. There’s a whole lot o’ twistin’ goin’ on.
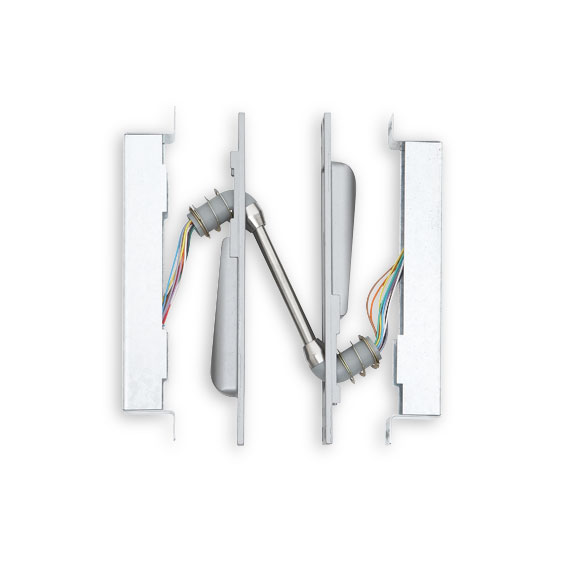
Von Duprin EPT10
When you open a door equipped with an EPT, however, there is less twisting happening. The wires must still bend with the motion, but only a fraction of the bending that occurs with an electric hinge. That’s why the rep always recommends EPT’s over electric hinges if the opening is to have any serious traffic through it. Sure, installing an EPT is a lot more work, but a callback to replace a failed electric hinge is at least as much work, especially considering travel time.
Yes, you’re right, I did mention Molex connector class. A few times now I’ve run into applications where the installer wants to convert a regular removable mullion into an electric mullion so they can install an electric strike on the mullion. Since the advent of the surface mounted electric strike for rim exit devices, it was inevitable that someone would want to do this. The problem? What do you do with the wire at the header? Well, if you just run a continuous wire, the mullion is no longer removable, is it?
But, aha! I said. We’ll use a Molex connector at the header. What is a Molex connector, you ask? Those would be those plastic connectors attached to the ends of the wires on the McKinney hinge above. Molex is a company that has created a system of plug-and-play wire connectors, and these connectors are becoming more and more common in the door hardware industry. Major door hardware manufacturers are now incorporating Molex connectors into all their electrified products and offering what are in effect extension cords with Molex connectors.
So a couple of connector-equipped extension cords would solve the problem of the suddenly non-removable mullion, right? Well, not so fast, buckaroo.
This is what I learned in Molex class. In Molex connectors, which connector will connect to what other connector is determined by the pin crimped onto the end of the wire. They give them genders, “male” and “female”, because the male can be inserted into the female. Okay, great. Where is the problem? The problem is that as of this writing, door hardware manufacturers’ extension cords all have connectors of the same gender on each end, so you cannot plug them into each other. They will only plug into an electric hinge or EPT that has Molex connectors.
The solution to the DIY electrified mullion problem: make your own DIY Molex connector for the wire in the header. To do this you will need a standard wire stripper, some 12-conductor cable, the special Molex crimping tool, Molex connector housings, and Molex male and female pins. There is a service kit available that contains all these parts. It is a fairly time consuming process to make your own Molex connector, and it requires skill, but it is the only solution that I know to the mullion problem.
Get your surface mount electric strike with Molex connectors (several electric strike manufacturers offer these) and an extension cable from Assa Abloy or Allegion to get the wire from the strike to the top of the mullion. Now you have the capability to connect your makeshift electrified mullion into the connector you must make. You can attach your homemade Molex to as long a cable as you like – long enough to reach the power supply or access control panel.
Does this solution comply with code? I do not know. Best check with your local AHJ before embarking on your Molex DIY mullion adventure.
Why is the industry moving to Molex connectors? They do not fall off, look ugly, or take up a lot of space like wire nuts, and if you need to trade out an electric hinge or electric strike they sure do make it a whole lot cleaner and easier.
That’s right. As usual, it all comes down to sex.
Your source for quality security products with superior service!
Comments Off on The Wacky World of Wireless Access Control Locks
Wireless access control locks are at the leading edge of door hardware evolution, creating hybrid devices that are both credential reader and locking hardware all in one. Some of these locks are designed to integrate with existing access control systems without the need to run cable back to the panel from the door; others interface with their own software on the end user’s computer or computer network using a wifi gateway.
Alarm Lock and Dorma Kaba are two manufacturers that offer wireless access control locks with proprietary software designed only to control and monitor these locks. This represents a step up from standalone programmable locks that needed to be visited with a notebook computer or handheld programmer for programming and audit trail download purposes. The locks connect via a wireless router or gateway to a single PC or to a server on the end user’s computer network.
The Alarm Lock Networx product can also be integrated into a few access control systems; see the Alarm Lock Networx web site for details. The Dorma Kaba wireless Eplex lock is compatible with Dorma Kaba E-Enterprise software.
These independent solutions are good for folks who want to upgrade from mechanical locking systems to electronic access control, offering full featured access control capabilities, near-instantaneous reporting and monitoring and requiring very little wiring to install.
If, however, the end user has an existing access control system that they would like to expand, using the Alarm Lock Networx software or Dorma Kaba E-Enterprise software would mean adding a second access control system – a complication many end users would like to avoid.
In the past, when a facility wanted to expand their access control system their access control company would be called in to run wire and install credential readers and the door hardware installer might be called in to install electric locks or strikes to be controlled by these new readers. Today, however, the door hardware installer can install wireless access control locks that can be integrated into the end users existing system.
But wait! Not so fast, there, champ.
Left: Schlage AD-400 ………. Right: Sargent IN120
The Integrators
Allegion and Assa Abloy are two major lock manufacturers that offer wireless access control locks that integrate with existing access control systems. This means that the end user can program these locks using the same access control software they are currently using.
Using the Allegion AD series wireless as an example, a single interface panel can allow up to sixty-four of these locks to the panel. There is actually some wiring involved with wireless locks: the interface panel (or wifi gateway) must still be wired to the main access control panel. This is the great attraction: that one can greatly expand an access control system without spending a lot of time and money on wiring. A wire is run from the access control panel to the interface panel in a distant wing of the building, and then the interface panel (or a few of them) communicate with all the locks in that wing.
Conflict arises from the very fact that these locks are designed to integrate with existing systems. Over the last several decades, access control systems have become big business. Traditionally, for every door in the system, the access control company sells a reader. In addition, an expansion module may be needed at the access control panel. If we install sixty-four wireless locks and integrate them into the existing access control system, it can be said that we just deprived the access control company of the sale of sixty-four readers.
Access control does a lot more than control access these days. Access control, environmental control systems, fire and security alarms, elevator control, employee time and attendance, student meal plan administration and other systems may all be incorporated into the same system, run by enterprise level software on a server on the end user’s computer network. You might say the access control company that owns the rights to the software and manufactures the access control panel is in a very secure position. Extricating one access control company to replace it with another could be a monumental task, involving every person whose life the system touches.
What can access control manufacturers do about these wireless locks being attached to their systems? Plenty. They can update their software so that these locks are incompatible. They can charge the end user a licensing fee for every lock that is added. In short, they can make the addition of wireless access control locks to their system expensive or impossible.
Both Allegion and Assa Abloy have made agreements with access control manufacturers that allow their products to be added to existing access control systems. Allegion has a range of agreements with various manufacturers limiting to whom Allegion wireless access control products can be sold. In many cases Allegion wireless products can only be sold to the access control company with whose system they will be integrated. Assa Abloy wireless access control locks can only be sold to their designated Certified Integrators. It is through these channels that wireless access control locks make it onto job sites.
Because of these sales limitations, bidding on jobs that specify these kinds of locks can be complicated. Bidders often find they must exclude specified wireless access control locks from their bid because they are unable to buy them. In the case of Assa Abloy products, some bidders may elect to take the online course and become a Certified Integrator. In the case of Allegion, they might be fortunate enough to be bidding on a job in which the access control manufacturer has no agreement with Allegion, and the job can therefore be freely bid. In either case, however, it is a more complicated process than simply pricing out a piece of door hardware.
Evolution or intelligent design? Wait, did you say, ‘intelligent?’
Your source for quality security products with superior service!
Comments Off on Field Reversing the Precision E2203 SVR Exit Device
The Precision E2203 is a Surface Vertical Rod exit device with a solenoid in the head that controls the outside lever trim. Ordered complete with trim: part number is E2203 × 4908A, specify door width, finish, handing, fail safe or fail secure. The right thing to do is to order it fail safe or fail secure and handed at the factory for your application.
But… let’s say for the sake of this article that you ordered the device and did not specify handing or fail safe / fail secure. You might find yourself needing to field reverse the handing. Here is what you need to know.
Handing
Changing the hand on the basic 2200 device is not very difficult, but changing the hand on the E2200 is fairly difficult, and requires skill, patience and … tape.
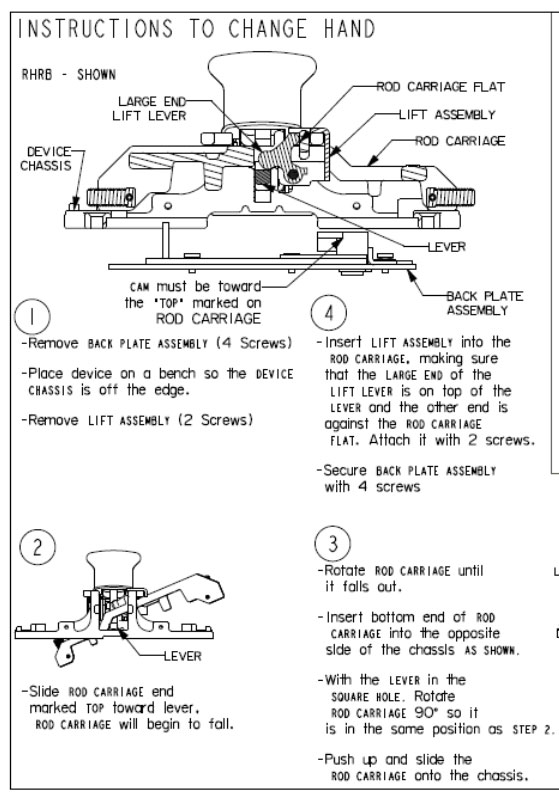
For the non-electric, purely mechanical version of this device, changing the hand is not as simple as it is with some other exit devices, for example, flipping the device over, but it is not all that hard to do. Below are the directions for field handing excerpted from the 2200 Series installation instructions from the Stanley Precision web site. Why they have arranged the steps to be followed in counterclockwise order is a mystery to me, but I am not here to judge, just inform.
At a glance you can see that there is some disassembly of the exit device head required to change the handing of the device. But when you add electrified trim control it complicates things a bit.
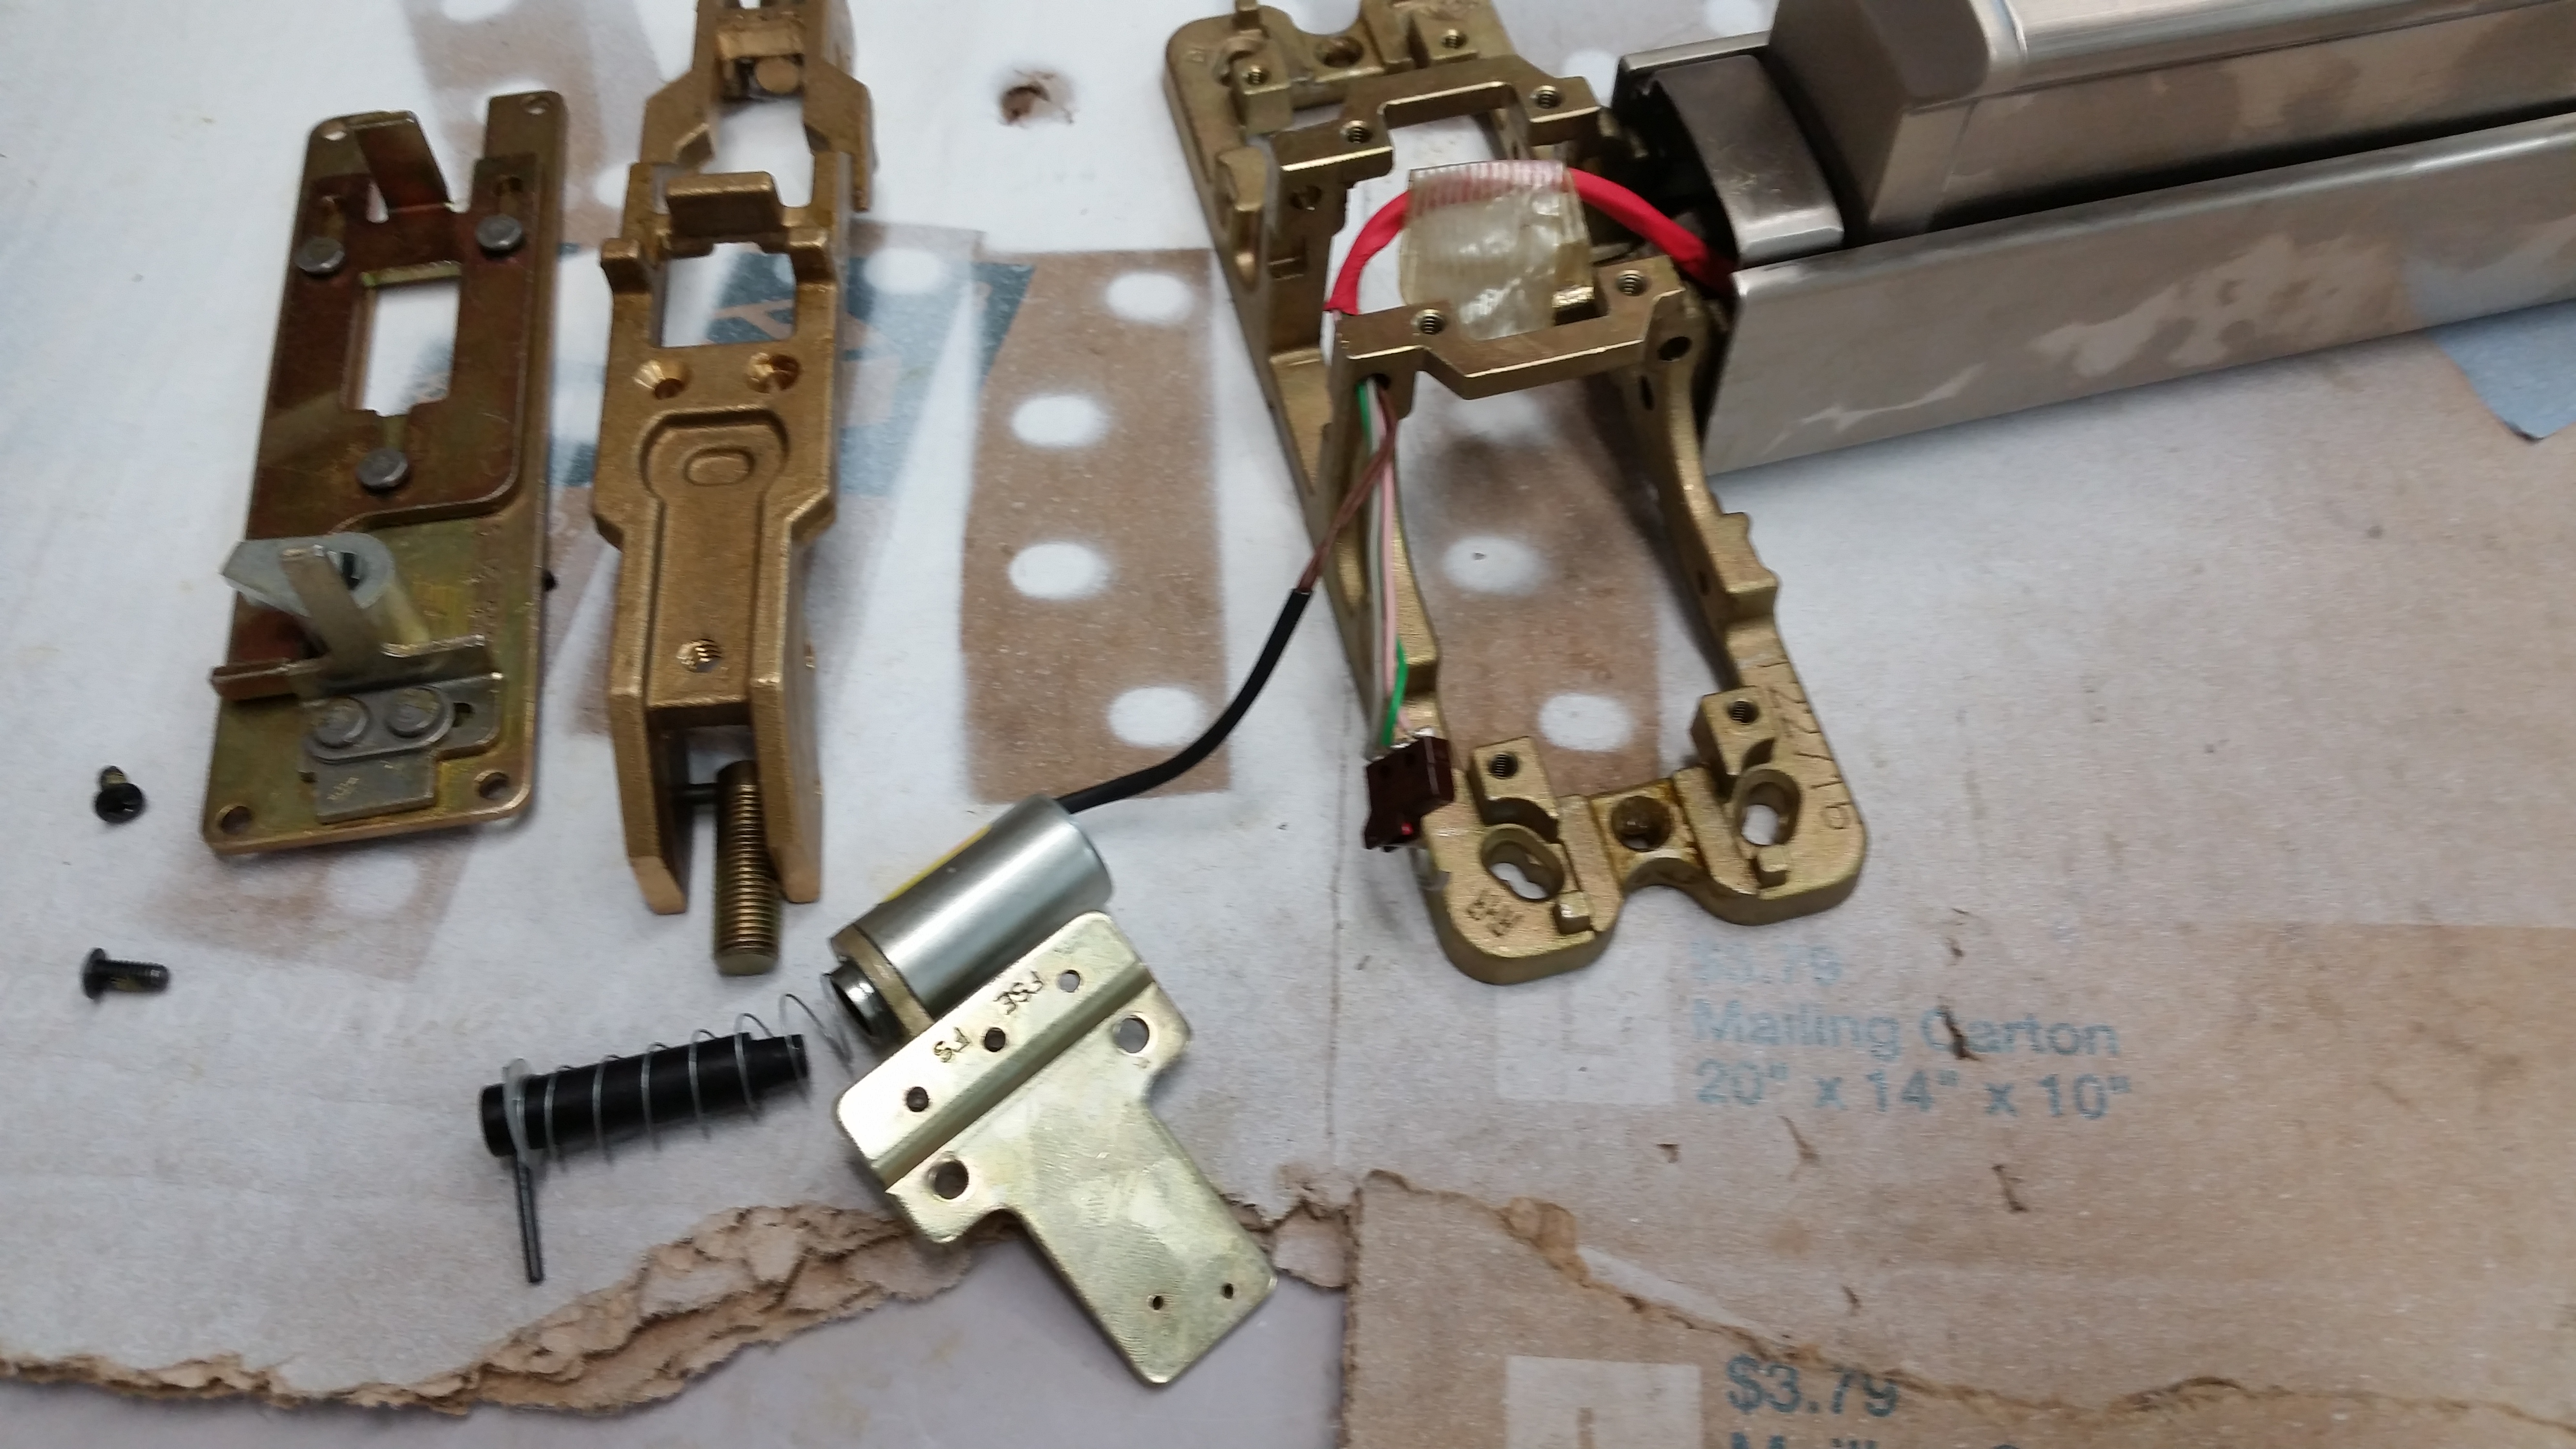
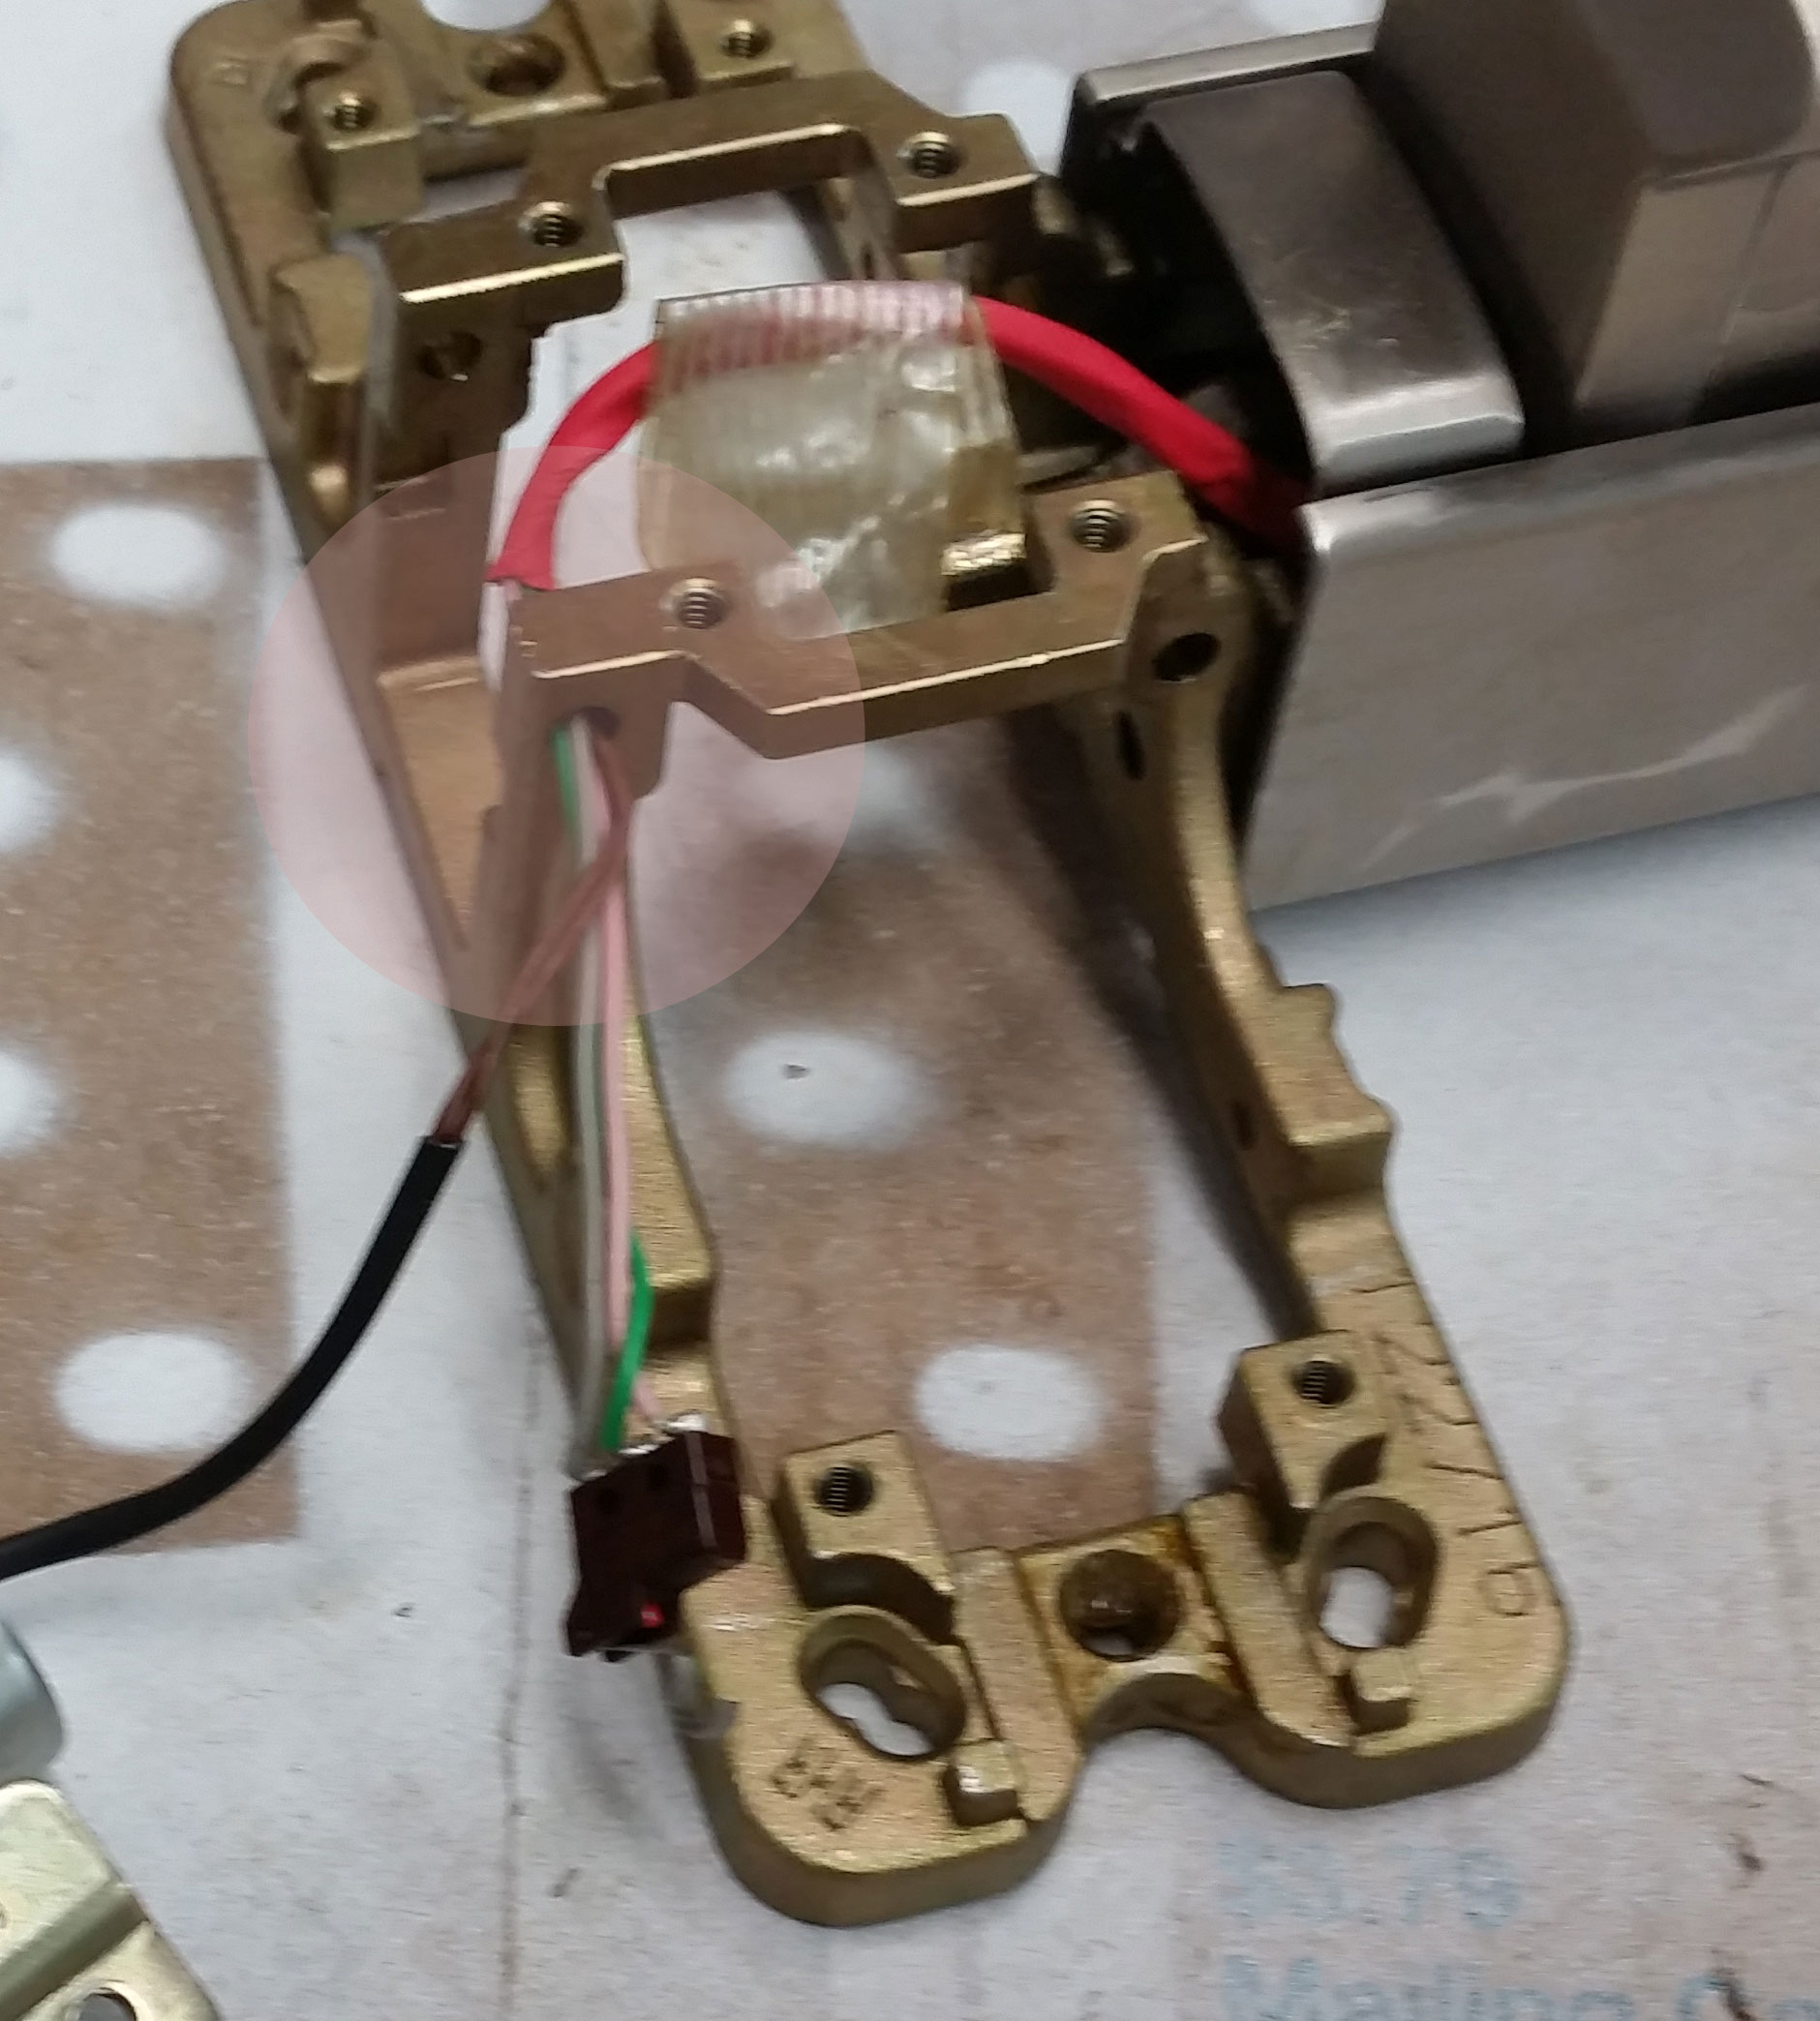
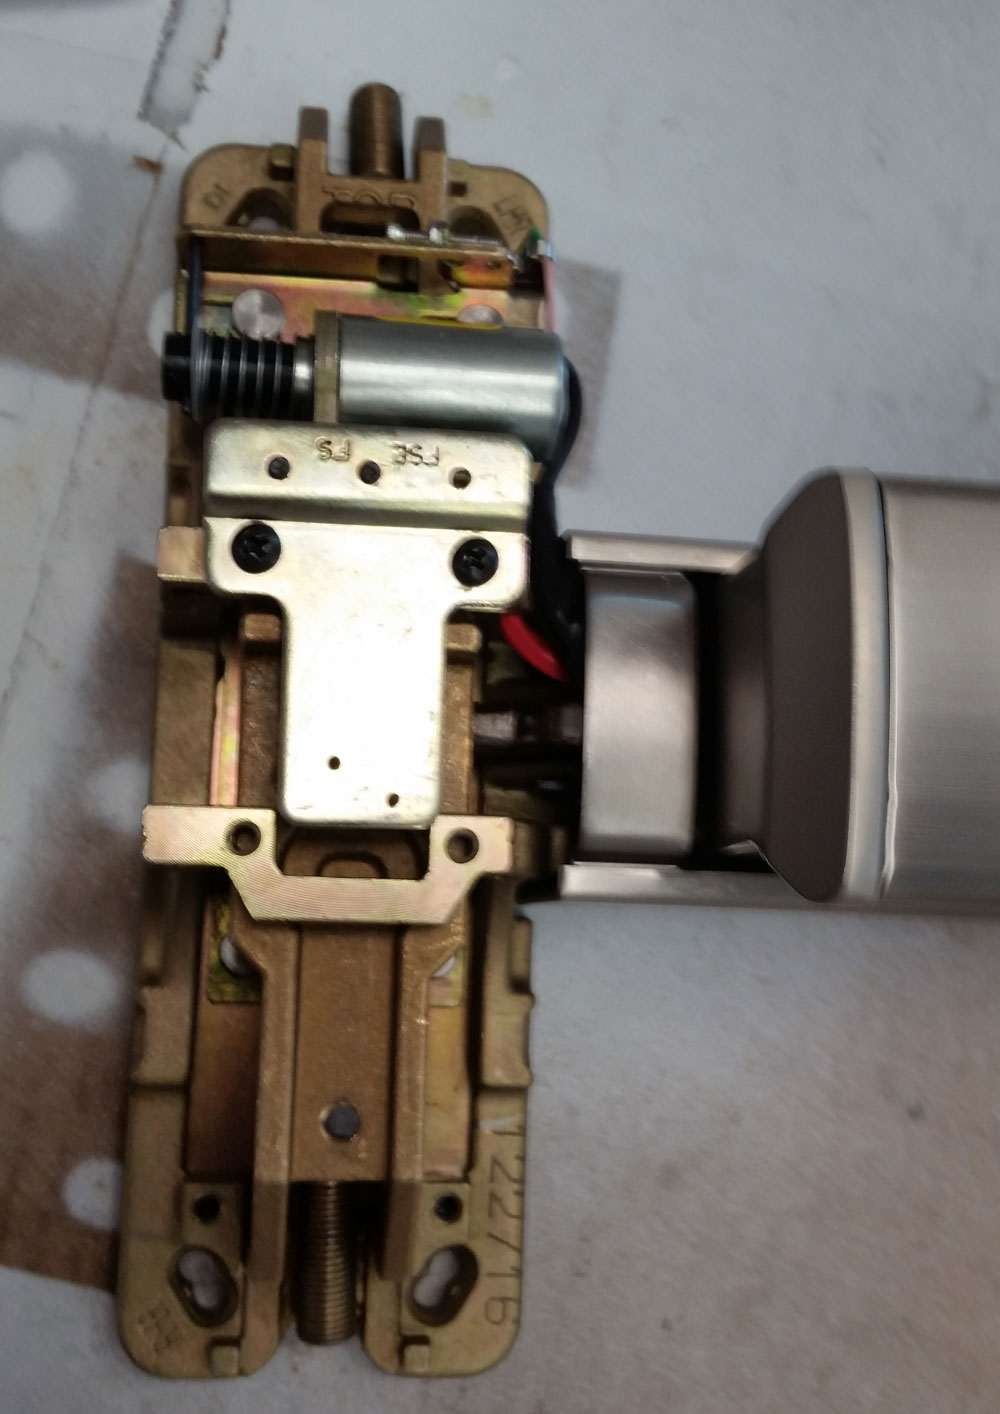
In the photo below you see the wires for the solenoid where they pass through the hole in the bracket. That bracket is an integral part of the active head and it does not move. However, the solenoid must be installed at the other end of the active head in order to interface with the working parts of the device and the wires are just long enough to allow it to be installed where it is. There is no play in the wire that would allow the wire to remain where it is and yet allow one to move the solenoid.
In order to move the solenoid to the other side of the active head, one must either cut the wires (a nightmare, do not do it) or to completely disassemble the exit device, bar and all.
Why do you have to completely disassemble the exit device to pull the wire through? Because it is taped to the baseplate of with a piece of filament tape that runs the length of the bar. The tape must be removed to free the wire so you can pull it out through the hole in the bracket.
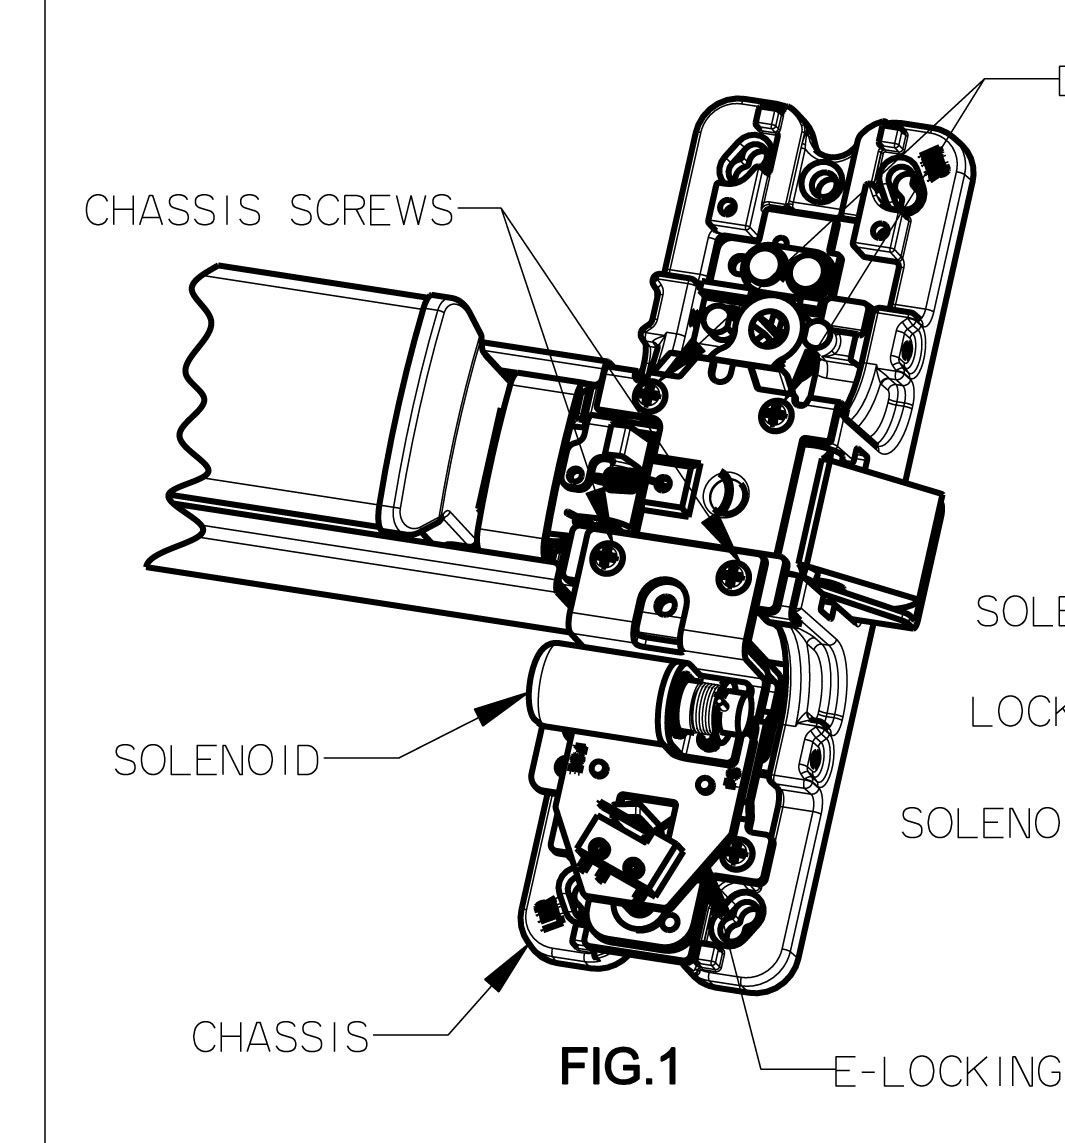
I could not find the directions for changing the hand of the E2203, but here is a drawing of the solenoid placement for the E2103 rim exit device taken from the installation instructions from the E2103 Kit.
Once you have pulled the wire through the hole, changed the hand of the head, taped the wire back down the length of the bar baseplate and reassembled the device, you’re done.
Below is a picture of the E2203 with handing freshly changed and the device reassembled and ready to install.
Like I said: order it fail safe or fail secure… AND ORDER IT HANDED.
Your source for quality security products with superior service!
When specifying door hardware I understand that it can be like being an kid in a candy store. But like that kid, you may not be able to always get everything you want. Sometimes “this” might not go with “that.” There are some examples that should be obvious, such as fire rated exit devices with cylinder dogging, since fire rated exit devices must positively latch each time they close without exception and any kind of dogging could prevent that. But other combinations of options are less obviously incompatible.
One elusive combination of exit device options that pops up sometimes is delayed egress with electric latch retraction. In most electric exit devices this is almost a contradiction in terms because they use the same mechanism for delayed egress as they do for electric latch retraction, except it works the opposite way. For example, the Von Duprin Chexit uses the same kind of motor that the Von Duprin EL devices use, except that the Chexit motor pushes out on the latch mechanism while the EL motor pulls in. What would be necessary I guess would be to build a little transmission so one could shift gears from push to pull to switch from delayed egress to electric latch retraction and back again.
But since no one has yet invented this miniature transmission neither the Sargent Electroguard nor the Von Duprin Chexit currently offer both delayed egress and electric latch retraction in the same device. The only device I have encountered so far that does offer these two options together in the same device is Detex. There could be others. Check with individual factories to be sure.
Two options that are offered together in many, but not all exit devices, with varying degrees of availability, are cylinder dogging and electric latch retraction. For example, Sargent offers cylinder dogging with electric latch retraction, but only when factory installed. Von Duprin offers “Special Dogging” (SD prefix) with electric latch retraction. In this case the effect of cylinder dogging is accomplished by a cylinder operated latch holdback feature in the center case of the device. (Not quite the same as traditional cylinder dogging.) Precision can offer cylinder dogging and electric latch retraction in the same device without complication because their electric latch retraction and cylinder dogging mechanisms happen in different sections of the rail altogether. Corbin and Yale offer devices with cylinder dogging and electric latch retraction in the same device. Yes, the electric latch retraction and cylinder dogging combo is all over the charts when it comes to availability.
As in all facets of life, when in doubt, contact your friendly door hardware genius.
Your source for quality security products with superior service!
Comments Off on Experiencing the New Von Duprin Chexit
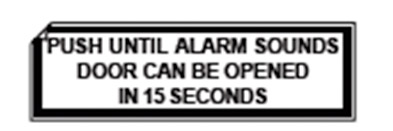
Von Duprin Chexit door label from Chexit installation instructions.
Last year Von Duprin began shipping Chexit self-contained delayed egress exit devices that are motorized instead of solenoid driven. Since they are motorized, the new Chexits draw less current and will probably be more reliable than the previous solenoid-driven version. This means a less serious, less expensive power supply, less need for high capacity, high gauge, high cost wire and greatly increased workable wire run distances – all good things.
The new Chexit will do everything the old Chexit did, including release of the outside lever trim when the external inhibit function is activated by access control or another external switch. That remains a way to get access control out of a Chexit by simply adding a blank escutcheon or other unlocked outside trim to the Chexit exit device.
As of this writing Exit-only function Chexit devices were being shipped less the part number 040193-00 cable used to connect the E996L to the Chexit PC board. The cables are only provided if you order the Chexit from the factory with trim, but that is okay as long as you want to use no trim or non-electric trim. Electrified trim is a means to provide fail secure access control from the trim side, so if the fire alarm goes off and powers down the Chexit, the fail secure electrified trim will stay locked. Entry can still be gained by key.
On another note, recently I was involved in an application where the installer was replacing a mortise exit device and wanted delayed egress from the push side and free ingress from the pull side. Luckily it was a mortise device, so all I had to do was provide a Chexit mortise exit device with blank escutcheon (passage function) trim because THE MORTISE LOCK ACTS INDEPENDENTLY FROM THE CHEXIT ON THE TRIM SIDE. Cool. 🙂
Bear in mind that the Chexit remains active while people are using the passage function trim to get in, so if they happen to depress the touch bar, say by bumping it up against the wall for two seconds, they may activate the Chexit alarm. Von Duprin Tech Support suggested a palm switch on the trim side to activate the inhibit circuit in the Chexit while a person enters from that side.
It was fun, easy, and I looked like a … Hardware Genius.