You are currently browsing the archives for the Life Safety Hardware category


The Double Door Rim Strike – A.K.A. “The Pocket Ripper”

pocketripperOne of the hallmarks of bad hardware choices is the “pocket ripper” strike, used on a pair of doors when there is an inactive leaf with flush bolts or a vertical rod exit device and an active leaf with a rim exit device. Whenever I see this I think, “Cheap bastard,” because the only reason for this half fast solution is money and the desire not to spend it on doing the job right.

This lovely piece of hardware earned the nickname, “pocket ripper,” but hanging into the opening at a convenient height to catch the front pocket of a pair of trousers, resulting in egregious damage to said pocket and colorful language on the part of the victim.

What is the right way to secure a pair of doors? Vertical rod exit devices are the best. My second choice would be a mortise exit device with an open back strike and a vertical rod exit device on the inactive leaf. My third choice would be a mortise exit device with flush bolts on the inactive leaf.

Below are a couple of examples of the ‘pocket ripper.’   On the left is the classic Von Duprin 1609 strike and on the right an example from Ingersoll Rand in Europe.  The European version looks like it has better manners.

In the center we have the Hager 4921 strike that really looks like it could take out more than just a pocket if you catch it the wrong way.

image001image002hager


In addition, I find that often the rim latch stops dead before latching on the strike.  Also, depending on how you install the rim device, the latch may drag across the edge of the other leaf, scraping an ugly divot over time.  Yes, all in all a hardware choice to be avoided if you can.


Securitech Lexi Electrified Exit Device Trim

Great Problem Solver

The Securitech Lexi series retrofit exit device trim is available with a variety of back plates and adapters that allow it to be used with most major brands, including many surface vertical rod and concealed vertical rod exit devices.  Compatibility with a variety of vertical rod devices is a major plus.

I mean, anybody can electrify a rim exit device by simply installing an electric strike.  However, while it is possible to install an electric strike on a vertical rod device it rarely brings a good result.  First of all, in order to use an electric strike you have to first lose the bottom rod.  That just leaves one latch at the top of the door to provide all the security.  If it is a tall door or a flexible door – like an aluminum storefront door – you can pull the bottom open several inches with just that top latch holding it.  Add a little time and a little hinge sag and pretty soon you have no security at all.

The other solution is electric latch retraction, or electric latch pullback, as some manufacturers call it:  relatively expensive compared with a Lexi trim.  Also, electric latch retraction is a fail secure only solution when locking trim is used and therefore may be inapplicable to fail safe installs such as stairwells, unless passage function (always unlocked) trims are used.

I notice that right out of the box the Lexi is very self contained.  Other than a tiny box containing mounting screws, tailpiece operators, and a cylinder collar and cam, what you see is pretty much what you get.  It’s pretty hefty for its size – it is designed on the slim side so as to be usable on narrow stile as well as hollow metal or wood doors.   This does mean that the installer may have to be a little creative when replacing a larger exit device trim with the Lexi.

Installation instructions are easy to follow and short – only four pages, including the template. Something I would have liked to see in the instructions, but didn’t, was current draw.  If I am installing one of these, the number of amps it draws are not going to matter much to me.  But if I am installing twenty of them and want a centralized power source, now it’s an issue.  Yet it isn’t anything that an experienced low voltage specialist with a ammeter can’t find out in two seconds.

One of the great innovations I noticed right away is the rotation restriction clip that allows the installer to customize tailpiece rotation to the exit device.  I do not think that this is handled better by any other manufacturer.  Correct degree of rotation often determines whether a trim will work or not, and to have a trim that has degree of rotation so easily selectable is damn nice.

As mentioned in the sales literature, since Securitech’s Lexi trim is compatible with so many exit devices, if you have a facility with different brands of exit devices dispersed throughout, you can install access control and unify the exterior appearance at the same time.  And in addition to being versatile it is also durable.  Forcing the lever only causes its internal clutch to break away, and it can easily be set right by rotating it back the other way.

All in all the Securitech Lexi trim seems to be a well built, versatile problem solver.  I think you’ll find it useful in many access control installations.

Multi-function Doorways, Part Two

Secured stairwell doors are among the most basic multi-function door applications.  In most jurisdictions they must (usually)* be both unlocked and positively latched in the event of a fire.  Unlocked so that if a person, fleeing into the stairwell during a fire, finds the stairwell full of smoke, they can safely exit the stairwell.  Positively latched so that the door will remain latched closed against the spread of the fire.

Until there is a need for access control, a passage function mortise lock, cylindrical lock with UL listed latch or exit device with passage function trim are fine.  The application begins to get interesting when the need arises to lock a stairwell door.

Right up front, electric strikes are out of the question because of the unlocked/positive latching requirement mentioned above.   It is not possible to positively latch a door when the electric strike is unlocked.  There is no such thing as a fire rated, fail safe electric strike.  If you configure a fire rated electric strike to be fail safe it voids the fire rating.

Since electric strikes are unusable for this application, that leaves either electric locks or electromagnetic locks.  Both have advantages and disadvantages.  Fail safe electric locks positively latch whereas mag locks allow the installer to us the existing hardware on the door to accomplish positive latching.  Electric locks require running wire through the door and some means of getting the wire from the frame into the door, such as an electric through-wire hinge.  Not all inspectors like electromagnetic locks, so before you install them be sure to check with your local Authority Having Jurisdiction (AHJ ) – that is, Fire Marshal or Building Inspector.

If the stairwell door already has a fire rated exit device installed, there is probably a fail safe electrified trim available for it.  Once again, this means an electric through-wire hinge or other power transfer device would be required.  Sometimes existing exit devices are incompatible with the electrified trims available for that brand and model of device.  If that is the case, the exit device might have to be replaced with one that is compatible with electrified trim.

Alternatively, there are after market request to exit (a.k.a. RX) switches available for most exit devices.  One could be used to release an electromagnetic lock on the stairwell door.

Usually it is required that all electric locking devices on stairwell doors be controlled by the fire alarm panel.  When the fire alarm is in a state of alarm, it unlocks all the stairwell doors.  Two conductor wire is run from the fire alarm panel contacts to a special fire alarm relay in the power supply that powers the electric locks on the stairwell doors.  The alarm panel opens the circuit, causing the state of the fire alarm relay to change, thus powering down the fail safe locks and thereby leaving them unlocked.

An important detail:  technically speaking, according to most building and life safety codes, fire rated doors can only be modified in a fire rated shop.  Therefore if you field cut a raceway for an electric wire through the cross members of the door, for example, you are probably voiding the fire rating.  I have never heard of anyone being called on this, but it is good to keep in mind.  Just like it is good to keep in mind that the AHJ has total authority over what you can or can’t install.  Best make sure you’re on the same page with her or him, otherwise they do have the power to make you remove what you installed and replace both door and frame to repair the damage.

Happy hardware and good luck to you.


*Some jurisdictions specify that not all stairwell doors need be unlocked in the event of a fire, only certain doors.  For example, I have known some places where code was the door had to be unlocked at every fourth floor.  Check with your local AHD to find out what the rules are for your location.


Multi-function Doorways, Part One

As seen in Doors and Hardware Magazine.

Whenever something is invented, humans find more uses for it.  This is certainly true for door automation and electric locking.  It was not long after people realized a door could be unlocked remotely using an electric strike and a door could be opened automatically using a power operator (automatic door opener) that they began using these devices together.   Of course this combination of devices was soon interfaced with intercoms.  Exit devices with electric latch retraction and electromagnetic locks were thrown into the mix, as well as access control, delayed egress and/or security interlock systems.  Any of these systems alone is sufficient to complicate an installation, but when you start to use several on one opening, that’s when things really start to get interesting.

A hospital can be one of the best places to run into a doorway that needs to perform many functions (pun intended).  Hospitals seem to have more varied reasons to keep different people out at different times, or to let them in or out by different means.  In addition to standard life safety and security issues, hospitals also have to anticipate the needs of patients who may be under the influence of medication and/or mental disorders and/or have physical limitations.  Some patients must be kept inside for their own safety while all patients must be able to exit swiftly and safely in the event of a fire.

Let’s use as an example a hospital emergency ward entrance used primarily by ambulance drivers.  The hospital wants only ambulance personnel and the security guard  to be able to activate the power operator, and to control access by use of a remote switch operated by the security guard  for the general public and an access code by hospital employees (other than ambulance personnel).

Since it is a pair of doors, concealed vertical rod exit devices are the most efficient, safe and secure way to lock them and provide reliable free egress in the event of an emergency.  However, since there is a power operator involved, these devices must be equipped with electric latch retraction; and since use of the power operator was to be limited, a second electric means of opening the door would be required.

A simple way to solve the problem of the second means of unlocking is by using electrified exit device lever trim with one of the concealed vertical rod exit devices.  Persons not requiring the power operator can get in by using the access control, or the security guard  can “buzz” them in using one of two remote buttons.  Because there will be two means of unlocking the door electrically, the security guard  will need a small desk unit with two buttons:  one that activates the power operator and electric latch retraction and one that activates the electric exit device trim.

Below is an amateur wiring diagram (made by me) of how, basically, the system works.

Central to the concept is an access control device with two relays and a request to exit input.  This allows several of the connections to be made through the access control system.  If the access control system on site does not provide more than one relay, the same functions can be accomplished by using additional relays in the power supply.

The system as shown in my illustration above works like this:

Ambulance personnel activate the power operator using the access control system.  The access control system signals the power operator via contact closure in Relay #1.  The power operator triggers the relay in the power supply to retract the latches of the exit devices, then opens the door.

Other authorized hospital personnel use the access control system to unlock the lever trim.  The access control system changes the state of Relay #2, triggering the relay in the power supply to unlock the trim.  They turn the lever, pull the door open and walk in.

Injured people arrive on foot at the Emergency Room entrance.  The Security Guard sees them (or is notified by intercom, not shown) and lets them in by pressing the red button, activating the power operator, or by pressing the green button that unlocks the exit device trim.

There exist many possible variations of this system.  Knowledge of access control systems and door hardware are required, but the most important principal in play is the use of contact closure to signal multiple devices.


Exit Device Checklist

See also Exit Device Basics

Here are a few questions you need to be able to answer before you order exit devices:

  • Is the door made of wood, hollow steel, Fiberglas, aluminum and glass, or all glass?
  • Is the door is fire rated or non-fire rated?
  • Door width if single door or pair of doors with center mullion?
  • Door width and height if for a pair of doors without mullion?
  • Door thickness?
  • Exit device finish?
  • Will this be an exit-only device, or will there be outside trim?
  • If there is outside trim, what function is it?

It will save you time and aggravation if you know the answers to these questions before you call your hardware vendor.

You may also want one or more of these or other mechanical options:

  • Cylinder dogging (not available on fire rated devices)
  • Less bottom rod (for vertical rod exit devices)
  • Double cylinder (trim locked or unlocked from inside secured space)

There may also be electrified options:

  • Does the exit device need to have electrified trim?  If so, fail safe or fail secure?
  • Does the exit device need to have electric latch retraction?
  • Does the exit device need to have push pad or latch monitor switches?
  • Do you need a delayed egress exit device?

Save time and money by gathering the necessary facts before shopping for exit devices.

Interconnected Locks


Sargent 7500 Series Interconnected Lock

An interconnected lock is actually two locks that are connected by an assembly that retracts both the deadbolt and the latch simultaneously when the inside handle is turned.   This is done to fulfill the life safety requirement under NFPA 101 that egress should be accomplished by one motion with no prior knowledge necessary, and at the same time provide the user with the security of a deadbolt.  The same function could be provided by an entry function mortise lock, but interconnected locks are cheaper, since they are usually cobbled together out of (usually) a grade 2 cylindrical lock and a tubular deadbolt.

The history of the interconnected lock is a twisted, strange story of different companies reinventing the wheel with different distances between the centerlines, connected or separate latch/bolt assemblies with correspondingly different strike preps, and radically different hole patterns on both interior and exterior door surfaces.  The end result has been many, many doors and frames prepped for locks that are now irreplaceable.

Today, preps are much more standardized.

These are some of the interconnected locks available today and the measurements of their preps:

  • Falcon H Series – 4 inches CTC, 1-3/4 inch hold above, 2-1/8 inch hole below
  • Schlage H Series – 4 inches CTC, 1-1/2 inch hole above, 2-1/8 inch hole below
  • Schlage S200 Series – 4 inches CTC, 1-1/2 inch hole above, 2-1/8 inch hole below
  • Schlage CS200 Series – 4 inches CTC, 2-1/8 inch holes above and below
  • Sargent 75 Series – 4 inches CTC, 2-1/8 inch holes above and below
  • Yale 4800LN series – 4 inches CTC, 2-1/8 inch holes above and below

Replacing any of the locks above with any of the others would not present an enormous problem.


Sargent 7500 Series Door Prep

PS900 Series Schlage Electronics and Von Duprin Power Supplies Demystified

Von Duprin and Schlage Electronics are divisions of Ingersoll Rand. Both are major manufacturers of power supplies for use with electric locking systems and access control. As of January 1st, 2011, Ingersoll Rand discontinued two of their power supply product lines, the PS800 series Von Duprin and the Schlage Electronics 500 series, and merged them into the new PS900 series.

A split in power supply branding may or may not remain, depending on what document you are looking at, but whether they say they are Schlage or Von Duprin, they are all the same PS900 series.

Here is the lineup:

PS902 – 2 Amp output at 12 or 24VDC, field selectable

Compatible with these option boards:

  • 900-BBK: Battery Backup – back up power in case of power outage, includes batteries
  • 900-FA: Fire Alarm – relay for interface with fire alarm panel  – wires to main board
  • 900-2Q: 2 Relay QEL control Board – to run 2 Von Duprin QEL devices
  • 900-4R: 4 Relay Output Board – four relay outputs to operate 4 electric locking devices, not QEL or EL
  • 900-4RL: 4 Relay Logic Board – for man trap or security interlock systems or up to 4 QEL devices
  • 900-8F: Fused 8 Zone Distribution Board – 8 outputs, fused for circuit protection
  • 900-8P: PTC 8 Zone Distribution Board – 8 outputs, circuit breaker protected

PS902 can accommodate 1 of the above option boards in addition to the 900-FA option and battery backup.

For use with electric locks and with Von Duprin Quiet Electric Latch retraction (QEL) exit devices, but NOT with Von Duprin electric latch retraction (EL) exit devices.

PS904 – 4 Amp output at 12 or 24VDC, field selectable

Compatible with these option boards:

  • 900-BBK: Battery Backup – back up power in case of power outage, includes batteries
  • 900-FA: Fire Alarm – relay for interface with fire alarm panel  – wires to main board
  • 900-2Q: 2 Relay QEL control Board – to run 2 Von Duprin QEL devices
  • 900-4R: 4 Relay Output Board – four relay outputs to operate 4 electric locking devices, not QEL or EL
  • 900-4RL: 4 Relay Logic Board – for man trap or security interlock systems
  • 900-8F: Fused 8 Zone Distribution Board – 8 outputs, fused for circuit protection
  • 900-8P: PTC 8 Zone Distribution Board – 8 outputs, circuit breaker protected

PS904 can accommodate up to 2 option boards and battery back up.

Note:  no plug-in for fire alarm relay on main board.  900-FA is only usable with the PS904 if used with an option board.

For use with electric locks and with Von Duprin Quiet Electric Latch retraction (QEL) exit devices, but NOT with Von Duprin electric latch retraction (EL) exit devices.

PS906 – 6 Amp output at 12 or 24VDC, field selectable

Compatible with these option boards:

  • 900-BBK: Battery Backup – back up power in case of power outage, includes batteries
  • 900-FA: Fire Alarm – relay for interface with fire alarm panel  – wires to main board
  • 900-2Q: 2 Relay QEL control Board – to run 2 Von Duprin QEL devices
  • 900-2RS: 2 Relay EL Control Board – to run up to 2 Von Duprin EL devices
  • 900-4R: 4 Relay Output Board – four relay outputs to operate 4 electric locking devices, not QEL or EL
  • 900-4RL: 4 Relay Logic Board – for man trap or security interlock systems
  • 900-8F: Fused 8 Zone Distribution Board – 8 outputs, fused for circuit protection
  • 900-8P: PTC 8 Zone Distribution Board – 8 outputs, circuit breaker protected

PS906 can accommodate up to 3 option boards, fire alarm interface (with option board) and battery back up.

For use with electric locks and with up to 6 Von Duprin Quiet Electric Latch retraction (QEL) exit devices, but NOT with Von Duprin electric latch retraction (EL) exit devices.

PS914 – 4 Amp output at 12 or 24VDC, field selectable

Compatible with these option boards:

  • 900-BBK: Battery Backup – back up power in case of power outage, includes batteries
  • 900-FA: Fire Alarm – relay for interface with fire alarm panel  – wires to main board
  • 900-2Q: 2 Relay QEL control Board – to run 2 Von Duprin QEL devices
  • 900-2RS: 2 Relay EL control Board – to run up to 2 Von Duprin EL devices
  • 900-4R: 4 Relay Output Board – four relay outputs to operate 4 electric locking devices, not QEL or EL
  • 900-4RL: 4 Relay Logic Board – for man trap or security interlock systems
  • 900-8F: Fused 8 Zone Distribution Board – 8 outputs, fused for circuit protection
  • 900-8P: PTC 8 Zone Distribution Board – 8 outputs, circuit breaker protected

PS914 can accommodate 2 of the above option boards, plus fire alarm interface (on one of the boards) and battery back up.

Capable of powering:

  • Up to 4 Electric Latch retraction (EL) exit devices with 900-4RL board
  • Up to 2 EL devices with 900-2RS board
  • Up to 4 Quiet Electric Latch retraction (QEL) exit devices
  • Up to 4 Chexit (CX) delayed egress exit devices off the main board (use 900-8FA combination board if Fire Alarm relay is required)
  • Electric locks or strikes


Ordering Tips:

PS-914 is a 4 Amp power supply that is double the capacity of the old PS873, however, from my conversation with IR tech support, their feeling is that it is prudent to power no more than 4 EL devices per PS-914.  Theoretically the power supply could support as many as 8 EL devices however this presents the challenge of timing the relays so that no two can change states at the same time.  If two EL devices are powered up simultaneously the PS-914 could be damaged.

None of the PS900 series power supplies are a drop-in replacement for their predecessors, and the old and new option boards are not cross-compatible with the old and new power supplies.  Therefore, replacing old power supplies with new can present a rewiring challenge.

Ordering back-up batteries can be a little tricky, since they have very similar part numbers for the batteries, the charging circuit board, and a set that includes the board and the batteries.

  • 900-BAT – Pair of batteries only
  • 900-BB – Battery back up board only
  • 900-BBK – Power battery back up kit, board and batteries


The “Passage Set”

Often, when customers say they want a “passage set” they really want a cylindrical lock that actually locks.  This is because they don’t know (and often don’t want to know) cylindrical lock functions.   Therefore, the next question I ask is often, “How do you want this ‘passage set’ to work?”

Of course, “passage set” is the name of a cylindrical lock function.  The function of a passage set is that the latch can always be retracted by turning either handle.  It always latches but is never locked.   So when customers order a passage set with an electric strike, I am doubly suspicious.  Do they really want a passage set with that electric strike?

Passage sets are used in non-locking applications like corridors, closets and some offices, and in non-locking fire rated doors to meet the positive latching requirement for fire rated openings.

Therefore, if you want to sound intelligent as you order your cylindrical locksets, don’t call them passage sets unless they are.  Thank you.


Locking People In

I often get a request to help create a system that locks people in.  People want to lock children inside a daycare center, students inside a “Time-Out” room, babies inside a nursery in a maternity hospital or patients inside, for example, an Alzheimer’s disease in-patient facility for their own good.

“Well, what if there’s a fire?” I ask.

That’s really the issue.  If we are keeping them in, how are they supposed to get out in the event of a fire?  Yet, except when there is a fire or other emergency that renders the building unsafe, it is in their best interest if they are kept inside.

Often, people simply want to lock people in with an electromagnetic lock or other device.  Since this is certainly a violation of life safety code, any injury that may result would be uninsurable and could invite litigation.

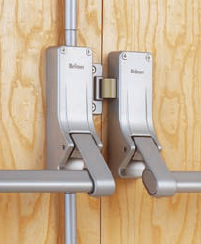
I discuss delayed egress systems in depth in another article (click here to read).     A delayed egress system is really the right way to do this, since it is actually covered in the NFPA 101A Special Locking Arrangements section of the fire safety code, but it is fairly inconvenient to use.  To get out without setting off an alarm users must use some kind of bypass request to exit switch like a keypad, card reader or key switch – much less convenient than, say, simply pushing a door open via the push pad on an exit device.

The gist of a delayed egress system is that, after a short ‘nuisance’ delay, the lock sounds an alarm for fifteen seconds and then lets the person out.  That means that authorities on the secured premises have fifteen seconds to get to the exit and prevent unauthorized egress.

Where unauthorized egress is not a life threatening prospect, therefore, a delayed egress system is perfectly adequate.  However, when a person’s life may depend on being kept inside their care facility, a more complex solution maybe required.

A great solution for Alzheimer’s or other dementia care facilities is the WanderGuard system by Stanley.  This system is designed for Alzheimer’s and other health care facilities where unscheduled patient departure is an issue, and covers other needs with fall monitoring and patient call capabilities.  Patients are fitted with bracelets that serve as tracking and communication devices.  As one might expect, such a system is not inexpensive and a bit on the overkill side for use in a day care center or maternity facility.  To physically keep people inside the facility, the WanderGuard system is designed to interface with delayed egress locks.

I think that the WanderGuard system would be a good choice for use in maternity ward nurseries as well.

The situation is more challenging when you have a day care center or a “Time-Out” room.

I had heard that Schlage was coming out with a mechanical time out lock, but a search as of today renders only the same Time-Out Room solution:  An electromagnetic lock with a momentary pushbutton.  The troublesome child is forced into a room, the door is shut, and then the teacher or other disciplinarian must physically press the momentary contact pushbutton to keep the magnetic locked locked.  As soon as the teacher lets go, the child is free.

As long as the button is momentary, I have no problem with this idea.  Should there be a fire or other life safety emergency, even if the teacher panics and runs away, leaving the child in the Time Out Room, the child will still be able to leave the room and exit the building.

The right way to prevent the kids in a daycare center from running out of the building and into the street without permission is with a delayed egress system.  True, it may be cumbersome to punch in a code on a keypad or present a proximity card for authorized egress, but delayed egress systems can be easily deactivated for periods of time, say, for drop off and pick up.  A delayed egress system is more expensive than, for example, an electromagnetic lock connected to the fire alarm system for safety.  But if you run the scenario of a fire in your mind, the fire alarm interface to the electromagnet malfunctions, panicked children and day care providers flinging themselves against an illegally locked door, too crazed with fear to think – suddenly a delayed egress system makes a lot more sense.

There is really only one place you can really lock someone in, and that’s in a jail or prison.  Otherwise there must be some provision to let them out – for safety’s sake.
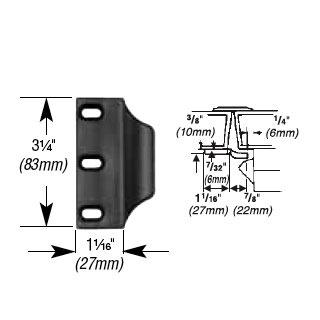
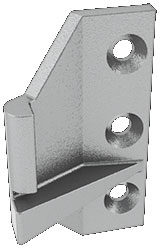
 

Low Voltage Detective Work


Finding the Current Drop


As electric locking systems become increasingly complicated, troubleshooting these systems has also become more complex.  Yet certain basic principles always apply.

Case in point, a customer had access control on a stairwell door using a fire rated mortise exit device with an electrified mortise lock.  The solenoid in the mortise lock had burned out twice and the third one, newly installed, was already too hot to touch.  Granted, a solenoid operated fail safe device used in a continuous duty application will get warm, but it should not get too hot to touch.  So they called me to help them figure out what was going on.

To find the problem, I first listed the possibilities:

  1. They had gotten three defective solenoids in a row
  2. The power supplied is the wrong voltage – if the voltage was either too high or low, that would cause the solenoid to heat up
  3. The current supplied is inadequate – the solenoid used 330mA.  If it were being supplied with only 150mA, for example, the solenoid would heat up.

We determined that 27 volts DC was available at the door to power the 24 volts DC solenoid – perfectly acceptable – and we all felt that it was rather unlikely that they had received three defective solenoids in a row.  So that left current drop.  Where was the current going?  What was preventing it from getting the current it needed?

The access control tech on site could not determine whether the solenoid was getting enough current at the door by using a meter (for whatever reason) so we traced the current back through the line.

The power supply was a 6 amp, 24 volts DC power supply that had an output board with 8 fused outputs.  If all were in use, then a max of 750mA should be available from each output, provided they all were carrying the same amperage load.  We determined that four of the outputs were being used:  three were used to power electric strikes at 300mA and one was used to power the electric mortise exit device at 330mA.  The sum of the current draw for all devices attached to the power supply was therefore about 1.2 amps – well within the power supply’s capacity.  Therefore the power supply size was not the problem.  The technician measured the output from the contacts that were connected to the mortise lock and found that they were outputting correct voltage and current.  Therefore the output board was not the problem.

Assured by the technician that the wire run between the power supply and the mortise lock was less than 100 feet and that 18 gauge wire was used, I knew that the wire run was not the problem.  I asked how power got from the door frame through the door and into the mortise lock.  The technician responded that power transfer was accomplished by use on an electric hinge.

Typical wire gauge in an electric hinge is 24 gauge – a thin wire to be sure, but since power only needs travel a few inches through it, hinge wire gauge is usually not a problem.  But this electric hinge had its own 3-foot wire lead threaded through a raceway in the door to the mortise lock.  Whereas a few inches of 24 gauge wire might not be a problem, I reasoned, three feet of it might be a problem.  We talked about it briefly and then agreed that they would give it a try.

To my dismay, they called back two hours later – after they had replaced the wire running through the door with 18 gauge wire and let the mortise lock run on it for a while – and let me know that this did not work either.

The answer finally came when I asked how the electric mortise lock was connected to access control and was told there was a controller in a box above the door.  The controller used a form C relay to turn the electric mortise lock on and off.  I suggested that the technicians check the relay to make sure it was working properly.  When they did they discovered that the electric mortise lock had been connected in series with another device.  This other device – whatever it was – drew enough current to deprive the mortise lock of the current it needed to operate without burning up.  Problem solved.

The moral of the story is that, yes, access control has only gotten more complex as time goes by, but by using simple, logical methods a good technician and figure out and repair most problems.  So stick with it and keep asking questions until you ask the right one.


And good luck!


Tags