You are currently browsing the Door Hardware Genius posts tagged: fail safe


The Time-Out Room

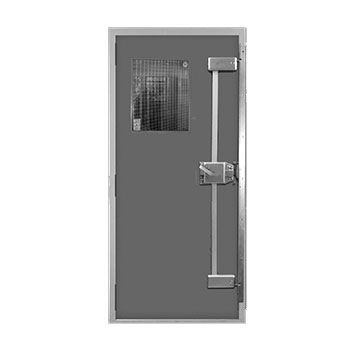
DormaKaba Stanley Best SSRL seclusion room lock.

The “Time-out Room,” also called a “Seclusion Room,” is, perhaps, a sign of our times. The purpose of a time-out room in a middle school or elementary school is to temporarily segregate an out-of-control student from the rest of the school population.  As you can imagine, the use of a seclusion room is heavily regulated, and regulations vary from state to state, city to city, and even institution to institution.  However, there are some common rules.  For example, such rooms are required to be equipped with a means to see and communicate with the student while they inside the room; the room must be free of objects and conditions that might be potentially dangerous; and the door must be unlocked from the inside.  The room must also be large enough for the student to lie down in without touching a wall, and must have a high enough ceiling that the student will not have to bend.

The purpose of the room is to let the student cool off and calm down before rejoining the school population.  It is not a holding cell.  Its purpose is less as a punishment than a behavioral tool.

What stops the student from leaving the seclusion room?  A person keeps them in.  A person must be present to observe and make sure the student is safe.  I venture to say that same person is the one who gets the student into the room in first place and keeps them there.  With no great stretch of the imagination, one might foresee instances in which the student to be secluded might be significantly bigger and stronger than the person responsible for keeping him and others safe.  It might be physically impossible for the responsible person to keep the student in the room.  They might need help.

The answer could be to put someone large, strong and well-versed in non-lethal martial arts with the patience of a saint in charge of the seclusion room duties, or it could be to use some kind of locking device to keep them in.  But, wait!  You can’t lock them in.  It’s against the rules.  How do you solve the problem?

Often the answer is an electromagnetic lock controlled by a normally open, momentary contact switch.  The magnet is only activated when the button is pressed.  As soon as the responsible person takes their hand off the button the mag lock is unlocked.  Often, local or institutional rules governing seclusion rooms require a time limit on seclusion.  One could add a timer to the system that would automatically release the electromagnetic lock after the permissible amount of time has expired.  Life safety code would demand that the magnetic lock be disabled by the fire alarm.

Pictured above is the Stanley Best SSRL seclusion room lock as seen under the Behavioral Health Products section at the bestaccess.com web site.  One must stand there and hold the lever in position to temporarily secure the door.  In photo we can see that the door is a hollow metal door in a hollow metal frame, and the door has a lite kit in it with wire glass.  I’ll bet it’s a heavy gauge, reinforced steel door, too, judging from the three-point locking version of the SSRL shown.  Clearly they expect trouble.  Through the window they can observe the student and make sure that they are safe.

Since we can see the knuckles of the hinges we know the door swings out.  This eliminates the need for a ligature-resistant handle on the inside of the door.   We’ll talk more about ligature-resistant hardware soon.


Sometimes you just need a little time.


locksnsafescom

Your source for quality security products with superior service!

Choosing a Delayed Egress System: Self-Contained, or Built from Components?

Delayed egress is a process that delays unauthorized exit from a space while complying with NFPA 101 life safety code.  Use of this process is strictly regulated with the help of building inspectors and fire marshals across the United Sates.  With that in mind it is always a good idea to get your local AHJ (Authority Having Jurisdiction) on board whenever you are planning to install delayed egress on an opening.

When you beginning planning your delayed egress system you will find that many systems on the market are self-contained.    These could be delayed egress electromagnetic locks or electrified delayed egress exit devices.

Here are some examples of self-contained delayed egress maglocks:

  • SDC 1511S
  • Schlage Electronics M490DE
  • Dynalock 3101C

Here are some examples of self-contained delayed egress exit devices:

  • Detex V40 EE
  • Von Duprin Chexit
  • Sargent Electroguard

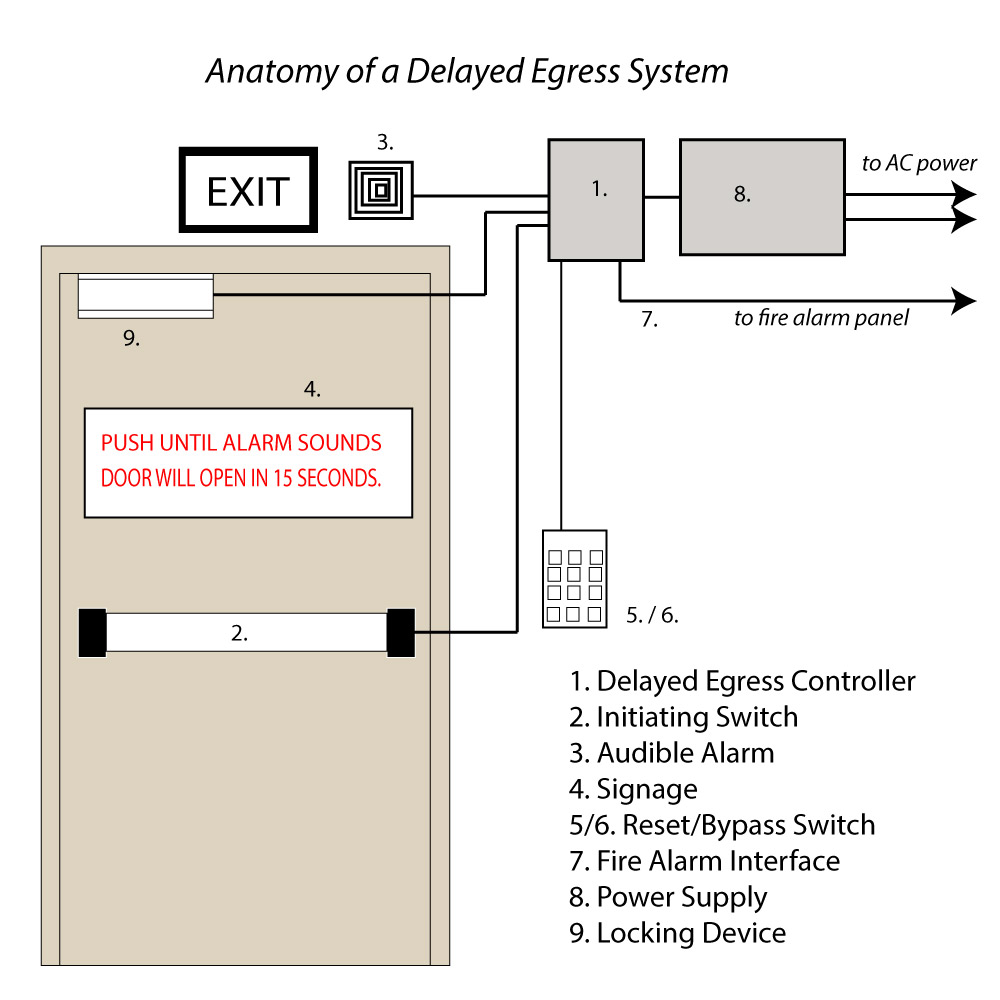
delayed-egress-anatomy
Almost all delayed egress systems are made up of the same components:

  1. Delayed egress timer and relay logic board
  2. Initiating Switch (to initiate the delayed egress process)
  3. Audible alarm
  4. Signage
  5. Reset switch
  6. Optional bypass switch
  7. Fire Alarm interface
  8. Power supply
  9. Locking device

Therefore it is possible to construct a custom delayed egress system from components.  Later I’ll talk about why you might want to choose a built-from-components delayed egress system instead of a self-contained one.   The following sections describe each part of a built-from-components delayed egress system.

Delayed Egress Timer and Relay Logic Board

This board is UL Listed and specifically designed to perform all delayed egress functions in compliance with life safety code.   Here are some examples of component boards for delayed egress:

  • Securitron XDT-12 or XDT-24
  • Seco-Larm SA-025EQ

The board is the brains of the delayed egress operation.  It has contacts to wire in switches for delayed egress initiation, fire alarm interface and system reset, timers to control nuisance and egress delay, and relays to control locks and notify external devices.

There are also delayed egress controllers that offer more features.  The following may include the delayed egress timer/relay board and some other required feature(s) such as the initiation switch or the audible alarm.

  • Alarm Controls DE-1
  • Security Door Controls 101-DE
  • Securitron BA-XDT-12 or BA-XDT-24

Initiating Switch

The switch that initiates the delayed egress process shares several characteristics with any request-to-exit switch.  To comply with life safety regulations it must require no prior knowledge to operate; it must require no more than one motion to operate; and it must be placed in relation to the door according to life safety standards in your local jurisdiction.  I think that the best possible initiation device is a mechanical push bar with a switch, such as the Adams Rite 8099-M or the Securitron EMB.  In a panic situation it remains obvious that to get out, one must push on the bar, and because it is mechanical it is unaffected by power outage.  If it is wired to open the contact when pushed, if the wires leading to it are cut it will initiate the delayed egress process.

In rare circumstances where it might be permitted, the locking device might be a fail safe electrified mortise lock that is locked on both sides, inside and out.  Then the initiation switch might be a palm switch next to the door.

Audible Alarm

The mandatory audible alarm sounds for 15 seconds before the delayed egress controller releases the locking device to allow exit.  It’s loudness must be between 81 and 88 decibels.  In some jurisdictions the alarm must be manually reset at the door; in others it may be self resetting via timer or door position switch.  Yet another reason to have a heart-to-heart talk with your local AHJ when designing your delayed egress system.

Signage

The wording on the mandatory sign must comply with life safety code.  There are minor variations in wording.  I suggest buying a sign that is part of a delayed egress system.  The sign that comes standard with the Von Duprin Chexit is readily available as a separate part.

Reset Switch

As mentioned in the “Audible Alarm” section above, a delayed egress system reset switch located at the door is mandatory in some jurisdictions.  Check with your local AHJ.  In some jurisdictions delayed egress systems are allowed to be reset by remote switch or other means, such as a door position switch.

Any kind of momentary contact switch will do the reset switch job, but delayed egress system reset switches located at the door almost always require some kind of security to prevent unauthorized resetting.   Standalone keypads or key switches are often used for this purpose.  Delayed egress systems can also be integrated into existing access control.

Optional Bypass Switch

Not required but often needed, the optional bypass switch allows authorized personnel to exit without triggering the delayed egress system.  Again, any momentary contact switch will do, but usually some security is required.  If you are using a keypad as the system reset switch and the keypad has more than one relay, you can program the second relay to be the bypass switch.

If access from the exterior side is required a bypass switch is required on that side.  Sometimes security is not needed from the exterior side.  In that case a simple momentary contact pushbutton will do the job.

Fire Alarm Interface

The mandatory fire alarm interface allows enables fire alarm panel to deactivate the delayed egress system immediately in the event of a fire alarm.  This is an integral part of the life safety code that allows a delayed egress system to exist.  Therefore, if your building does not have a fire alarm panel, without special permission from the local AHJ you cannot have a delayed egress system.

Power Supply

All delayed egress systems I have had experience with run on low voltage power that comes from a low voltage power supply.  Generally delayed egress systems require regulated and filtered power at 12 or 24 volts.  Delayed egress controllers draw very little current, but as will all electrically operated systems, the current draw of all attached devices must be taken into account when selecting a power supply.

Locking Device

The locking device must be electrically locked and fail safe from the egress (interior) side.  The most frequently used locking device in a component based delayed egress system is the electromagnetic lock.

Why Build a Delayed Egress System?

Why would you put together a delayed egress system from components when there are so many good self-contained systems?

  1.  To Save Money.  Piecing together a delayed egress system can be significantly cheaper than buying a self contained delayed egress system.
  2.  To take advantage of existing hardware.  For example, if there is already an electromagnetic lock on the door, adding the other components is relatively easy.
  3. Conditions at the door prohibit use of a self contained delayed egress system.  For example, door size or the presence of existing hardware may require the installer to seek a more creative solution.


Bottom line, unless you have a prison, you cannot lock ’em in.  Well, not without permission.  🙂

Compact Electric Strikes

A common problem with installing electric strikes is cavity depth – that is, how deeply you need to cut into the frame (or wall) so that the electric strike will fit. For most of the twentieth century electric strikes were, and most still are, designed without consideration for this factor. Instead they are designed for burglary resistance and durability.

VD6211

Von Duprin 6211 Electric Strike

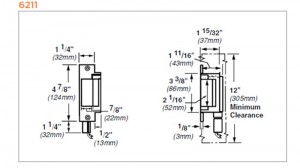
Click on  the dimensional diagram of the Von Duprin 6211 electric strike at right.   You can see that its total depth is 1-11/16 inches. All of its internal parts are heavy duty, and it has a heavy cast body and a thick, finished face plate. Most of the parts are individually replaceable. To install the 6211 in a hollow metal door frame, the dust box must be removed and often material inside the door frame – sheet rock, wood, masonry, whatever – must be removed in order to accommodate the strike. If the strike must be installed in a grouted door frame the installer is in for perhaps an hour’s worth of work that may involve a masonry drill, a 2-1/2 lb. sledge hammer, a masonry chisel and safety goggles.

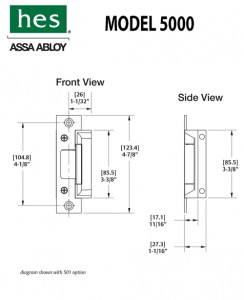
HES 5000 Dimensional DrawingsIn more recent years a new generation of low profile (shallow depth) electric strikes has become available, offering unprecedented ease of installation. The HES 5000 (illustration at left) was one of the first strikes on the scene to offer a depth of only 1-1/16 inches, and advertised that it could be installed without even removing the dust box from the frame. I have found it is usually much easier to knock out the dust box for wiring reasons, but it is true that the unit will fit neatly inside most original equipment dust boxes in hollow metal frames.

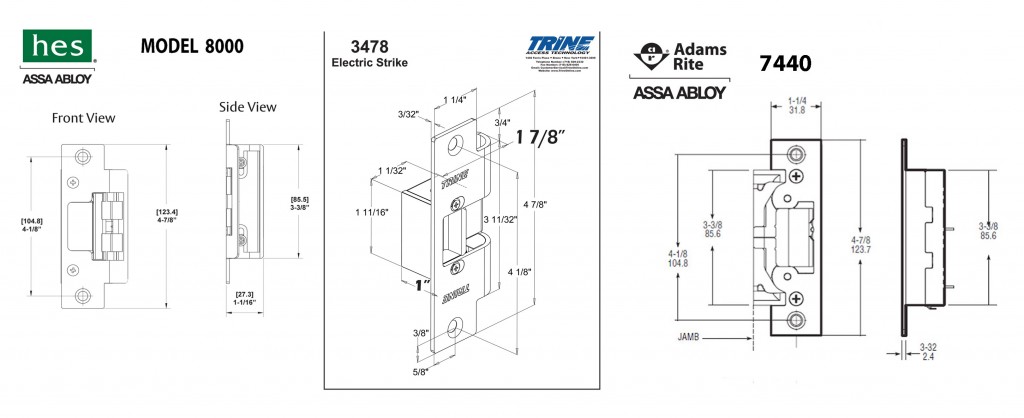
More recent offerings in the shallow depth electric strike department include the Trine 3478, the HES 8000 and the Adams Rite 7440, illustrations shown at the end of this article.  All are UL Listed burglary resistant. The HES 8000 offers 1500 lbs. holding force, the 3478 offers 1200 lbs. holding force and the Adams Rite, with its innovative double keeper design, offers 2400 lbs. of holding force.  The Trine 3478 offers an install with a very tiny lip cutout, and the HES 8000 offers the advantage of needing no lip cutout at all. Each of them fit in a strike cavity only 1-1/16 inches deep.

These strikes have revolutionized electric strike installation. Before, a good installer might install six or ten electric strikes in a day. Now a really fast installer might be able to install 20 or more, greatly reducing labor and other costs associated with installation.

What’s the Trade-Off?

None of the internal parts of these strikes are available. When these strikes break, you throw them away and buy new ones. Also they do not last as long. Whereas it is not unusual to see a Von Duprin 6211 or a Folger Adam 712 still in use after 10 or even 20 years, 6 years of service is a long time for a low profile strike. In ten years you might be replacing a spring or solenoid in a Von Duprin, but you might be installing your second or third low profile strike in the same door frame in that same amount of time. This is a small inconvenience.

Upon installing that third strike in the same hole, you probably will not yet have equaled the price of a single Folger Adam 712 or Von Duprin 6211. If price up front is the primary consideration, low profile is definitely the way to go. But if in about 12 years you are installing the fourth replacement strike in the same prep, those expensive, harder-to-install, heavy duty strikes start to look like a much better value.

strikethree

HES model 8000, Trine model 3478 and Adams Rite model 7440

Thank you.

Securitech Lexi Electrified Exit Device Trim

Great Problem Solver

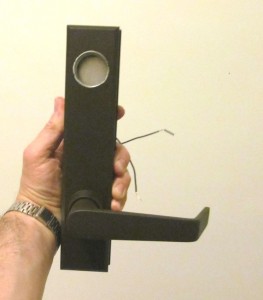
The Securitech Lexi series retrofit exit device trim is available with a variety of back plates and adapters that allow it to be used with most major brands, including many surface vertical rod and concealed vertical rod exit devices.  Compatibility with a variety of vertical rod devices is a major plus.

I mean, anybody can electrify a rim exit device by simply installing an electric strike.  However, while it is possible to install an electric strike on a vertical rod device it rarely brings a good result.  First of all, in order to use an electric strike you have to first lose the bottom rod.  That just leaves one latch at the top of the door to provide all the security.  If it is a tall door or a flexible door – like an aluminum storefront door – you can pull the bottom open several inches with just that top latch holding it.  Add a little time and a little hinge sag and pretty soon you have no security at all.

The other solution is electric latch retraction, or electric latch pullback, as some manufacturers call it:  relatively expensive compared with a Lexi trim.  Also, electric latch retraction is a fail secure only solution when locking trim is used and therefore may be inapplicable to fail safe installs such as stairwells, unless passage function (always unlocked) trims are used.

I notice that right out of the box the Lexi is very self contained.  Other than a tiny box containing mounting screws, tailpiece operators, and a cylinder collar and cam, what you see is pretty much what you get.  It’s pretty hefty for its size – it is designed on the slim side so as to be usable on narrow stile as well as hollow metal or wood doors.   This does mean that the installer may have to be a little creative when replacing a larger exit device trim with the Lexi.

Installation instructions are easy to follow and short – only four pages, including the template. Something I would have liked to see in the instructions, but didn’t, was current draw.  If I am installing one of these, the number of amps it draws are not going to matter much to me.  But if I am installing twenty of them and want a centralized power source, now it’s an issue.  Yet it isn’t anything that an experienced low voltage specialist with a ammeter can’t find out in two seconds.

One of the great innovations I noticed right away is the rotation restriction clip that allows the installer to customize tailpiece rotation to the exit device.  I do not think that this is handled better by any other manufacturer.  Correct degree of rotation often determines whether a trim will work or not, and to have a trim that has degree of rotation so easily selectable is damn nice.

As mentioned in the sales literature, since Securitech’s Lexi trim is compatible with so many exit devices, if you have a facility with different brands of exit devices dispersed throughout, you can install access control and unify the exterior appearance at the same time.  And in addition to being versatile it is also durable.  Forcing the lever only causes its internal clutch to break away, and it can easily be set right by rotating it back the other way.

All in all the Securitech Lexi trim seems to be a well built, versatile problem solver.  I think you’ll find it useful in many access control installations.

Multi-function Doorways, Part Two

Secured stairwell doors are among the most basic multi-function door applications.  In most jurisdictions they must (usually)* be both unlocked and positively latched in the event of a fire.  Unlocked so that if a person, fleeing into the stairwell during a fire, finds the stairwell full of smoke, they can safely exit the stairwell.  Positively latched so that the door will remain latched closed against the spread of the fire.

Until there is a need for access control, a passage function mortise lock, cylindrical lock with UL listed latch or exit device with passage function trim are fine.  The application begins to get interesting when the need arises to lock a stairwell door.

Right up front, electric strikes are out of the question because of the unlocked/positive latching requirement mentioned above.   It is not possible to positively latch a door when the electric strike is unlocked.  There is no such thing as a fire rated, fail safe electric strike.  If you configure a fire rated electric strike to be fail safe it voids the fire rating.

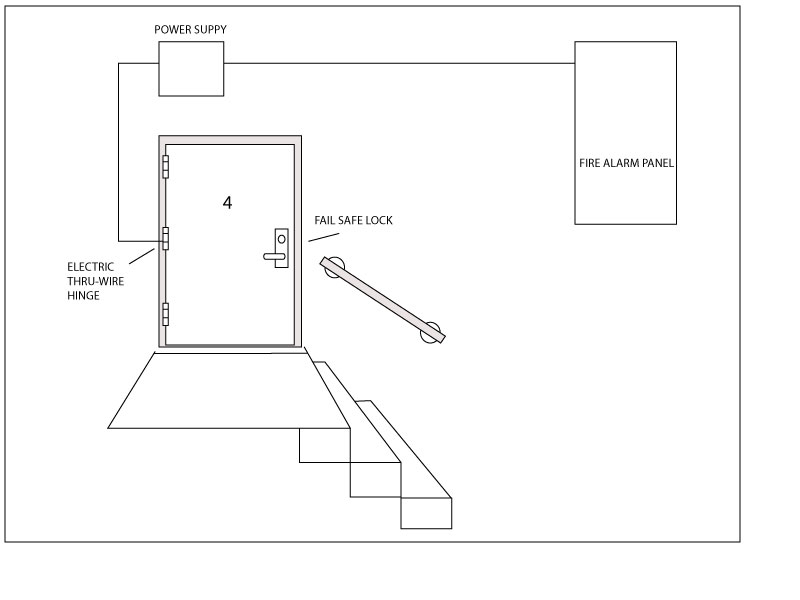
Since electric strikes are unusable for this application, that leaves either electric locks or electromagnetic locks.  Both have advantages and disadvantages.  Fail safe electric locks positively latch whereas mag locks allow the installer to us the existing hardware on the door to accomplish positive latching.  Electric locks require running wire through the door and some means of getting the wire from the frame into the door, such as an electric through-wire hinge.  Not all inspectors like electromagnetic locks, so before you install them be sure to check with your local Authority Having Jurisdiction (AHJ ) – that is, Fire Marshal or Building Inspector.

If the stairwell door already has a fire rated exit device installed, there is probably a fail safe electrified trim available for it.  Once again, this means an electric through-wire hinge or other power transfer device would be required.  Sometimes existing exit devices are incompatible with the electrified trims available for that brand and model of device.  If that is the case, the exit device might have to be replaced with one that is compatible with electrified trim.

Alternatively, there are after market request to exit (a.k.a. RX) switches available for most exit devices.  One could be used to release an electromagnetic lock on the stairwell door.

Usually it is required that all electric locking devices on stairwell doors be controlled by the fire alarm panel.  When the fire alarm is in a state of alarm, it unlocks all the stairwell doors.  Two conductor wire is run from the fire alarm panel contacts to a special fire alarm relay in the power supply that powers the electric locks on the stairwell doors.  The alarm panel opens the circuit, causing the state of the fire alarm relay to change, thus powering down the fail safe locks and thereby leaving them unlocked.

An important detail:  technically speaking, according to most building and life safety codes, fire rated doors can only be modified in a fire rated shop.  Therefore if you field cut a raceway for an electric wire through the cross members of the door, for example, you are probably voiding the fire rating.  I have never heard of anyone being called on this, but it is good to keep in mind.  Just like it is good to keep in mind that the AHJ has total authority over what you can or can’t install.  Best make sure you’re on the same page with her or him, otherwise they do have the power to make you remove what you installed and replace both door and frame to repair the damage.

Happy hardware and good luck to you.


*Some jurisdictions specify that not all stairwell doors need be unlocked in the event of a fire, only certain doors.  For example, I have known some places where code was the door had to be unlocked at every fourth floor.  Check with your local AHD to find out what the rules are for your location.


Low Voltage Detective Work


Finding the Current Drop


As electric locking systems become increasingly complicated, troubleshooting these systems has also become more complex.  Yet certain basic principles always apply.

Case in point, a customer had access control on a stairwell door using a fire rated mortise exit device with an electrified mortise lock.  The solenoid in the mortise lock had burned out twice and the third one, newly installed, was already too hot to touch.  Granted, a solenoid operated fail safe device used in a continuous duty application will get warm, but it should not get too hot to touch.  So they called me to help them figure out what was going on.

To find the problem, I first listed the possibilities:

  1. They had gotten three defective solenoids in a row
  2. The power supplied is the wrong voltage – if the voltage was either too high or low, that would cause the solenoid to heat up
  3. The current supplied is inadequate – the solenoid used 330mA.  If it were being supplied with only 150mA, for example, the solenoid would heat up.

We determined that 27 volts DC was available at the door to power the 24 volts DC solenoid – perfectly acceptable – and we all felt that it was rather unlikely that they had received three defective solenoids in a row.  So that left current drop.  Where was the current going?  What was preventing it from getting the current it needed?

The access control tech on site could not determine whether the solenoid was getting enough current at the door by using a meter (for whatever reason) so we traced the current back through the line.

The power supply was a 6 amp, 24 volts DC power supply that had an output board with 8 fused outputs.  If all were in use, then a max of 750mA should be available from each output, provided they all were carrying the same amperage load.  We determined that four of the outputs were being used:  three were used to power electric strikes at 300mA and one was used to power the electric mortise exit device at 330mA.  The sum of the current draw for all devices attached to the power supply was therefore about 1.2 amps – well within the power supply’s capacity.  Therefore the power supply size was not the problem.  The technician measured the output from the contacts that were connected to the mortise lock and found that they were outputting correct voltage and current.  Therefore the output board was not the problem.

Assured by the technician that the wire run between the power supply and the mortise lock was less than 100 feet and that 18 gauge wire was used, I knew that the wire run was not the problem.  I asked how power got from the door frame through the door and into the mortise lock.  The technician responded that power transfer was accomplished by use on an electric hinge.

Typical wire gauge in an electric hinge is 24 gauge – a thin wire to be sure, but since power only needs travel a few inches through it, hinge wire gauge is usually not a problem.  But this electric hinge had its own 3-foot wire lead threaded through a raceway in the door to the mortise lock.  Whereas a few inches of 24 gauge wire might not be a problem, I reasoned, three feet of it might be a problem.  We talked about it briefly and then agreed that they would give it a try.

To my dismay, they called back two hours later – after they had replaced the wire running through the door with 18 gauge wire and let the mortise lock run on it for a while – and let me know that this did not work either.

The answer finally came when I asked how the electric mortise lock was connected to access control and was told there was a controller in a box above the door.  The controller used a form C relay to turn the electric mortise lock on and off.  I suggested that the technicians check the relay to make sure it was working properly.  When they did they discovered that the electric mortise lock had been connected in series with another device.  This other device – whatever it was – drew enough current to deprive the mortise lock of the current it needed to operate without burning up.  Problem solved.

The moral of the story is that, yes, access control has only gotten more complex as time goes by, but by using simple, logical methods a good technician and figure out and repair most problems.  So stick with it and keep asking questions until you ask the right one.


And good luck!


Fail Safe and Fail Secure Electric Locking Devices

Definition

Basically:

  • Fail Safe = power off, it’s unlocked
  • Fail Secure = power off, it’s locked

Electric locking devices include:

  • Electric strikes
  • Electromagnetic locks
  • Electromechanical locks
  • Electrified exit devices

Most electric strikes are sold fail secure by default. For example,
if you order a Von Duprin 6123 24V US32D, and architectural grade 1
electric strike, it will most likely come fail secure regardless if
it has Von Duprin’s “FSE” (standing for fail secure) in the part number
or not. The part number in the Von Duprin price book does not include
“FSE.” To be sure you are going to get a fail safe electric strike (not
the norm) if that is indeed what you want, in this instance you would
include Von Duprin’s abbreviation for fail safe, “FS”, for example,
6123 -24V-FS-US32D.

All electromagnetic locks are fail safe because they are always
unlocked when disconnected from the power source. Using a battery
back-up does not make an electromagnetic lock fail secure because
the magnet would still be unlocked if the power was disconnected.
Later in this article it should become apparent why this detail
is important for reasons of life safety.

Electromechanical locks include standard cylindrical or mortise
locks that have been electrified and locks that are designed to
only work electrically, such as an electric bolt lock. They are
sold in equal amounts fail safe and fail secure.

Electrified exit devices come in a variety of functions, including
those with electric latch retraction and those with electrified outside
trim control. Electric latch retraction devices are fail secure whereas
exit devices with electrified exterior trim control might be either
fail safe or fail secure.

Application

Electric Strikes

Fail safe electric locking devices are used wherever doors must remain
unlocked in the event of a fire or other life safety emergency. If
the opening is fire rated, it must be positively latched by a fire
rated device in the event of a fire. Therefore there is no such thing
as a fire rated fail safe electric strike because if the power were
off (as it might very well be during a fire) the door would not be
positively latched. If you install a fail safe electric strike on
a fire rated opening, the inspector can require you to replace the
entire doorframe.

Technically, fire rated door frames cannot be modified in the field,
but must be prepared for hardware (including architectural grade electrified
hardware) in a fire rated shop. I have never heard of this being enforced,
nevertheless, the AHD (Authority Having Jurisdiction) could enforce
it, so if you plan to modify a fire rated opening in any way it might
be a good idea to get the local fire marshal on board during the planning
stages.

In general, a fail safe electric strike is a good choice for a “non-fire-rated
door that must be unlocked in the event of an emergency other than
a fire” kind of application.

Fail secure electric strikes are a good choice for exterior or other
non-fire-rated doors where remote release or electronic access control
is needed. They are pretty reliable, usually not difficult to install,
and relatively inexpensive. One of the chief disadvantages of an electric
strike is that, on out-swinging doors, they provide an opening into
which a burglar can insert a tool, such as a tire iron, to pry directly
on the locking device. A latch guard is a minimally effective deterrent
to this kind of attack.

(Exterior doors are almost never fire rated, and if they are, usually
it is because all the doors on the job were ordered to the same spec,
not because they have to be.)

Electromagnetic Locks

Some inspectors and fire marshals just don’t like electromagnetic
locks. This is another reason to get your local AHD on board from
the start. But if your AHD is not an obstacle, a mag can be a good
solution for existing fire rated doors with existing fire rated hardware
on them. The fire rated hardware can stay to keep the door positively
latched in the event of a fire, and the mag is inherently fail safe,
so it could be a good choice for stairwell doors, greatly simplifying
the application. The problem with mag locks is that they lock both
sides of the door simultaneously. That means you have to deal with
both a means to get in (access control) and a means to get out (presence
detector and redundant exit pushbutton, for example).

If the door already has an exit device, it is probably possible to
install a request-to-exit (RX) switch in the bar to allow exit by
a fully mechanical means – a factor which might make the AHD happier
with the installation. The AHD will also want to know that all electromagnetic
locks are wired so that the fire alarm will cut power to them in the
event of a fire.

Since a mag lock does not positively latch, it cannot be legally
used alone on a fire rated door. There must be a fire rated positively
latching mechanism in addition to the mag.

Delayed egress electromagnetic locks can also be used for access
control on egress doors while helping to prevent unauthorized exit.
For more information on delayed egress, please visit:

Electromagnetic locks are not too expensive and are very easy to
install. Because they are inherently fail safe, you may want to install
a battery back-up system so that they remain locked during routine
power outages.

Electromechanical Locks

Fail safe electrified standard locks are ideal for stairwell doors
(unless they already have exit devices) because they remain positively
latched when unlocked. Many states and localities require that stairwell
doors be unlocked in the event of a fire, and because all interior
stairwell doors are fire rated, they must also remain positively latched.

In order to replace a standard mechanical lock with an electrified
one, a raceway must be drilled through the door from lock side to
hinge side so that wire can be run to power the lock. If you guessed
that, technically speaking, this voids the fire rating on a fire rated
door, you were correct. Be sure to clear all modifications to fire
rated openings in advance with the local AHD.

Electric bolts are usually used as a last resort when no other application
will work, such as when retrofitting access control to automatic sliding
doors. Electric bolts are most commonly used in prisons, where egress
concerns are treated rather differently than commercial applications.
They can also be used in place of electromagnetic locks, however electric
bolts designed for commercial (rather than detention) applications
are less secure, less durable and more difficult to install than mag
locks.

Electrified Exit Devices

If a door has an existing exit device or an architect has specified
an exit device for an opening, it is because the capacity of the building
in terms of the number of people therein warrants the use of an exit
device. Therefore it is unwise to replace an exit device with another
kind of hardware.

Luckily, many exit devices can be electrified in the field either
by replacing internal parts of the device or by adding an electrified
trim (outside handle or lever).

As I mentioned earlier, exit devices can be electrified in one of
two ways:

  • Electric latch retraction
  • Electrified outside trim

Since electric latch retraction is always fail secure, it might not
be a good choice for stairwell doors unless it was always unlocked
from the stairwell side. If that were the case, the only probable
purpose for the electric latch retraction would be to unlatch the
door for a power operator (automatic door opener).

Electric latch retraction is ideal on exterior pairs of doors where
fail secure access control is required. Since exterior pairs of doors
are often equipped with concealed vertical rod exit devices, installing
electric latch retraction is often the easiest and best alternative.
Electric latch retraction (or electric remote dogging) is also very
compatible for use with power operators.

The down side of electric latch retraction, in addition to being
expensive in its own right, is that it often requires a special and
expensive power supply. Sargent 56 prefix exit devices are an exception,
requiring only a minimal power supply for activation.

Fail safe electrified exit device trim is a good alternative for
stairwell doors whether they already have an exit device or not. For
one thing, since the wire powering the trim is run through the exit
device, no modification of the fire rated door is necessary.

Electrified exit device trim is also available fail secure, and is
often a less expensive alternative to electric latch retraction where
simple access control is the goal.

Note on “Continuous Duty”

I have been asked, ‘What is the difference between fail safe and
continuous duty?’ Fail safe applies to the function of the device
as described above whereas continuous duty simply means the strike
is built to be constantly powered if so required. The confusion arises,
I think, because all fail safe locking devices are continuous duty.
This is because a fail safe device must have power to be locked. Fail
secure electric strikes that are connected to a timer and powered
all day to remain unlocked also must be continuous duty rated. Therefore,
not all continuous duty electric strikes are fail safe, but all fail
safe strikes are continuous duty.

Rule of thumb: almost every kind of electric locking device that
runs on DC current is continuous duty.

Tags