You are currently browsing the Door Hardware Genius posts tagged: builders hardware


The Double Door Rim Strike – A.K.A. “The Pocket Ripper”

pocketripper
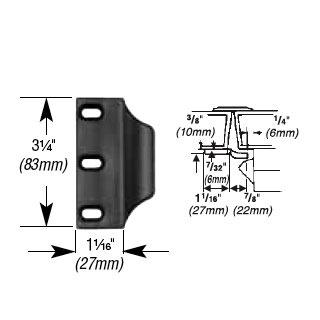
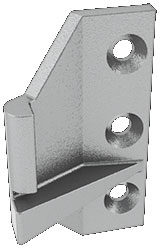
One of the hallmarks of bad hardware choices is the “pocket ripper” strike, used on a pair of doors when there is an inactive leaf with flush bolts or a vertical rod exit device and an active leaf with a rim exit device. Whenever I see this I think, “Cheap bastard,” because the only reason for this half fast solution is money and the desire not to spend it on doing the job right.

This lovely piece of hardware earned the nickname, “pocket ripper,” but hanging into the opening at a convenient height to catch the front pocket of a pair of trousers, resulting in egregious damage to said pocket and colorful language on the part of the victim.

What is the right way to secure a pair of doors? Vertical rod exit devices are the best. My second choice would be a mortise exit device with an open back strike and a vertical rod exit device on the inactive leaf. My third choice would be a mortise exit device with flush bolts on the inactive leaf.

Below are a couple of examples of the ‘pocket ripper.’   On the left is the classic Von Duprin 1609 strike and on the right an example from Ingersoll Rand in Europe.  The European version looks like it has better manners.

In the center we have the Hager 4921 strike that really looks like it could take out more than just a pocket if you catch it the wrong way.

image001image002hager


In addition, I find that often the rim latch stops dead before latching on the strike.  Also, depending on how you install the rim device, the latch may drag across the edge of the other leaf, scraping an ugly divot over time.  Yes, all in all a hardware choice to be avoided if you can.


Securitech Lexi Electrified Exit Device Trim

Great Problem Solver

The Securitech Lexi series retrofit exit device trim is available with a variety of back plates and adapters that allow it to be used with most major brands, including many surface vertical rod and concealed vertical rod exit devices.  Compatibility with a variety of vertical rod devices is a major plus.

I mean, anybody can electrify a rim exit device by simply installing an electric strike.  However, while it is possible to install an electric strike on a vertical rod device it rarely brings a good result.  First of all, in order to use an electric strike you have to first lose the bottom rod.  That just leaves one latch at the top of the door to provide all the security.  If it is a tall door or a flexible door – like an aluminum storefront door – you can pull the bottom open several inches with just that top latch holding it.  Add a little time and a little hinge sag and pretty soon you have no security at all.

The other solution is electric latch retraction, or electric latch pullback, as some manufacturers call it:  relatively expensive compared with a Lexi trim.  Also, electric latch retraction is a fail secure only solution when locking trim is used and therefore may be inapplicable to fail safe installs such as stairwells, unless passage function (always unlocked) trims are used.

I notice that right out of the box the Lexi is very self contained.  Other than a tiny box containing mounting screws, tailpiece operators, and a cylinder collar and cam, what you see is pretty much what you get.  It’s pretty hefty for its size – it is designed on the slim side so as to be usable on narrow stile as well as hollow metal or wood doors.   This does mean that the installer may have to be a little creative when replacing a larger exit device trim with the Lexi.

Installation instructions are easy to follow and short – only four pages, including the template. Something I would have liked to see in the instructions, but didn’t, was current draw.  If I am installing one of these, the number of amps it draws are not going to matter much to me.  But if I am installing twenty of them and want a centralized power source, now it’s an issue.  Yet it isn’t anything that an experienced low voltage specialist with a ammeter can’t find out in two seconds.

One of the great innovations I noticed right away is the rotation restriction clip that allows the installer to customize tailpiece rotation to the exit device.  I do not think that this is handled better by any other manufacturer.  Correct degree of rotation often determines whether a trim will work or not, and to have a trim that has degree of rotation so easily selectable is damn nice.

As mentioned in the sales literature, since Securitech’s Lexi trim is compatible with so many exit devices, if you have a facility with different brands of exit devices dispersed throughout, you can install access control and unify the exterior appearance at the same time.  And in addition to being versatile it is also durable.  Forcing the lever only causes its internal clutch to break away, and it can easily be set right by rotating it back the other way.

All in all the Securitech Lexi trim seems to be a well built, versatile problem solver.  I think you’ll find it useful in many access control installations.

Hardware Preparedness

Preparedness for the Commercial Door Hardware Installer

One of the most time consuming aspects of hardware installation is travel to and from the job.  In a perfect world, the installer knows in advance everything they will need, but as we all know, the World of Hardware is not a perfect one.   Often there is no opportunity to survey the job beforehand and the information given by the client is often either sketchy or nonexistent.   As a result, travel time to and from is often doubled or tripled by the necessity to ‘go back to the shop’ to pick up the parts needed to complete a given job.  A certain amount of travel time is billable, nevertheless your customer is not happy paying for it, trust me.

While it is virtually impossible for a hardware or access control installer to be always prepared for every need, here are some items that go a long way toward helping to reduce travel time that results from a lack of parts.

Generally Speaking

The first rule of hardware preparedness is to pay attention.  What kind of hardware does your customer have, and what do they have that tends to break?  If your customer has a building full of mortise locks will swivel spindles, best keep a few of those spindles on the truck because you know they are going to break in the middle.  If your customer has entrances with Doromatic 1690 or 1990 concealed vertical rod devices, you’d better stock a few pinion cams because you know the teeth are going to break off of them.  Whenever you repair anything that looks like it’s poorly made and notice there is a quantity of it on the property, best carry what you need to fix it.

If you are doing a lot of work for a client and they have a particular kind of lock, be sure to stock a few.  The property manager will be impressed when you triumphantly produce one from your service vehicle in the nick of time.

Fasteners

You know what fasteners you often find missing in action.  Undercut flat Philips head 12-24 1/2-inch self tapping hinge screws, for example.  In an emergency they can double as ANSI strike screws.  Collect those 6-32 3/4-inch combination machine/wood screws from tubular and cylindrical lock latch and bolt fronts.  They can double as screws for a mortise lock armor front if you cut them short.   For aluminum doors it can be very handy to carry some 10-32 x 2-inch flat head Philips machine screws, and its always good to have a few universal mounting tabs around just in case.

Other Stuff

On the electrical side it’s always good to have a SPDT relay, one each of a 12vdc and 24vdc 1-Amp plug-in power supply and a 4-1/2 x 4-1/2 4-wire electric power transfer hinge in satin chrome are all things that one tends to find oneself wishing for on the job; the Securitron TM-9 timer module sure does come in handy sometimes; on the lock frontier it’s always good to have a few cheap replacement cylinders for emergencies; and a full surface reinforcing pivot hinge can be a life saver sometimes, though because they are handed you do have to carry both hands for the full prophylactic effect.

In addition to these common sense items there are a couple of products that can save a parts run, too.

LCN 4040XP

The 4040XP in the RW/PA configuration (by the LCN Door Closer division of Ingersoll Rand) is a non-handed door closer like many others that can be installed in either regular, top jamb or parallel arm mount.  Its adjustable spring tension makes it a perfect choice for doors that require a lot of force to close due to wind or other conditions, or for an ADA compliant opening that must open with minimal resistance.  If the installer carries the closer and the 4040-18, 4040-18PA and 4040-18TJ drop plates, they will be able to install the 4040XP on almost any door.  The most popular finish of the 4040XP is 689 aluminum.

HES Electric Strikes with Faceplate Options

Hanchett Entry Systems (HES) has greatly advanced the concept of the modular electric strike since the company was founded.

  • The HES 1006 is field selectable for 12 or 24 volts DC power input, and with an optional Smart Pac line conditioner you can use anything from 12 to 32 volts AC or DC.   A variety of available faceplates for the 1006 enable the strike to accommodate virtually any lock.   Carrying a 1006 body with one each J option, K option, KD option and KM option faceplates and one Smart Pac will allow the installer to fill the need for an electric strike for 95% of all storeroom function cylindrical and mortise locks where the installation involves a hollow metal frame.
  • The HES 5200 is field selectable for 12 or 24 volts DC power input and any power input from 12 to 32 volts AC or DC with a Smart Pac.  Unlike the 1006, the 5200 is field selectable for fail safe or fail secure.  Since the 5200 has a three quarter inch keeper depth it will accommodate a mortise lock in a pinch, but really the 5200 is for use with cylindrical locks in hollow metal, wood or aluminum frame applications or for aluminum storefront door applications that include the Adams Rite deadlatch.  I recommend installers carry one each of the 501, 502 and 503 faceplate options to be prepared for the majority of these installations.

There are many things I’m sure I’ve missed:  electrical tape, fifty feet of 18/2 non-shielded wire, really sharp wood chisels, batteries – all kinds of stuff.  But don’t worry.  You’ll know what it is the next time you have to drive back to the shop to get it.


Full Height Housings for Electromagnetic Locks

Maglocks are generally great problems solvers, but they also create problems.  One significant problem is the fact that they are usually installed on the header, and therefore only lock the top of the door.  If the only lock on the door is a magnetic lock and the door is fairly flexible, a reasonably strong person may be able to pull the bottom of the door open four or more inches.

One solution to this problem is to install mags top and bottom on the lock side leg of the frame rather than on the header.  If you have an opening that measures at least 35 inches from stop to stop and you use magnets that are three inches wide or less, you can install mags in the opening and still have 32 inches clear to comply with the American Disabilities Act.  The problem with this idea is that no matter where they are installed in the opening, users are likely to bump into them with some body part or other.

Enter the full height housing for electromagnetic locks, an enclosure that houses one or two maglocks and mounts on the stop of the lock side leg of the door jamb as illustrated below.

The illustration above is one I prepared for a customer so that I could order a custom built, full height housing for two electromagnetic locks.  The drawing shows the dimensions I requested as indicated by the lines with arrows at both ends:  height of the opening from threshold to header stop; distance from header stop to center line of upper maglock prep; distance from threshold to center line of lower mag prep; and distance between the center lines of the mag preps.

Provided the opening is at least 35 inches clear and the housing is no more than three inches wide, the opening will still comply with ADA after the full height housing system is installed.


Exit Device Checklist

See also Exit Device Basics

Here are a few questions you need to be able to answer before you order exit devices:

  • Is the door made of wood, hollow steel, Fiberglas, aluminum and glass, or all glass?
  • Is the door is fire rated or non-fire rated?
  • Door width if single door or pair of doors with center mullion?
  • Door width and height if for a pair of doors without mullion?
  • Door thickness?
  • Exit device finish?
  • Will this be an exit-only device, or will there be outside trim?
  • If there is outside trim, what function is it?

It will save you time and aggravation if you know the answers to these questions before you call your hardware vendor.

You may also want one or more of these or other mechanical options:

  • Cylinder dogging (not available on fire rated devices)
  • Less bottom rod (for vertical rod exit devices)
  • Double cylinder (trim locked or unlocked from inside secured space)

There may also be electrified options:

  • Does the exit device need to have electrified trim?  If so, fail safe or fail secure?
  • Does the exit device need to have electric latch retraction?
  • Does the exit device need to have push pad or latch monitor switches?
  • Do you need a delayed egress exit device?

Save time and money by gathering the necessary facts before shopping for exit devices.

Interconnected Locks


Sargent 7500 Series Interconnected Lock

An interconnected lock is actually two locks that are connected by an assembly that retracts both the deadbolt and the latch simultaneously when the inside handle is turned.   This is done to fulfill the life safety requirement under NFPA 101 that egress should be accomplished by one motion with no prior knowledge necessary, and at the same time provide the user with the security of a deadbolt.  The same function could be provided by an entry function mortise lock, but interconnected locks are cheaper, since they are usually cobbled together out of (usually) a grade 2 cylindrical lock and a tubular deadbolt.

The history of the interconnected lock is a twisted, strange story of different companies reinventing the wheel with different distances between the centerlines, connected or separate latch/bolt assemblies with correspondingly different strike preps, and radically different hole patterns on both interior and exterior door surfaces.  The end result has been many, many doors and frames prepped for locks that are now irreplaceable.

Today, preps are much more standardized.

These are some of the interconnected locks available today and the measurements of their preps:

  • Falcon H Series – 4 inches CTC, 1-3/4 inch hold above, 2-1/8 inch hole below
  • Schlage H Series – 4 inches CTC, 1-1/2 inch hole above, 2-1/8 inch hole below
  • Schlage S200 Series – 4 inches CTC, 1-1/2 inch hole above, 2-1/8 inch hole below
  • Schlage CS200 Series – 4 inches CTC, 2-1/8 inch holes above and below
  • Sargent 75 Series – 4 inches CTC, 2-1/8 inch holes above and below
  • Yale 4800LN series – 4 inches CTC, 2-1/8 inch holes above and below

Replacing any of the locks above with any of the others would not present an enormous problem.


Sargent 7500 Series Door Prep

PS900 Series Schlage Electronics and Von Duprin Power Supplies Demystified

Von Duprin and Schlage Electronics are divisions of Ingersoll Rand. Both are major manufacturers of power supplies for use with electric locking systems and access control. As of January 1st, 2011, Ingersoll Rand discontinued two of their power supply product lines, the PS800 series Von Duprin and the Schlage Electronics 500 series, and merged them into the new PS900 series.

A split in power supply branding may or may not remain, depending on what document you are looking at, but whether they say they are Schlage or Von Duprin, they are all the same PS900 series.

Here is the lineup:

PS902 – 2 Amp output at 12 or 24VDC, field selectable

Compatible with these option boards:

  • 900-BBK: Battery Backup – back up power in case of power outage, includes batteries
  • 900-FA: Fire Alarm – relay for interface with fire alarm panel  – wires to main board
  • 900-2Q: 2 Relay QEL control Board – to run 2 Von Duprin QEL devices
  • 900-4R: 4 Relay Output Board – four relay outputs to operate 4 electric locking devices, not QEL or EL
  • 900-4RL: 4 Relay Logic Board – for man trap or security interlock systems or up to 4 QEL devices
  • 900-8F: Fused 8 Zone Distribution Board – 8 outputs, fused for circuit protection
  • 900-8P: PTC 8 Zone Distribution Board – 8 outputs, circuit breaker protected

PS902 can accommodate 1 of the above option boards in addition to the 900-FA option and battery backup.

For use with electric locks and with Von Duprin Quiet Electric Latch retraction (QEL) exit devices, but NOT with Von Duprin electric latch retraction (EL) exit devices.

PS904 – 4 Amp output at 12 or 24VDC, field selectable

Compatible with these option boards:

  • 900-BBK: Battery Backup – back up power in case of power outage, includes batteries
  • 900-FA: Fire Alarm – relay for interface with fire alarm panel  – wires to main board
  • 900-2Q: 2 Relay QEL control Board – to run 2 Von Duprin QEL devices
  • 900-4R: 4 Relay Output Board – four relay outputs to operate 4 electric locking devices, not QEL or EL
  • 900-4RL: 4 Relay Logic Board – for man trap or security interlock systems
  • 900-8F: Fused 8 Zone Distribution Board – 8 outputs, fused for circuit protection
  • 900-8P: PTC 8 Zone Distribution Board – 8 outputs, circuit breaker protected

PS904 can accommodate up to 2 option boards and battery back up.

Note:  no plug-in for fire alarm relay on main board.  900-FA is only usable with the PS904 if used with an option board.

For use with electric locks and with Von Duprin Quiet Electric Latch retraction (QEL) exit devices, but NOT with Von Duprin electric latch retraction (EL) exit devices.

PS906 – 6 Amp output at 12 or 24VDC, field selectable

Compatible with these option boards:

  • 900-BBK: Battery Backup – back up power in case of power outage, includes batteries
  • 900-FA: Fire Alarm – relay for interface with fire alarm panel  – wires to main board
  • 900-2Q: 2 Relay QEL control Board – to run 2 Von Duprin QEL devices
  • 900-2RS: 2 Relay EL Control Board – to run up to 2 Von Duprin EL devices
  • 900-4R: 4 Relay Output Board – four relay outputs to operate 4 electric locking devices, not QEL or EL
  • 900-4RL: 4 Relay Logic Board – for man trap or security interlock systems
  • 900-8F: Fused 8 Zone Distribution Board – 8 outputs, fused for circuit protection
  • 900-8P: PTC 8 Zone Distribution Board – 8 outputs, circuit breaker protected

PS906 can accommodate up to 3 option boards, fire alarm interface (with option board) and battery back up.

For use with electric locks and with up to 6 Von Duprin Quiet Electric Latch retraction (QEL) exit devices, but NOT with Von Duprin electric latch retraction (EL) exit devices.

PS914 – 4 Amp output at 12 or 24VDC, field selectable

Compatible with these option boards:

  • 900-BBK: Battery Backup – back up power in case of power outage, includes batteries
  • 900-FA: Fire Alarm – relay for interface with fire alarm panel  – wires to main board
  • 900-2Q: 2 Relay QEL control Board – to run 2 Von Duprin QEL devices
  • 900-2RS: 2 Relay EL control Board – to run up to 2 Von Duprin EL devices
  • 900-4R: 4 Relay Output Board – four relay outputs to operate 4 electric locking devices, not QEL or EL
  • 900-4RL: 4 Relay Logic Board – for man trap or security interlock systems
  • 900-8F: Fused 8 Zone Distribution Board – 8 outputs, fused for circuit protection
  • 900-8P: PTC 8 Zone Distribution Board – 8 outputs, circuit breaker protected

PS914 can accommodate 2 of the above option boards, plus fire alarm interface (on one of the boards) and battery back up.

Capable of powering:

  • Up to 4 Electric Latch retraction (EL) exit devices with 900-4RL board
  • Up to 2 EL devices with 900-2RS board
  • Up to 4 Quiet Electric Latch retraction (QEL) exit devices
  • Up to 4 Chexit (CX) delayed egress exit devices off the main board (use 900-8FA combination board if Fire Alarm relay is required)
  • Electric locks or strikes


Ordering Tips:

PS-914 is a 4 Amp power supply that is double the capacity of the old PS873, however, from my conversation with IR tech support, their feeling is that it is prudent to power no more than 4 EL devices per PS-914.  Theoretically the power supply could support as many as 8 EL devices however this presents the challenge of timing the relays so that no two can change states at the same time.  If two EL devices are powered up simultaneously the PS-914 could be damaged.

None of the PS900 series power supplies are a drop-in replacement for their predecessors, and the old and new option boards are not cross-compatible with the old and new power supplies.  Therefore, replacing old power supplies with new can present a rewiring challenge.

Ordering back-up batteries can be a little tricky, since they have very similar part numbers for the batteries, the charging circuit board, and a set that includes the board and the batteries.

  • 900-BAT – Pair of batteries only
  • 900-BB – Battery back up board only
  • 900-BBK – Power battery back up kit, board and batteries


The “Passage Set”

Often, when customers say they want a “passage set” they really want a cylindrical lock that actually locks.  This is because they don’t know (and often don’t want to know) cylindrical lock functions.   Therefore, the next question I ask is often, “How do you want this ‘passage set’ to work?”

Of course, “passage set” is the name of a cylindrical lock function.  The function of a passage set is that the latch can always be retracted by turning either handle.  It always latches but is never locked.   So when customers order a passage set with an electric strike, I am doubly suspicious.  Do they really want a passage set with that electric strike?

Passage sets are used in non-locking applications like corridors, closets and some offices, and in non-locking fire rated doors to meet the positive latching requirement for fire rated openings.

Therefore, if you want to sound intelligent as you order your cylindrical locksets, don’t call them passage sets unless they are.  Thank you.


Avoiding Tailpiece Loss Syndrome

SFIC Tailpieces, A.K.A. Throw Members

Tailpiece Loss Syndrome is such a common occurrence in the door hardware industry that it is almost a joke.  It happens like this:

  1. The job specifies small format interchangeable core (SFIC) cylindrical locks
  2. The locks are shipped with separate tailpieces, often called ‘throw members’
  3. The installer (usually a contractor) installs the locks and throws the tailpieces away

This occurs so often that when I get a call from a customer who says, “I have a job where we installed all SFIC cylindrical locks…”  I finish the sentence for them, “… and the contractor threw the tailpieces away.”   That usually gets a chuckle, but there’s not much humor in it really, especially if the tails must be factory ordered with a lead time of several weeks and the inspection is tomorrow.

Nope, no fun.

To avoid losing the tailpieces this way, there are a couple of things you might do:

  • Get a responsible person (maybe you) to collect the tailpieces when the locks are delivered, or
  • Have the tailpieces shipped separately directly to you, or
  • Order cores with the locks and have the contractor install them and ensure they are working properly.  (They will need to have the tails to accomplish this.)

If you elect to order the cores with the locks and want to avoid the delays associated with waiting for an order of master keyed permanent cores, order construction cores.   Construction cores are temporary cores that are all keyed alike for use during the construction phase.  Typically hardware re-sellers stock construction cores or they are readily available from the factory, so they are usually deliverable fairly quickly.


How to Choose a Door Closer

To intelligently choose a door closer for your application you have to know certain facts:

  • Does the closer need to comply with ADA opening force guidelines?
  • Is the door an interior or exterior door?
  • What is the door width?
  • Will the closer be mounted on the push or pull side of the door?
  • Where on the door will the door closer be installed?  How much room is there?
  • Are there any special circumstances like wind, positive or negative pressure, etc.?
  • You may also need to know the door handing.

ADA Reduced Opening Force Guidelines

American Disabilities Act (ADA) reduced opening force restrictions are enforced by the Authority Having Jurisdiction in your locality.  In some localities or applications ADA requires a maximum opening force of 5 lbs. and in others a maximum opening force of 8.5 lbs.  Most closers on the market today can be field adjusted to comply with these restrictions, but to do so you need to have a door pressure gauge.

I am mildly acquainted with two door pressure gauges.  One is the model DPG by HMC and the other is the ADA/FG by LCN.  Apparently there are a lot of initials involved in door pressure.

Door closers are also available with reduced opening force meant specifically to comply to ADA standards.

Manufacturers usually print a disclaimer that says that a door closer adjusted to ADA maximum opening force may not have enough power to shut the door.  This is often true because perhaps recommended spring strengths for different applications are the result of perhaps a century of innovation.  Manufacturers know that a force greater than 8.5 pounds may be necessary to close a door.

Interior versus Exterior

When speaking about door closer closing force, we say that a door closer is of a certain size.  Door closer size does not refer to actual dimensions, but to spring strength.  Historically, door closers are available in sizes 1 through 6 – 1 being the wimpiest and 6 capable of exerting the strongest closing force.

A size 4 closer is usually recommended for an exterior, 3-foot wide door, whereas a size 3 closer is deemed appropriate for an interior door of the same dimensions.  The assumption here is that the exterior door is more likely to be expected to close a door against a wind or negative or positive air pressure.

Door Width

If you look at a door hung on butt hinges and equipped with a door closer from above, it looks something like this:

View from the Ceiling


You see from the illustration that the door closer closes the door by exerting force on a point about eight or ten inches from the hinge side of the door.  To see what this means, go to a door with no door closer.  Open it.  Now put your hand a foot from the hinge side of the door and push it closed.  Pretty difficult, isn’t it?   If your door was wider, it would be even harder to close from that point.  This is why door closer size – that is, spring strength – is determined by the width of the door rather than the height.

For a three foot wide exterior door, you would normally adjust your door closer to be a size four.  For a four foot wide exterior door you would adjust your door closer to be a size five.  Therefore, if you have a four foot wide exterior door, you had better buy a closer that can be adjusted to a size five.

Push or Pull?

Different arms are required for different applications.  On doors that swing out, where the closer is mounted on the push side, the closer is mounted in a top jamb or parallel arm configuration.  If it is mounted on the pull side it is mounted in what is called a ‘standard’ installation.  (There are other ways to mount a closer on the push side, but parallel arm and top jamb are the most common.)

See manufacturer’s literature for more information, or check out my article on Door Closer Basics.

Room

If you have a glass and aluminum storefront kind of door, you may have a space issue as regards your choice of door closer.  If you have a hollow metal door with no window hung in a steel frame, chances are you will have no space issue.

You need to figure out what door closer will fit.  To do that, measure the space where you would like to install it and download installation templates or instructions from manufacturer’s web sites.  Check the dimensions to see if the closer you have selected will work or not.

Or you can measure your door and frame and consult a door hardware professional.

Special Circumstances

I have installed door closers in some fairly challenging environments.  One, for example, was on a four foot wide, eight foot high, two and a quarter inch thick mahogany and glass door.  In addition to the size of the door, the location was also challenging – right across Beacon Street from the Boston Common where the wind could race across the open ground and dash itself against the door to its heart’s content.  Also, the front of the building had settled over the century or so of its existence, and leaned decidedly inward.  The door opened inward, and, left on its own, would swing sedately inward to 90 degrees if not latched.

In other words I had to install a door closer that would close an extra heavy door, uphill, in a wind.  I actually got one that would do it about 95% of the time.  For this application I chose the most durable, powerful, adjustable door closer I knew at the time:  the LCN 4041.  If I did the same job today I would probably choose an LCN 4011 or a Norton 7500.

A big, beefy, versatile door closer is not a cure-all.  For example, sometimes the 4041 is just too big, or templated too close to the hinge.  The point is that you must look at all the details of your door before you buy a door closer – not only how it is made and its size, but its environment as well.


Tags