This article is for facilities or property managers who need to buy hardware for change-of-use projects in which there is no architect involved.
On larger projects that involve build-outs or new construction, along with the doors architects usually specify the door hardware, often with the help of an Authorized Hardware Consultant (AHC). On smaller projects wherein the services of an architect are otherwise not required, hardware choices often fall to you: the facilities or property manager or owner. This article will provide language and concepts that will facilitate communication between you and your hardware dealer and/or installer.
Get Good Advice
If you do not already have one whom you do business with, choose a qualified hardware installer. I may be a little biased, but I think locksmiths make the best hardware installers. Some contractors also have hardware installation specialists on staff who are qualified to do the work. Experienced and qualified hardware installers can help answer your questions as you tackle this project.
Specifying the wrong hardware can be expensive, so your hardware choices can be very important. In addition to your hardware dealer or qualified installer, your local building inspector and fire marshal can be invaluable sources of information. They will be able to tell you, for example, if a particular door needs panic hardware and/or fire rated hardware. Your qualified installer should also be able to help with these choices, but if there is ever a choice you are not sure of you can always consult these governmental authorities.
Know Your Doors
Number Your Doors
Assign each door a number. Stick a label with the door number on every door on the edge on the hinge side, just above the top hinge. List the door numbers across the top of a spreadsheet. Under each door number enter the existing hardware, door dimensions and other characteristics as discussed in the following sections.
Existing Hardware
Do a survey of the property and catalog every door, hinge, kick plate, door closer and lock. Base your notes on the following categories of information in this article and you should be able to answer most questions your hardware installer may have without them having to visit. You get two benefits from this:
- Knowledge of what you have and what you want
- Savings of time and therefore, money
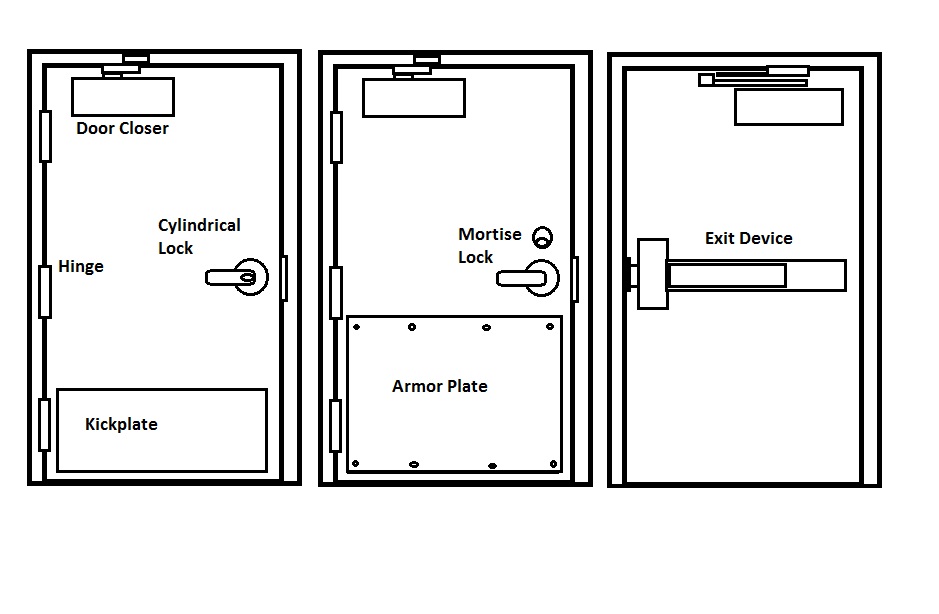
List every hardware item on every door. Be sure to open the door and look on both the inside and the outside. Below is an illustration of some of the different kinds of hardware one may find on a door.
Don’t forget the wall or floor stops.
You may ultimately decide to reuse your existing hardware if it suits your intended use of the space and is in good working order. You may need to rely on your hardware installer to help you determine what may be kept and what should be discarded.
Fire Rated vs. Non Fire Rated
Fire rated doors are designed to resist the spread of a fire within a structure. Fire rated doors get their fire rating from Underwriters Laboratories and have a UL label on them showing the fire rating. Only fire rated hardware can be used on fire rated doors if the fire rating is to be maintained and your project is to pass inspection. Interior stairwell doors are always fire rated. Other interior doors often may be fire rated as well. Check all doors for fire labels; consult your local Fire Marshal if you are unsure.
 Locks for fire doors are UL listed as such and must positively latch whenever the door is closed. Without exception, fire rated doors must be closed and positively latched in the event of a fire. Therefore fire rated doors always have a door closer and some kind of UL listed latching device, such as a mortise lock, fire rated exit device or UL listed cylindrical lock.
Non-fire rated exit devices may have a “dogging” mechanism that keeps the push bar pushed in so that the latch(es) remain retracted. Usually this is apparent as a small hole in the bar where a hex key can be inserted to dog the device down. Sometimes the dogging mechanism is operated by a key cylinder. If your device is equipped with any kind of dogging it is not a fire rated device.
Fire rated doors must be equipped to self-close. This must almost always be accomplished through the use of a door closer.
Exterior doors are not usually fire rated, or if they are labelled may not have to comply with the positive latching rule. Consult your local fire marshal or building inspector if you have any question.
Failure to comply with fire and life safety code can have expensive consequences so use extra care.
 Dimensions
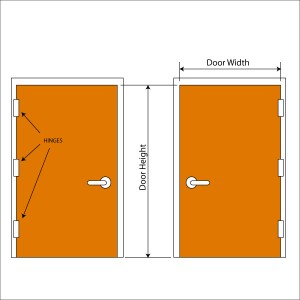
Accurate dimensions of door and frame are vital when choosing door hardware. Here are some common door measurements:
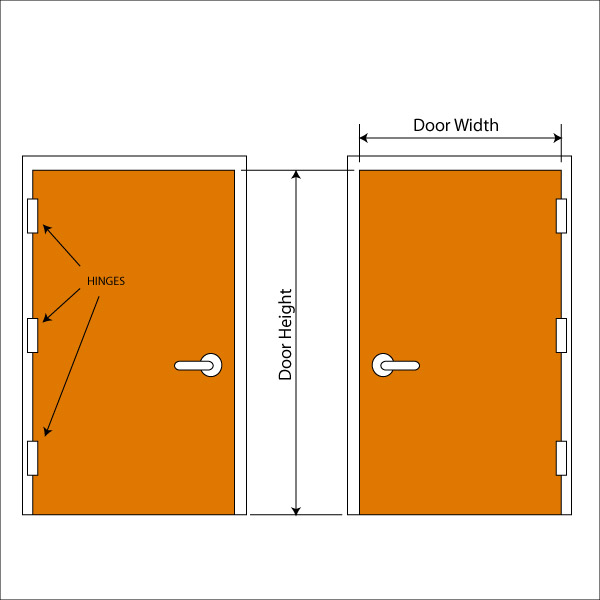
- Width
- Height
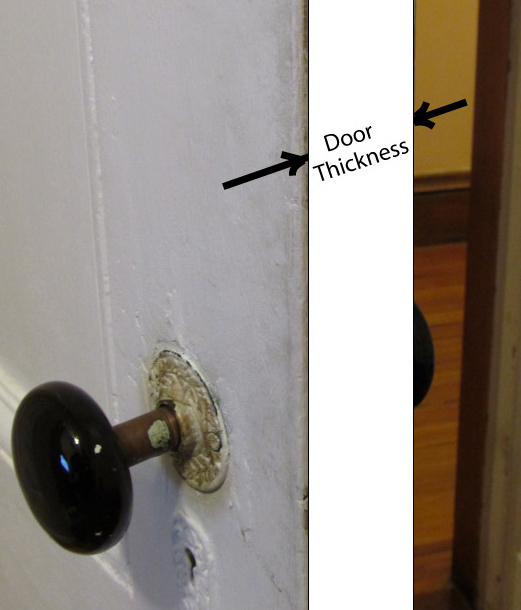
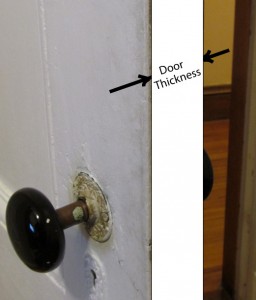
- Thickness
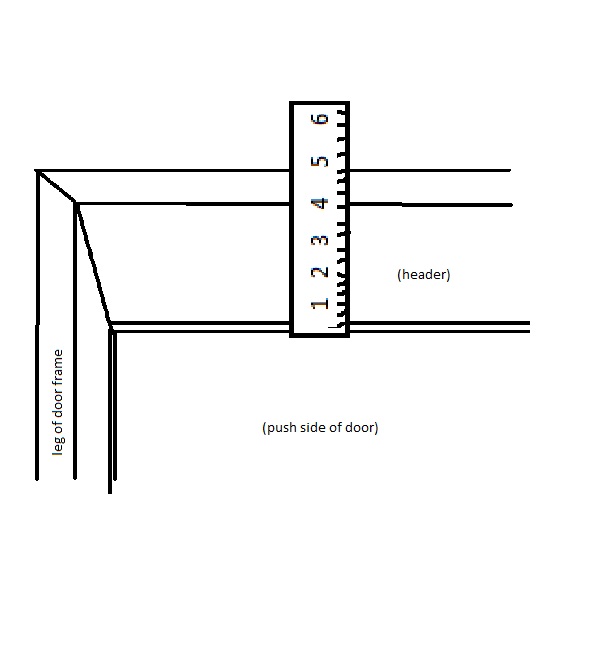
- Reveal
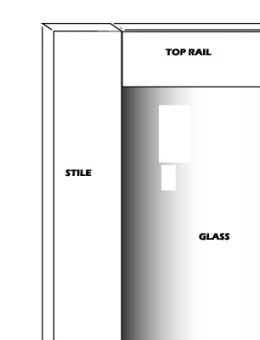
- Stile width
- Rail height
Door Width and height can be important when you are choosing a door closer or an exit device, and vital in complying with the American Disability Act (ADA) that requires openings to provide 32 inches of passage clearance. This includes the space occupied by the open door.

The Reveal.
Door thickness can be important when ordering door closers, exit devices and locks. Reveal dimension is important for certain types of door closer installations.
As shown in the illustration below, the stile is the vertical part of a door that is made up of the components, stile and rail, whereas the rail is the horizontal part. Most stile and rail type commercial doors are aluminum, although more and more of them are Fiber Reinforced Plastic.

Stile width is important when ordering locks or exit devices. Rail height is important when ordering door closers or electromagnetic locks.
Photos of doors are also good to have, but are not a substitute for accurate measurements.
Handing
The “hand” of a door describes the direction it swings in relation to its hinges. If you imagine yourself being the hinge, and your right hand is on the door while your left hand is on the frame (like the person in the picture), the door is Right Hand.
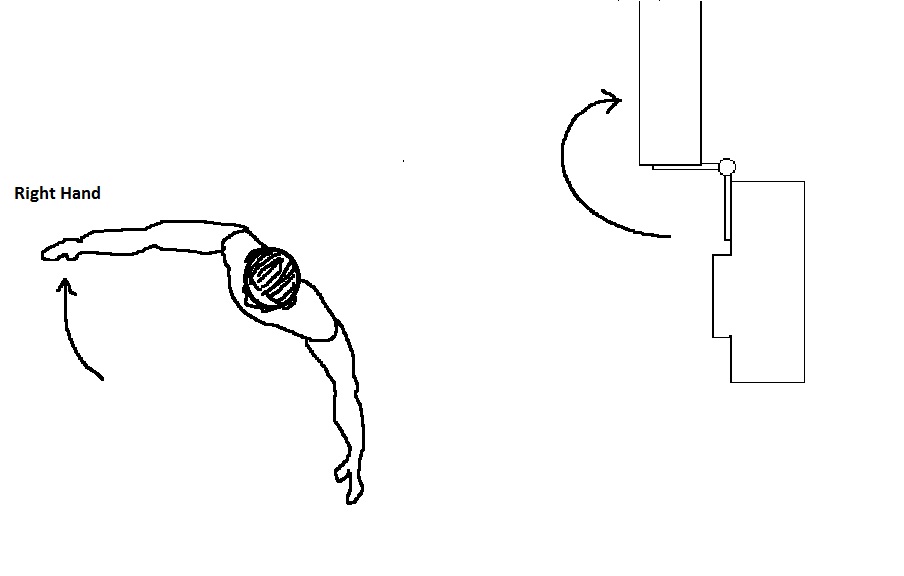
His right hand shows that this is a right hand door.
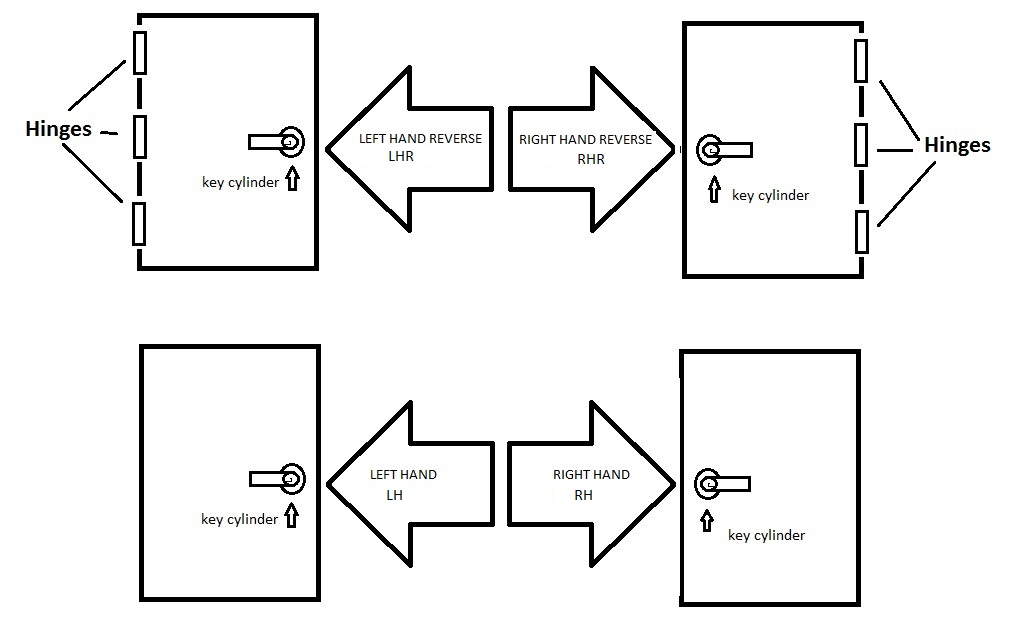
Doors are always Left Hand (LH) or Right Hand (RH) however some locks can be Left Hand, Right Hand, Left Hand Reverse (LHR) or Right Hand Reverse RHR). “Reverse” means that the locked side of the door is the pull side. If a ‘reverse’ handed lock is installed on a Right Hand door, the lock is said to be Left Hand Reverse. If it is installed on a Left Hand door it is said to be Right Hand Reverse.
All exit devices are reverse handed.
Location
The location of a door affects the hardware that can be installed on it. For example, locking exterior doors in commercial facilities designed to accommodate a given number of people are usually required to have panic hardware – that is, an exit device with a push bar that goes across the door, the actuating portion of which must measure at least half the width of the door. Most exit devices easily comply with this requirement.
All life safety code compliant buildings have a “path of egress,” that is, a clearly marked escape route in case people need to get out of the building in a hurry if, for example, the building is on fire. Electrically lit exit signs are usually required to be placed along the path of egress to show people where they need to go. Doors located in the path of egress are referred to as “egress doors” and are almost always required to swing in the same direction as the path of egress.
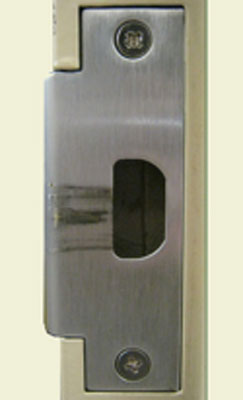
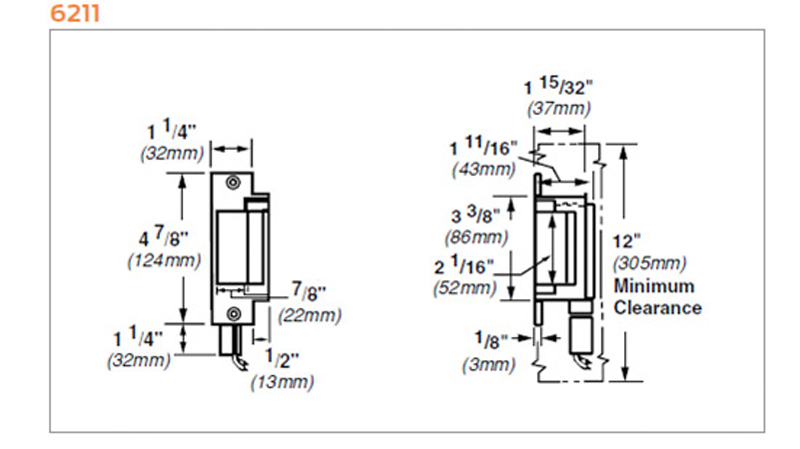
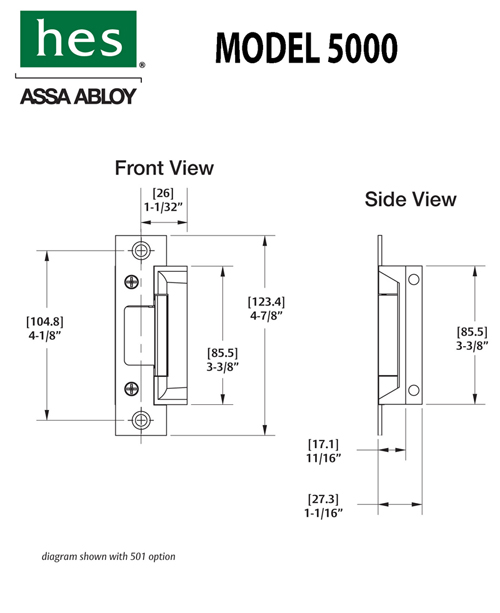
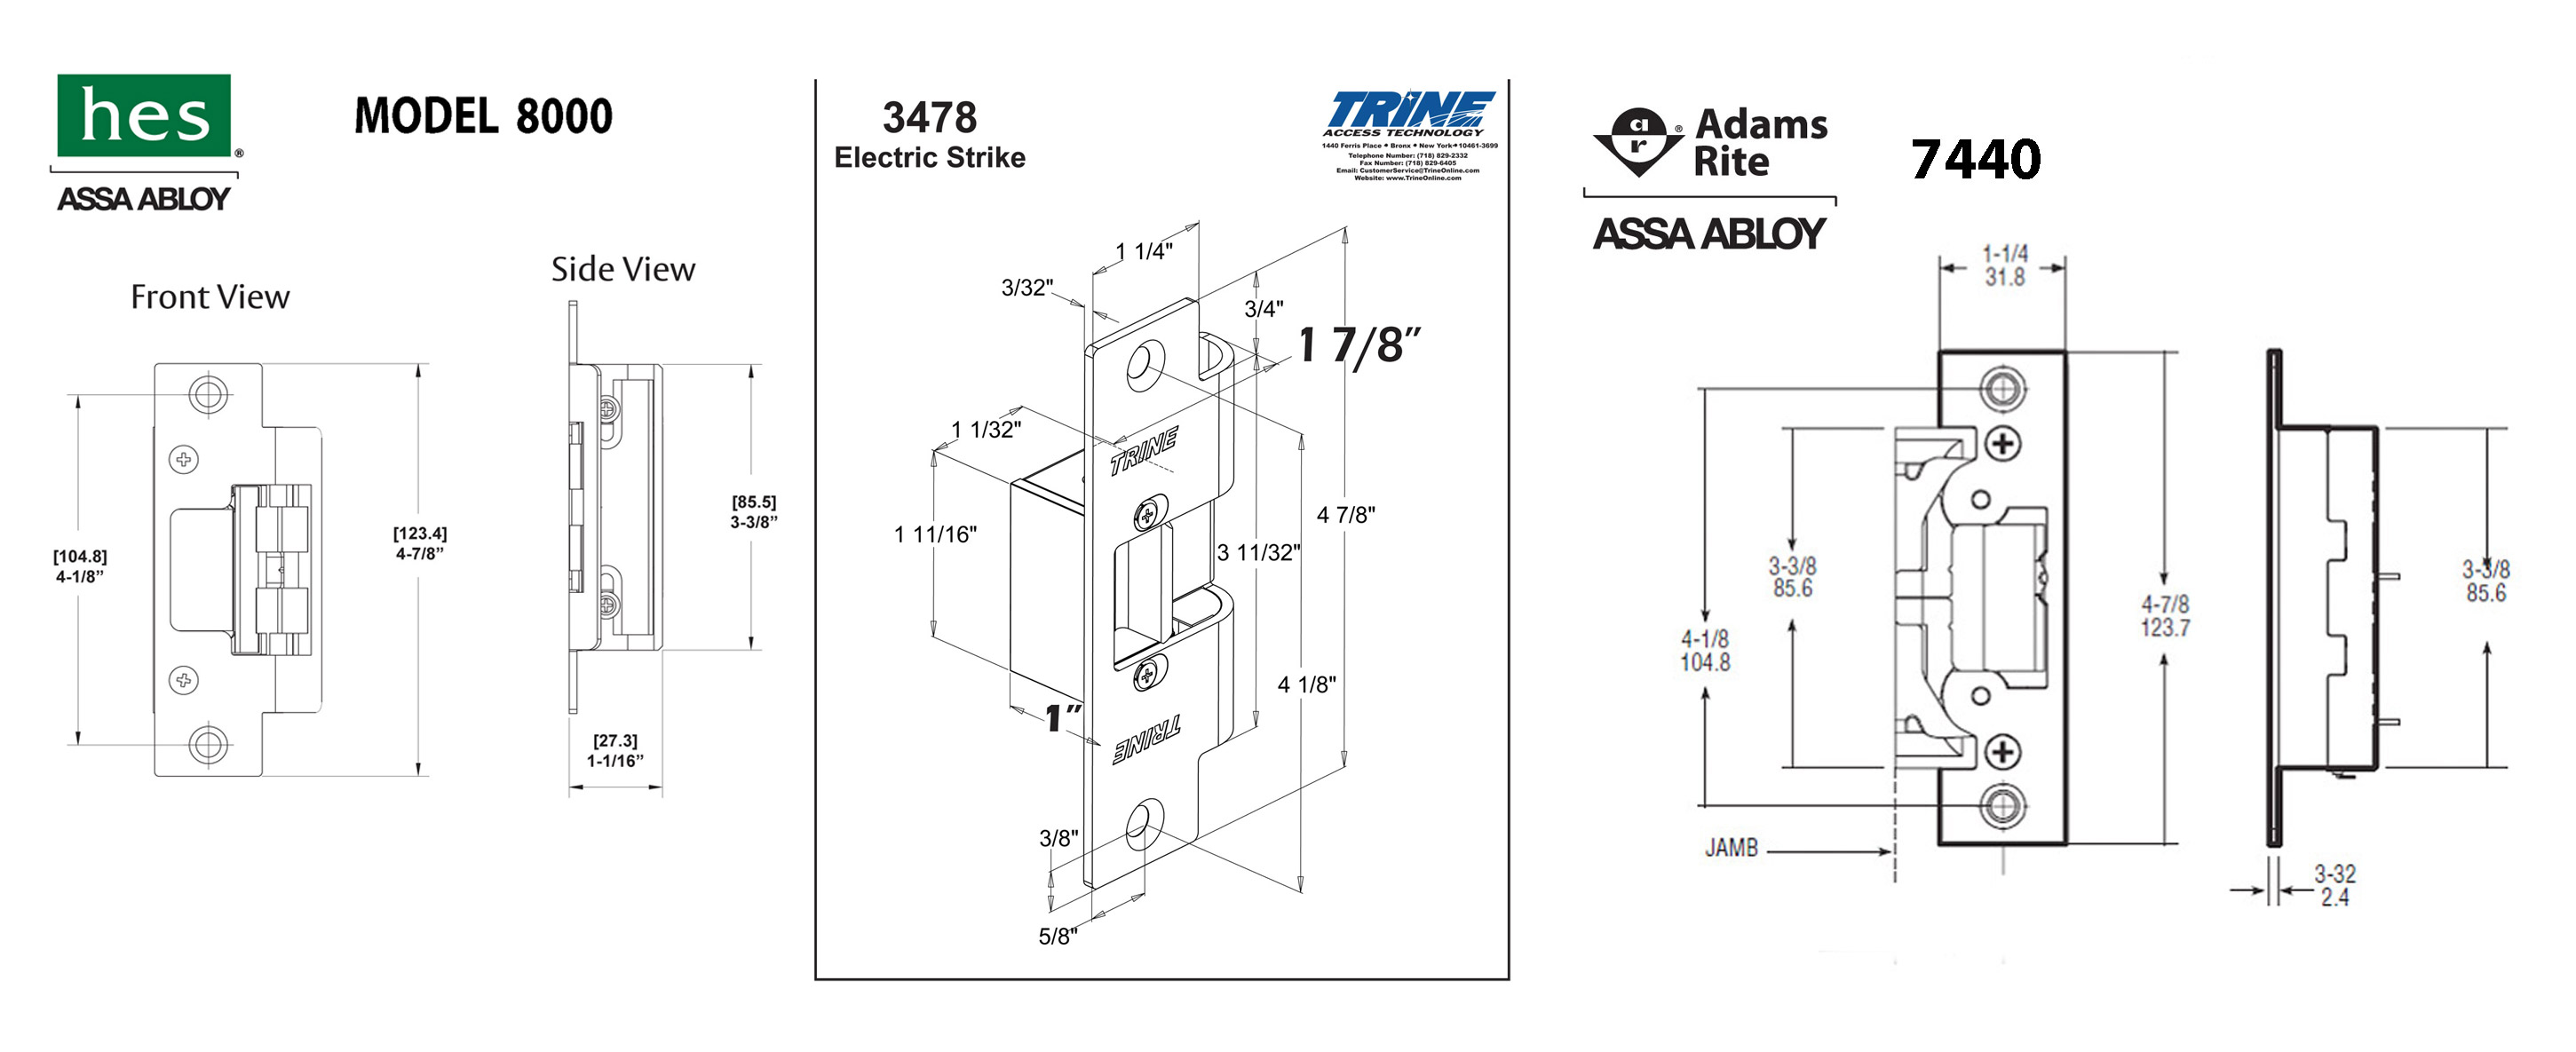
As previously discussed, while exterior doors are rarely fire rated, interior doors are often fire rated. Fire rated doors need to be positively latched in the event of a fire, so if you are using exit devices with electric latch retraction, the latches must be extended in the event of a fire; if you are using fire rated electric strikes, they must be locked in the event of a fire. Usually this is achieved (in both cases) through the use of a fire alarm interface relay, which is a device by which the fire alarm system can interrupt power to locking devices in the event of a fire.
Stairwell doors are unique in that not only are they fire rated – so they must be positively latched in the event of a fire – they must also usually be unlocked in the event of a fire. This is all fine and good if locking the stairwell doors is not required, (passage function mortise or Grade 1 cylindrical locks or fire rated exit devices with passage function trim will all do the job just fine) but when access control is required the range of choices is limited. Electric strikes cannot be used, but electrified fail safe mortise or cylindrical locks can be used as well as electrified fail safe exit device trim. All such devices must be automatically unlocked by the fire alarm system as described above.
Composition
What is your door made of? Doors made of different materials often require different kinds of hardware.
- If a magnet is attracted to your door, then it is a hollow metal door. Hollow metal doors are perhaps the most popular doors to be used in commercial facilities.
- Is your door mostly glass with a relatively slim frame around it? Then it is probably an aluminum storefront door.
- Wooden doors are also common and used in all of the applications as hollow metal doors.
- FRP (Fiber Reinforced Plastic) doors are also becoming more popular all the time, and they are available in different configurations to accommodate almost every application.
Lock Prep
Commercial hollow metal or wood doors are usually prepped one of three ways:
- Blank – no prep whatsoever
- 86 Prep – prepared for mortise clock
- 161 Prep – prepared for cylindrical lock, 2-3/4 inch backset, with ANSI standard 4-7/8 inch tall strike
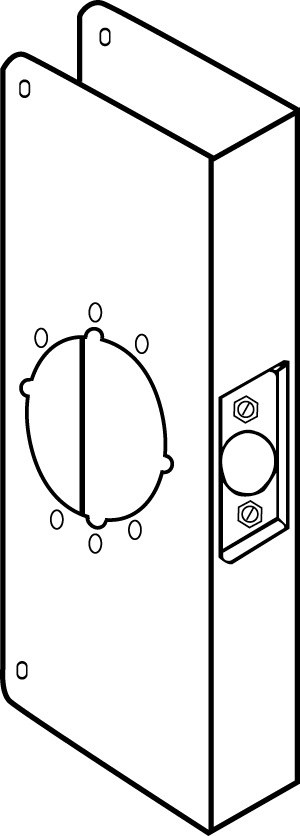
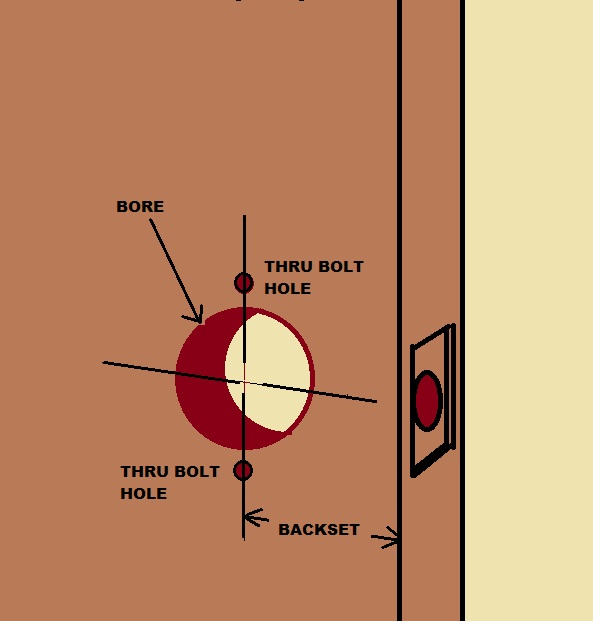
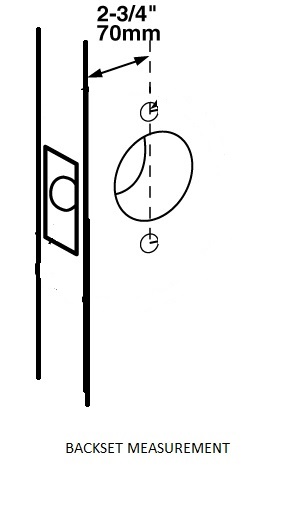 The 161 Prep is a prep for a cylindrical lock. It can be identified by a 2-1/8 inch diameter hole (called the ‘bore’) centered 2-3/4 inches from the edge of the door and a an opening in the edge of the door that is 2-1/4 inches high by 1-1/8 inches wide. Centered in this edge prep is a 1-inch diameter hole for the latch. The distance between the edge of the door and he centerline of the door is called the “backset.”
Most Grade 1 cylindrical lever locks have through-bolts that must be drilled outside the diameter of the 2-1/8 inch hole. Then it is said that the lockset has through-bolts “outside the prep.”
Aluminum and glass storefront doors have specialized hardware. Most hardware designed for other kinds of doors will not fit on a narrow stile storefront door, but may fit on a wide stile door. Aluminum doors most commonly come with a prep for an Adams Rite MS1850S deadbolt. Adams Rite offers other locks and exit devices that fit this same prep.
Locks
Lock Functions
There are many, many lock functions, but here are a few of the most common. Common lock functions often correspond to door use or location. Office doors are usually equipped with office function locks: locks that can be locked from the outside only by key, but can be locked from the inside by pushbutton or turn knob. Classroom doors get classroom or classroom security function locks. Single occupant bathrooms get privacy locks and/or occupancy indicator deadbolts. Janitors’ closets and storerooms are fitted with storeroom function locks. Non-locking doors get passage function locks: locks that are always unlocked from both sides.
Wherever you use an electric strike you will probably also use a storeroom function lock. You will also need a door closer.
In order to comply with ADA requirements, all locks should be equipped with lever handles. Check with your local building inspector to make sure your choice of lever design is ADA compliant.
Keying
Even if you intend to use electronic access control, your locks will probably still have keys. To determine which key will open which door, determine who will have access to that door. The more doors that are opened by the same key, the greater the convenience and the greater the security risk. Therefore key control must go hand in hand with keying.
If you are only using keys for access and have an existing master key system, it is helpful to have access to the bitting list for your system. If you do not have it on site, perhaps the locksmith who created the system still has it. With the bitting list a locksmith can determine whether it is possible to add more locks (more changes, s/he would say) to your system and may be able to safely add changes without creating keys that open more than one door in the system.
There are software programs on the market that create master key systems, but unless you are a locksmith I suggest you leave the keying (and the software) to a locksmith.
If you are creating a new group within an existing system – for example, you are head of maintenance at a small college that is opening a new department within an existing building – and you already have an institution-wide master key system in place, you may want to create a sub-master key that opens all the doors within this new group. This will be convenient, but remember to keep such a key in a safe place and be careful who you give it to. This is the essence of key control.
In addition to your new sub-master key, it is wise to key doors alike only when they will always be opened by the same people. For example your utility closets may only be opened by your maintenance staff, so you may want to key all your utility closets alike. They will also be accessible via the sub-master and the existing master key.
The important principle here is to realize that you put locks on door to keep people out and you give keys to people so that they can get in. Key control is making sure the people you want to keep out don’t get the keys and the people you want to let in do.
In addition to keying software, key control software is also available. Usually, however, if you are creating a small group of, say, 25 doors or less, a simple spreadsheet or even a hand written ledger may be all you need to keep track of your keys.
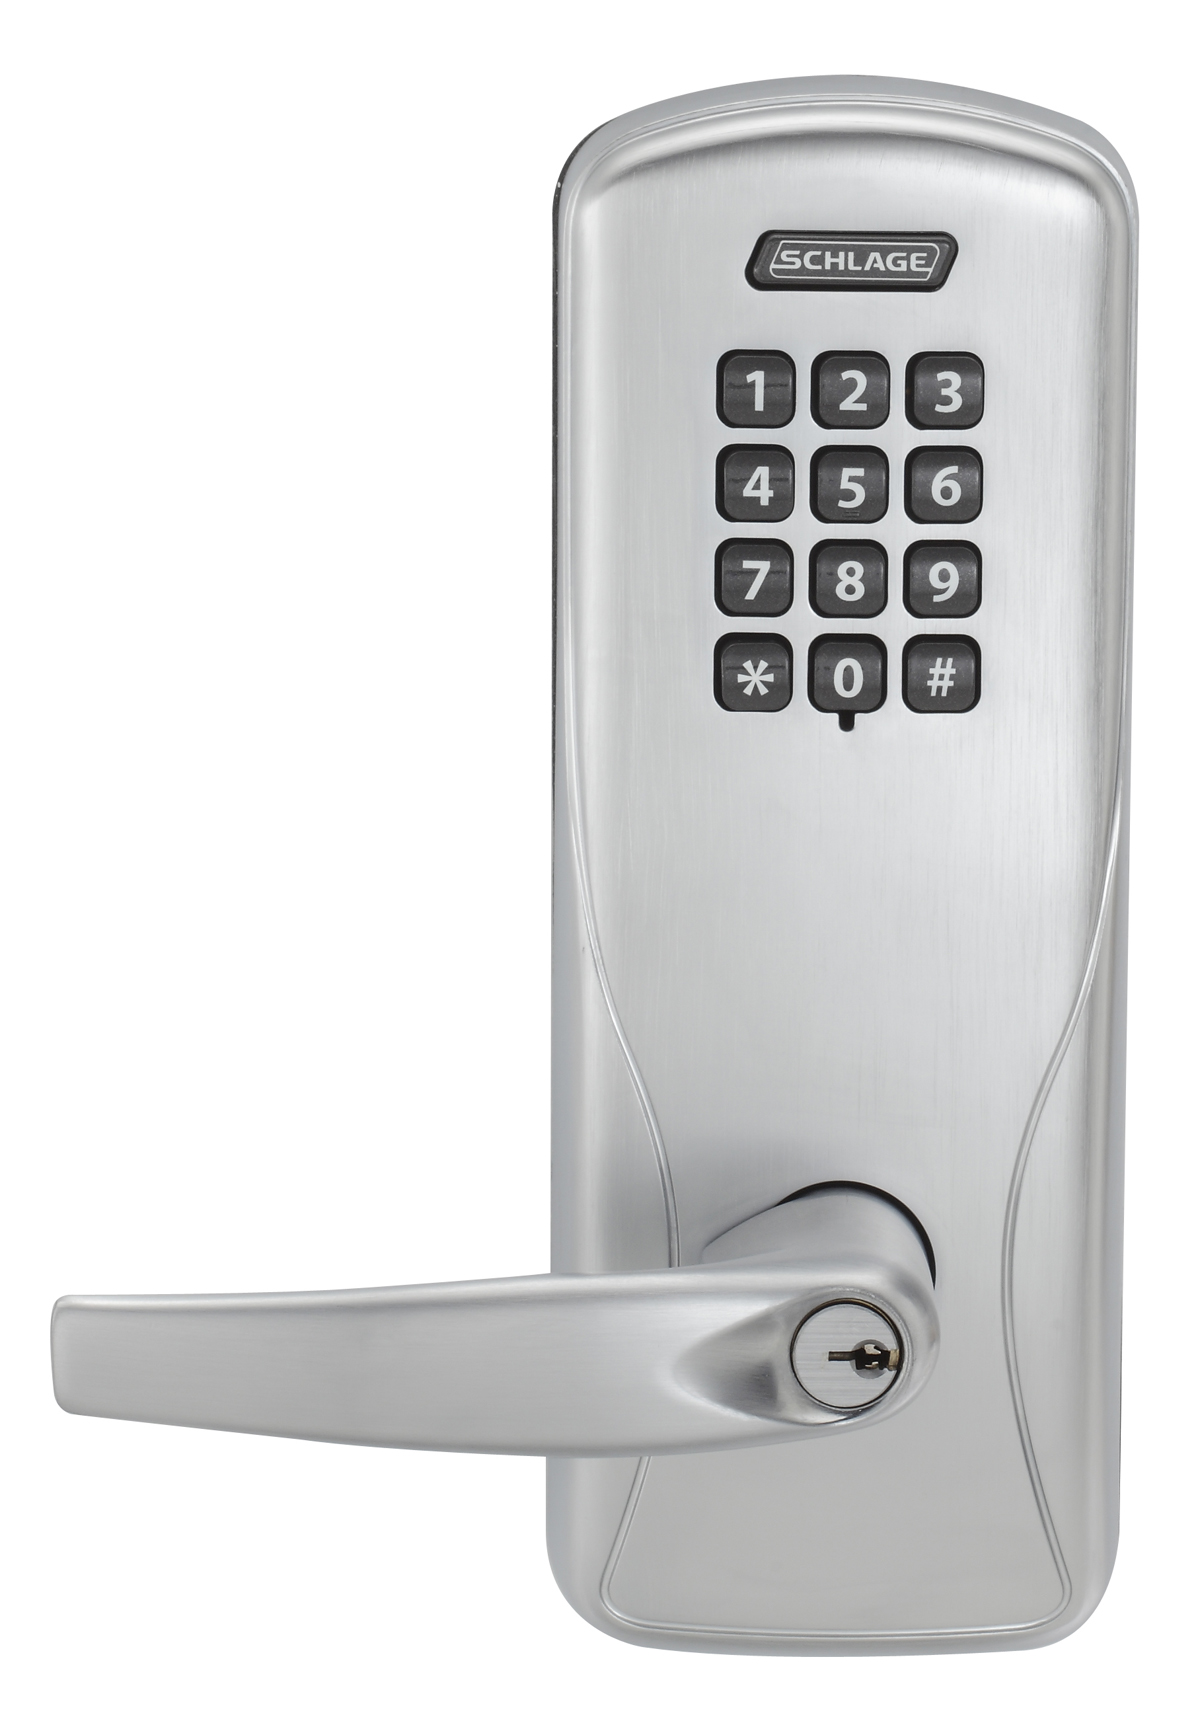
Access Control
The same principle applies to access control, but the practice of access control is much simpler. In access control you simply give everyone their own unique credential (magnetic stripe card, proximity card, pin code, etc.). The access control system keeps track of who accesses which door and when. You can have one credential open all the locks, but then you have to be careful who you give that credential to. It acts as your master key.
One advantage of access control is that you will be able to tell who accesses what door and when. If your project will house sensitive or expensive equipment or intellectual property, you may want the ability to keep records of the movements of people who have access to it.
Another advantage of access control is that you can change who has access to a given door without changing the lock. Often one can add and delete users from any given door right from one’s desk using the access control system software.
Other Door Hardware
Hinges
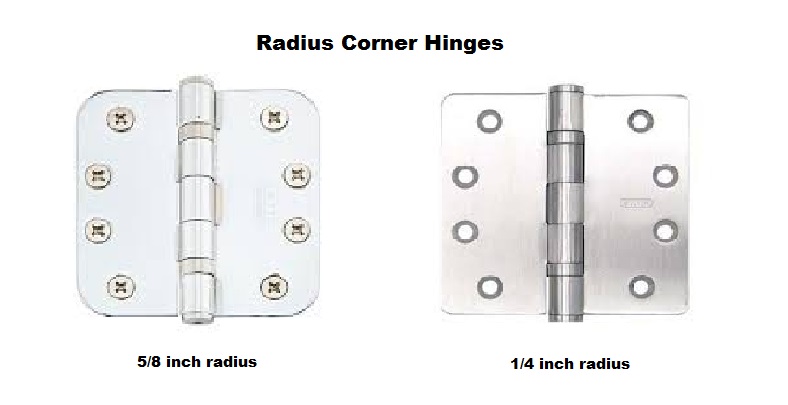
There are many, many varieties of hinges. On small projects I have found that the hinges and doors are often reused if they are in good working condition. But hinges must be replaced if they are damaged or worn. Take the time to identify and learn about the hinges on your job.
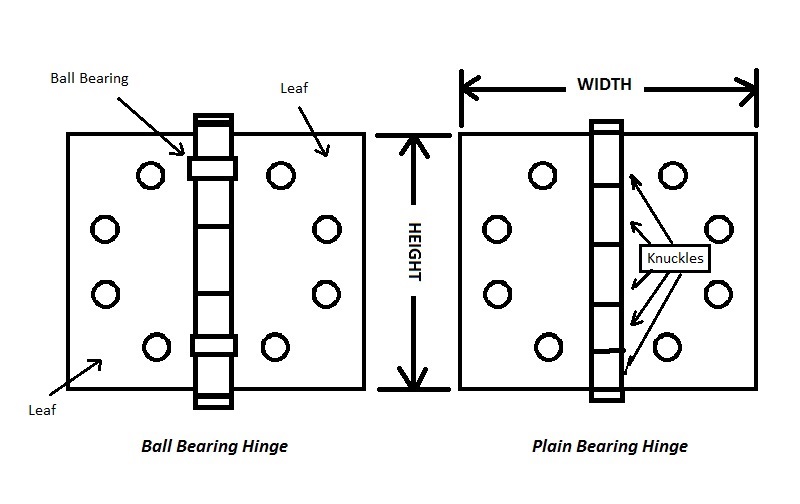
The overwhelming majority of hinges in the United States are one size, finish and configuration. They are 4-1/2 inches high and 4-1/2 inches wide; they have ball bearings to reduce friction and increase life; and, by far, most of them are satin chrome plated steel. They are full mortise hinges because both leaves are cut in: one is cut (or mortised) into the frame and one is cut into the door. These are called “butt hinges,” I’m not sure why.
The correct way to measure a hinge is [height] by [width] as shown in the illustration below:
You can check out my full article on hinges here.
Door Closers
I write of door closers at length elsewhere.
For your small commercial project you need to know how you want each door closer to behave on each door. There are some limitations. For example, you cannot have door closers with hold-open arms on fire rated doors unless they are electric and so can be released by the fire alarm. If you restrict your use of hold-open hardware to exterior doors you will be completely safe from code violations, but this is not always practical. Remember, therefore, that hold open hardware on fire doors must be releasable by the fire alarm panel and you should be okay.
As mentioned earlier, the reveal dimension of your header can affect whether or not you can use a closer mounted in top jamb configuration. Other opening idiosyncrasies – arch top doors, transoms, odd widths – can also affect your choice of door closer. My best advice is to take good measurements and consult with your qualified hardware installer.
Auto Operators
Also called power operators or automatic door openers, auto operators are growing more in demand every year as we move toward a more inclusive society. These devices are potentially dangerous if specified or installed incorrectly. Therefore if you need an automatic door opener your best bet is to hire an automatic door company. Your second best bet is to have your qualified hardware installer choose and install a low energy power operator that is designed to exert less force, thereby presenting less of a potential hazard.
Auxiliary / Decorative Hardware
On most openings one finds a door stop. The purpose of the door stop is usually to prevent the hardware on the door from hitting and damaging the wall, but sometimes it is used to prevent the door from opening too far. There is a great variety of door stops designed to accommodate different conditions.
In addition to door stops there may be kick plates or other protection plates, door viewers, lock guards, surface bolts, metal numerals or letters, mail slots, or various and sundry other hardware items to serve a myriad of purposes. Most of these items are fairly self explanatory.
Kick plates, armor plates and protection plates are measured like hinges: height x width.
Review
Once you have assembled the information and organized it by door number, review it as best you can for accuracy and completeness. You can always go back and check if you have to.
- Door dimensions, handing, composition and location
- Whether or not doors are fire rated or non-fire rated
- List of existing hardware and/or lock preps
- Lock functions, design, finish and keying (and access control)
- Hinge sizes and finishes
- Door closer functions and finishes
- Auto operators, if any
- Auxiliary hardware required
Armed with this information you will be on good footing when you discuss the job with your qualified door hardware installer. Best of luck with your project.
 As previously published in Doors and Hardware Magazine, Feb. 2016